A business logic abstraction gem that provides structure to the organization and composition of business logic (Ruby)
ActionLogic

![]()


![]()
Introduction
This is a business logic abstraction gem that provides structure to the organization and composition of business logic in a Ruby or Rails application. ActionLogic is inspired by gems like ActiveInteraction, DecentExposure, Interactor, Light-Service, Mutations, Surrounded, Trailblazer and Wisper.
Why another business logic abstraction gem? ActionLogic provides teams of various experience levels with a minimal yet powerful set of abstractions that promote easy to write and easy to understand code. By using ActionLogic, teams can more quickly and easily write business logic that honors the SOLID principles, is easy to test and easy to reason about, and provides a flexible foundation from which teams can model and define their application’s business domains by focusing on reusable units of work that can be composed and validated with one another.
Contents
- Backstory
- Overview
ActionContextActionTaskActionUseCaseActionCoordinator- Succeeding an
ActionContext - Failing an
ActionContext - Halting an
ActionContext - Custom
ActionContextStatus - Error Handling
- Attribute Validations
- Type Validations
- Custom Type Validations
- Presence Validations
- Custom Presence Validations
- Before Validations
- After Validations
- Around Validations
- Benchmarking
- Installation
- Contributing
Backstory
Consider a traditional e-commerce Rails application. Users can shop online and add items to their shopping cart until they are ready to check out.
The happy path scenario might go something like this: the user submits their order form, an orders controller action records the order in the database,
submits the order total to a payment processor, waits for a response from the payment processor, and upon a success response from the payment processor sends
an order confirmation email to the user, the order is sent internally to the warehouse for fulfillment which requires creating various records in the database,
and finally the server responds to the initial POST request with a rendered html page including a message indicating the order was successfully processed. In this
work flow there are at least 7 distinct steps or tasks that must be satisfied in order for the application’s business logic to be considered correct according
to specifications.
Although this flow works well for most users, there are other users whose credit card information might be expired or users who might attempt to check out when
your application’s payment processor service is down. Additional edge case scenarios start to pop up in error logs as exception emails fill up your inbox.
What happens when that user that is notorious for having 100 tabs open forgets to complete the checkout process and submits a two week old order form that
includes an item that your e-commerce store no longer stocks? What happens if an item is sold out? The edge cases and exception emails pile up, and as each one comes in
you add more and more logic to that controller action.
What once was a simple controller action designed with only the happy path of a successful checkout in mind has now become 100 lines long with 5 to 10 levels
of nested if statements. You think on it for awhile and consider not only the technical challenges of refactoring this code, but you’d also like to make this code
reusable and modular. You want this code to be easy to test and easy to maintain. You want to honor the SOLID principles by writing classes that are singularly focused
and easy to extend. You reason these new classes should only have to change if the business logic they execute changes. You see that there are relationships between the
entities and you see the possibility of abstractions that allow entities of similar types to interact nicely with each other. You begin thinking about interfaces and the
Liskov Substitution Principle, and eventually your mind turns towards domains and data modeling. Where does it end you wonder?
But you remember your team. It’s a team of people all wanting to do their best, and represent a variety of backgrounds and experiences. Each person has varying degress of familiarity
with different types of abstractions and approaches, and you wonder what abstractions might be as easy to work with for a new developer as they are for an experienced developer?
You consider DSL’s you’ve used in the past and wonder what is that ideal balance between magic and straightforward OOP design?
As more and more questions pile up in the empty space of your preferred text editor, you receive another exception email for a new problem with the order flow. The questions about
how to refactor this code transform into asking questions about how can you edit the existing code to add the new fix? Add a new nested if statement? You do what you can given the
constraints you’re faced with, and add another 5 lines and another nested if statement. You realize there is not enough time to make this refactor happen, and you’ve got to push the
fix out as soon as possible. Yet, as you merge your feature branch in master and deploy a hotfix, you think surely there must be a better way.
ActionLogic was born from many hours thinking about these questions and considering how it might be possible to achieve a generic set of abstractions to help guide
business logic that would promote the SOLID principles and be easy for new and experienced developers to understand and extend. It’s not a perfect abstraction (as nothing is),
but can help simplify your application’s business logic by encouraging you to consider the smallest units of work required for your business logic while offering features
like type and presence validation that help reduce or eliminate boiler plate, defensive code (nil checks anyone?). However, as with all general purpose libraries, your mileage
will vary.
Overview
There are three levels of abstraction provided by ActionLogic:
ActionTask(a concrete unit of work)ActionUseCase(organizes two or moreActionTasks)ActionCoordinator(coordinates two or moreActionUseCases)
Each level of abstraction operates with a shared, mutable data structure referred to as a context and is an instance of ActionContext. This shared context is threaded
through each ActionTask, ActionUseCase and / or ActionCoordinator until all work is completed. The resulting context is returned to the original caller
(typically in a Rails application this will be a controller action). In the problem described above we might have an ActionUseCase for organizing the checkout order flow,
and each of the distinct steps would be represented by a separate ActionTask. However, overtime it may make more sense to split apart the singular ActionUseCase for the order
flow into smaller ActionUseCases that are isolated by their domain (users, payment processor, inventory / warehouse, email, etc.). Considering that we limit our ActionUseCases to
single domains, then the ActionCoordinator abstraction would allow us to coordinate communication between the ActionUseCases and their ActionTasks to fulfill the necessary
work required when a user submits a checkout order form.
The diagram below illustrates how the ActionTask, ActionUseCase and ActionCoordinator abstractions work together, and the role of ActionContext as the primary, single input:
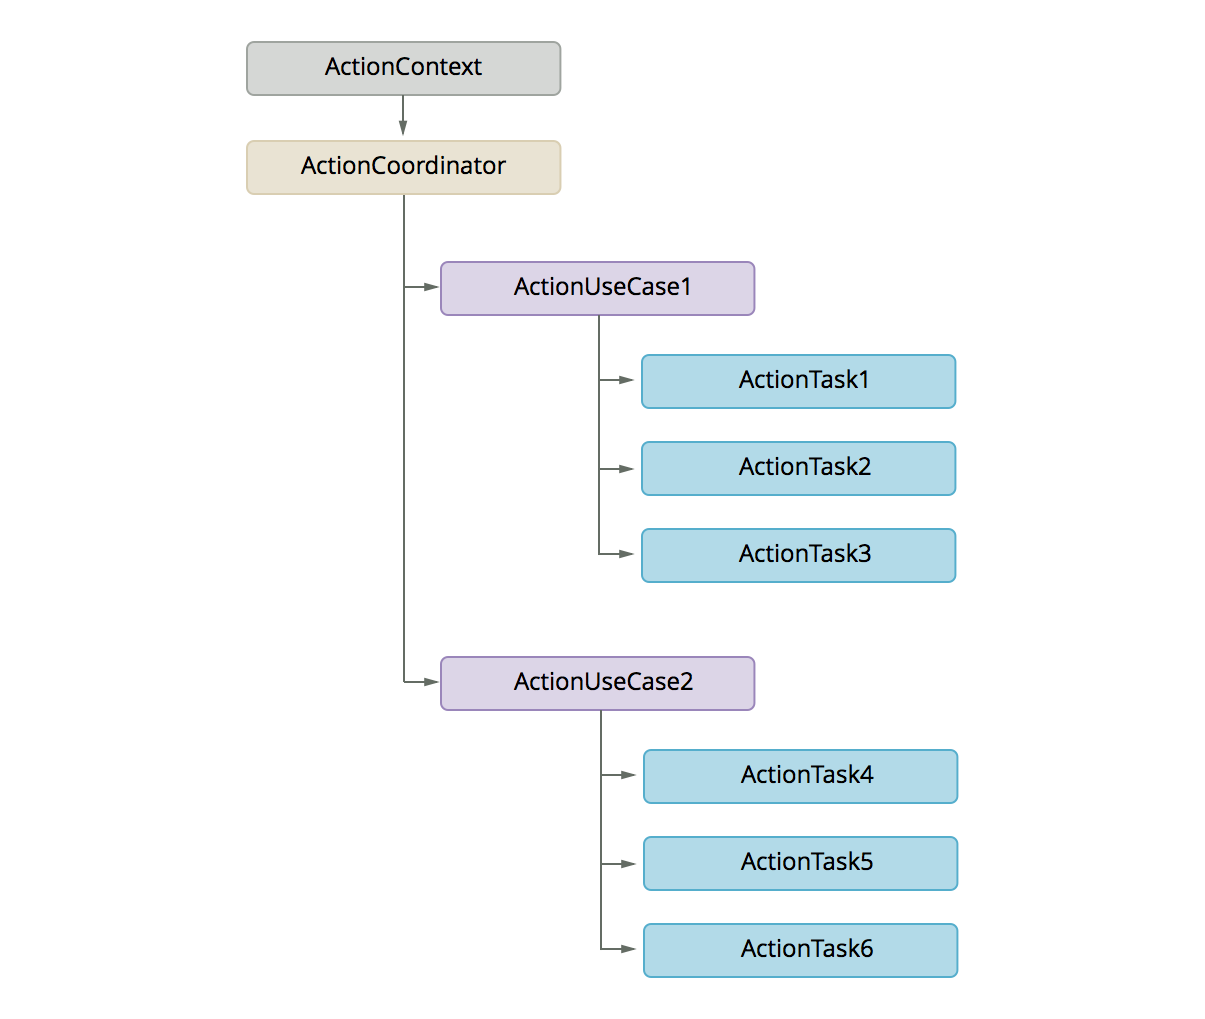
ActionContext
The glue that binds the three layers of abstraction provided in ActionLogic is ActionContext. Anytime an ActionTask, ActionUseCase or ActionCoordinator is invoked
an instance of ActionContext is created and passed as an input parameter to the receiving execution context. Because each of the three abstractions works in the same way
with ActionContext, it is intended to be a relatively simple “learn once understand everywhere” abstraction.
Instances of ActionContext are always referred to within the body of call methods defined in any ActionTask, ActionUseCase or ActionCoordinator as context. An
instance of ActionContext is a thin wrapper around Ruby’s standard library OpenStruct. This allows
instances of ActionContext to be maximally flexible. Arbitrary attributes can be defined on a context and their values can be of any type.
In addition to allowing arbitrary attributes and values to be defined on a context, instances of ActionContext also conform to a set of simple rules:
- Every
contextinstance is instantiated with a defaultstatusof:success - A
contextresponds tosuccess?which returns true if thestatusis:success - A
contextresponds tofail!which sets thestatusto:failure - A
contextresponds tofail?which returns true if thestatusis:failure - A
contextrseponds tohalt!which sets thestatusto:halted - A
contextresponds tohalted?which returns true if thestatusis:halted
Enough with the words, let’s look at some code! The following shows an instance of ActionContext and its various abilities:
context = ActionLogic::ActionContext.new

context # => #<ActionLogic::ActionContext status=:success>

# default status is `:success`:
context.status # => :success

# defining a new attribute called `name` with the value `"Example"`:
context.name = "Example"

# retrieving the value of the `name` attribute:
context.name # => "Example"

# you can set attributes to anything, including Procs:
context.lambda_example = -> { "here" }

context.lambda_example # => #<Proc:0x007f8d6b0a9ba0@-:11 (lambda)>

context.lambda_example.call # => "here"

# contexts can be failed:
context.fail!

context.status # => :failure

context.failure? # => true

# contexts can also be halted:
context.halt!

context.status # => :halted

context.halted? # => true
Now that we have seen what ActionContext can do, let’s take a look at the lowest level of absraction in ActionLogic that consumes instances of ActionContext, the ActionTask
abstraction.
ActionTask
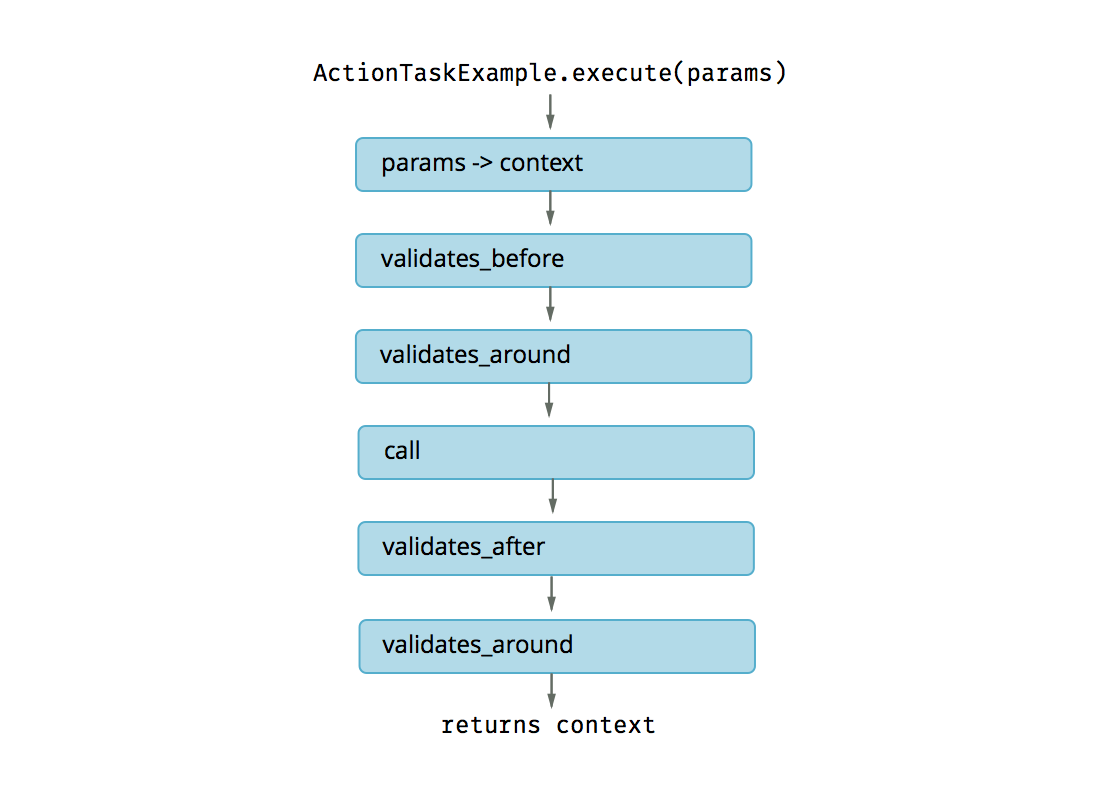
At the core of every ActionLogic work flow is an ActionTask. These classes are the lowest level of abstraction in ActionLogic and are where concrete work is performed. All ActionTasks conform to the same structure and incorporate all features of ActionLogic including validations and error handling.
To implement an ActionTask class you must define a call method. You can also specify any before, after or around validations or an error handler. The following code example demonstrates an ActionTask class that includes before and after validations, and also demonstrates how an ActionTask is invoked :
class ActionTaskExample
  include ActionLogic::ActionTask

  validates_before :expected_attribute1 => { :type => String },
                   :expected_attribute2 => { :type => Fixnum, :presence => true }
  validates_after  :example_attribute1 => { :type => String, :presence => ->(example_attribute1) { !example_attribute1.empty? } }

  def call
    # adds `example_attribute1` to the shared `context` with the value "Example value"
    context.example_attribute1 = "New value from context attributes: #{context.expected_attribute1} #{context.expected_attribute2}"
  end
end

# ActionTasks are invoked by calling an `execute` static method directly on the class with an optional hash of key value pairs:
result = ActionTaskExample.execute(:expected_attribute1 => "example", :expected_attribute2 => 123)

# The result object is the shared context object (an instance of ActionContext):
result # => #<ActionLogic::ActionContext expected_attribute1="example", expected_attribute2=123, status=:success, example_attribute1="New value from context attributes: example 123">
The ActionTaskExample is invoked using the static method execute which takes an optional hash of attributes that is converted into an ActionContext.
Assuming the before validations are satisfied, the call method is invoked. In the body of the call method the ActionTask can access the shared ActionContext
instance via a context object. This shared context object allows for getting and setting attributes as needed. When the call method returns, the context
is validated against any defined after validations, and the context is then returned to the caller.
The diagram below is a visual representation of how an ActionTask is evaluted when its execute method is invoked from a caller:
Although this example is for the ActionTask abstraction, ActionUseCase and ActionCoordinator follow the same pattern. The difference is that ActionUseCase
is designed to organize multiple ActionTasks, and ActionCoordinator is designed to organize many ActionUseCases.
ActionUseCase
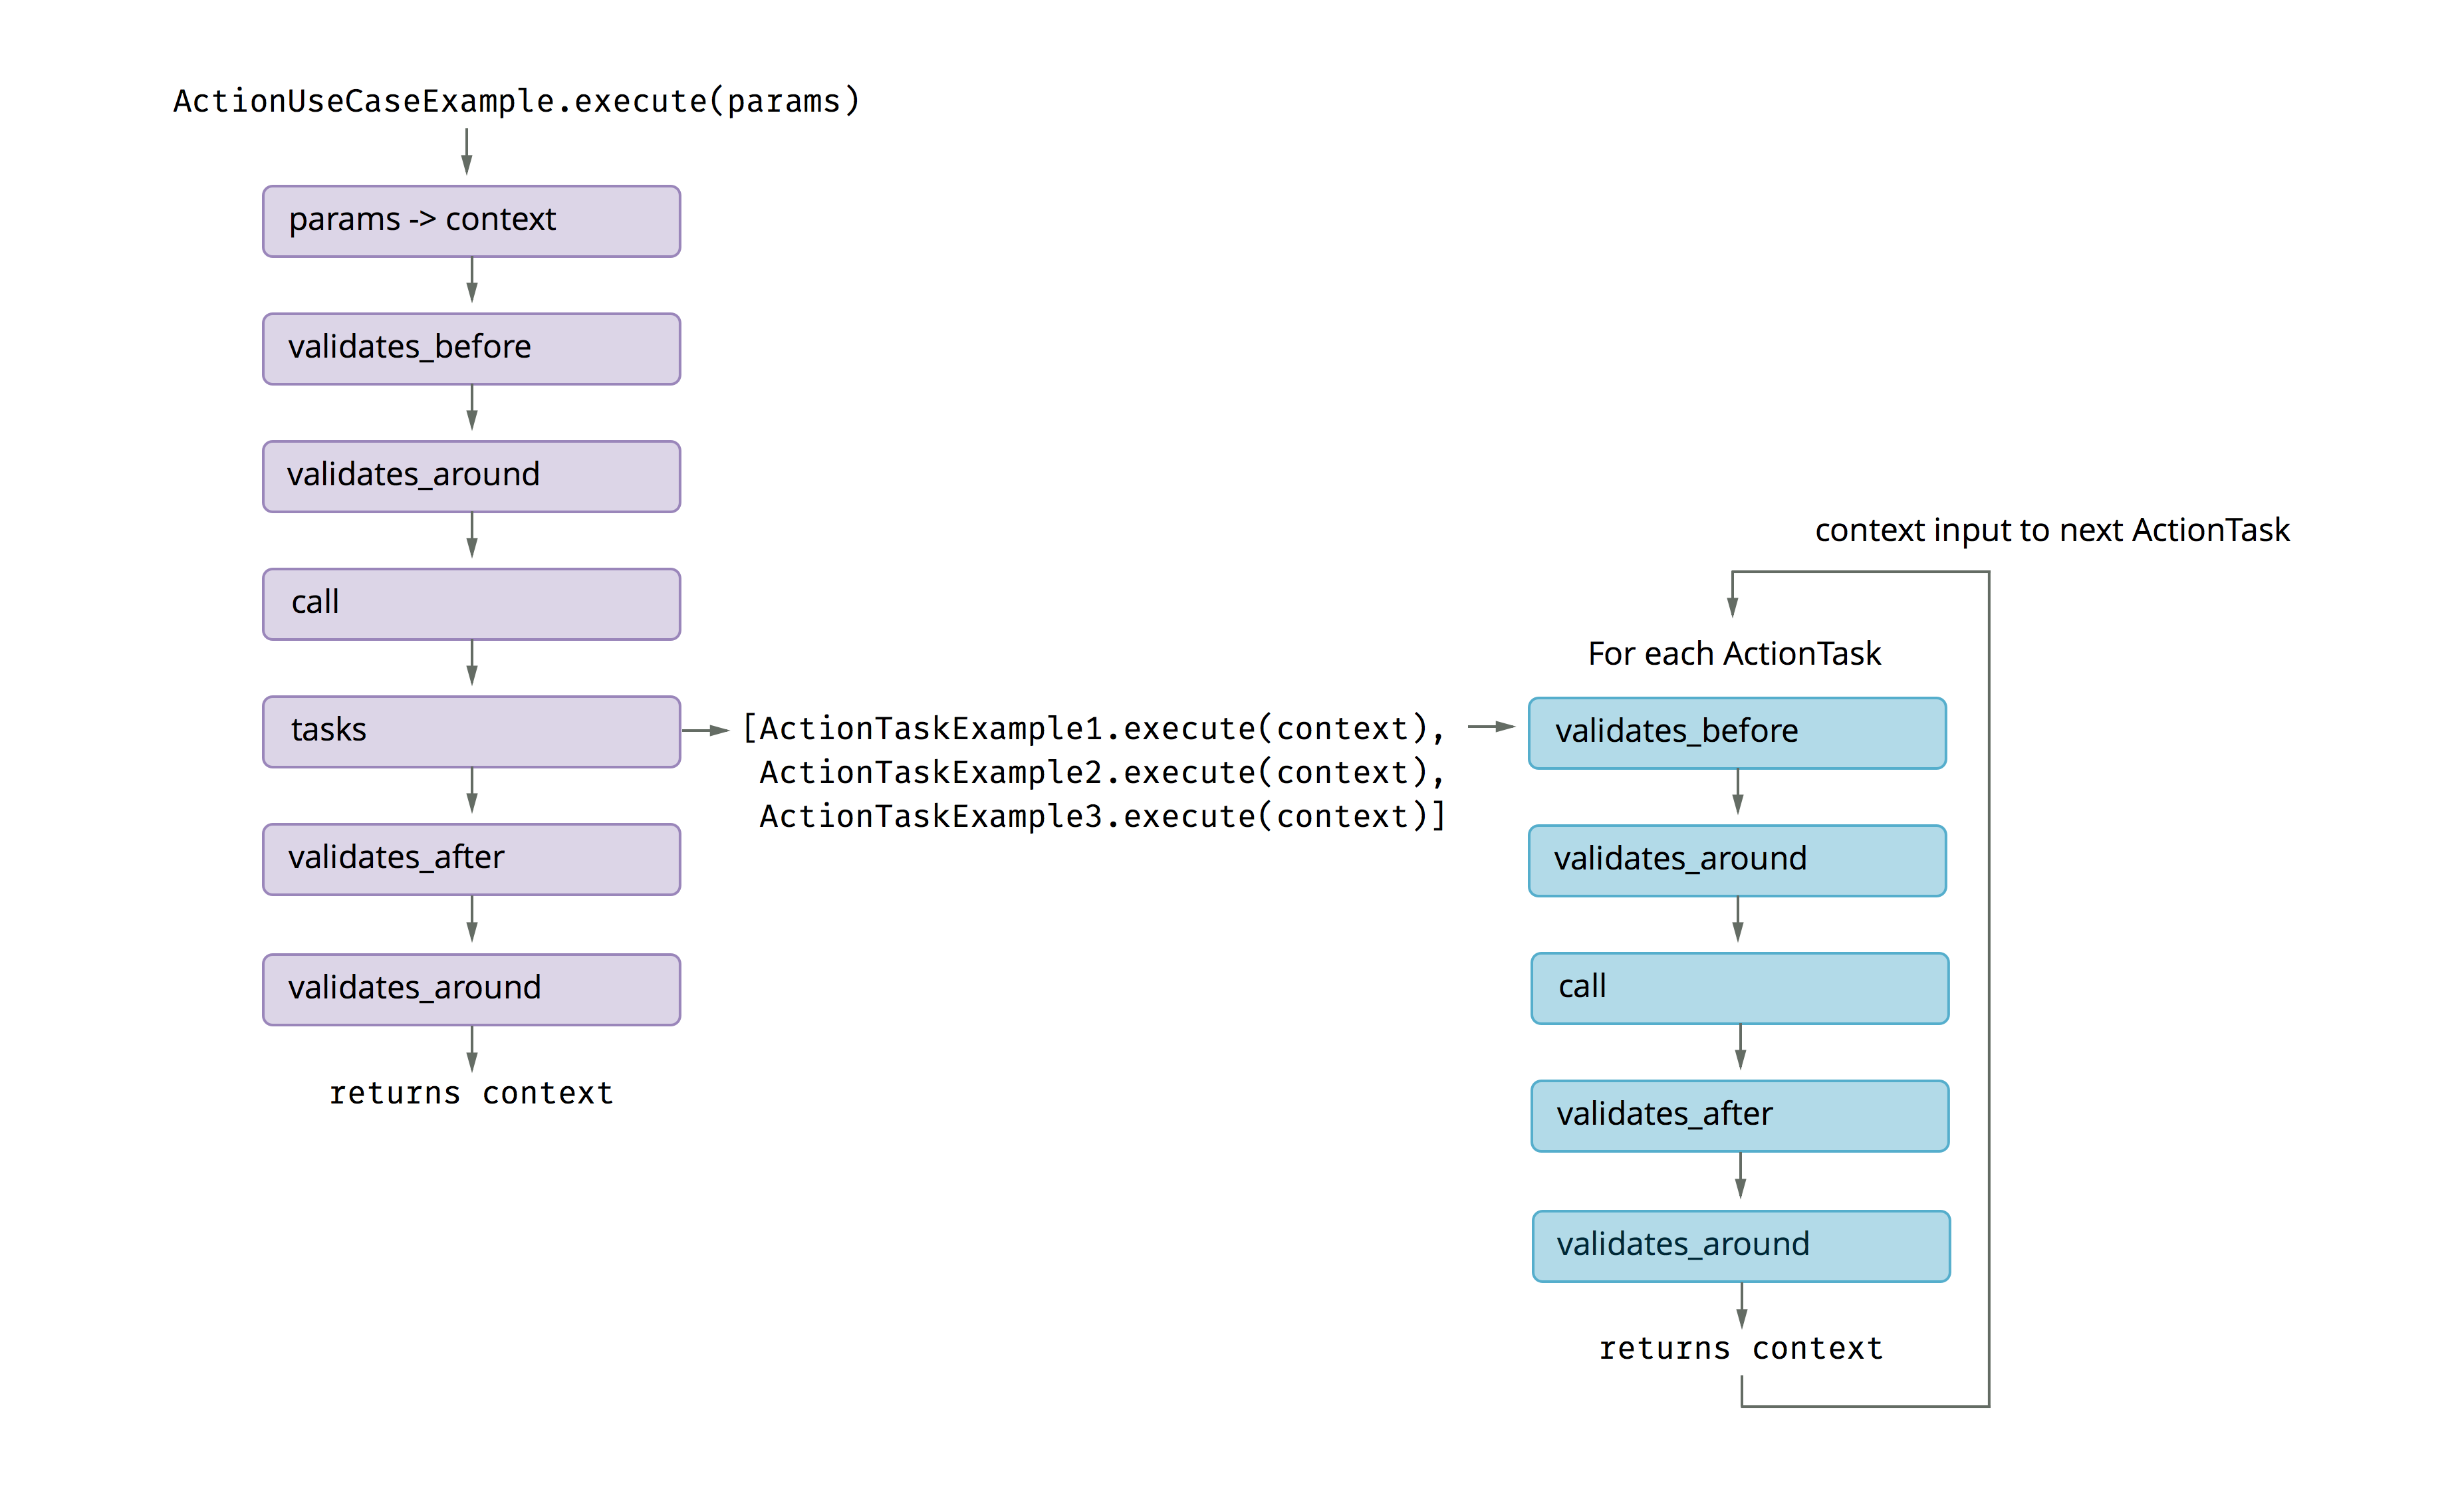
As business logic grows in complexity the number of steps or tasks required to fulfill that business logic tends to increase. Managing this complexity is a problem every team must face.
Abstractions can help teams of varying experience levels work together and promote code that remains modular and simple to understand and extend. ActionUseCase represents a layer of
abstraction that organizes multiple ActionTasks and executes each ActionTask in the order they are defined. Each task receives the same shared context so tasks can be composed together.
To implement an ActionUseCase class you must define a call method and a tasks method. You also can specify any before, after or around validations or an error handler.
The following is an example showcasing how an ActionUseCase class organizes the execution of multiple ActionTasks and defines before and after validations on the shared context:
class ActionUseCaseExample
  include ActionLogic::ActionUseCase

  validates_before :expected_attribute1 => { :type => String },
                   :expected_attribute2 => { :type => Fixnum, :presence => true }
  validates_after  :example_task1    => { :type => TrueClass, :presence => true },
                   :example_task2    => { :type => TrueClass, :presence => true },
                   :example_task3    => { :type => TrueClass, :presence => true },
                   :example_usecase1 => { :type => TrueClass, :presence => true }

  # The `call` method is invoked prior to invoking any of the ActionTasks defined by the `tasks` method.
  # The purpose of the `call` method allows us to prepare the shared `context` prior to invoking the ActionTasks.
  def call
    context # => #<ActionLogic::ActionContext expected_attribute1="example", expected_attribute2=123, status=:success>
    context.example_usecase1 = true
  end

  def tasks
    [ActionTaskExample1,
     ActionTaskExample2,
     ActionTaskExample3]
  end
end

class ActionTaskExample1
  include ActionLogic::ActionTask
  validates_after :example_task1 => { :type => TrueClass, :presence => true }

  def call
    context # => #<ActionLogic::ActionContext expected_attribute1="example", expected_attribute2=123, status=:success, example_usecase1=true>
    context.example_task1 = true
  end
end

class ActionTaskExample2
  include ActionLogic::ActionTask
  validates_after :example_task2 => { :type => TrueClass, :presence => true }

  def call
    context # => #<ActionLogic::ActionContext expected_attribute1="example", expected_attribute2=123, status=:success, example_usecase1=true, example_task1=true>
    context.example_task2 = true
  end
end

class ActionTaskExample3
  include ActionLogic::ActionTask
  validates_after :example_task3 => { :type => TrueClass, :presence => true }

  def call
    context # => #<ActionLogic::ActionContext expected_attribute1="example", expected_attribute2=123, status=:success, example_usecase1=true, example_task1=true, example_task2=true>
    context.example_task3 = true
  end
end

# To invoke the ActionUseCaseExample, we call its execute method with the required attributes:
result = ActionUseCaseExample.execute(:expected_attribute1 => "example", :expected_attribute2 => 123)

result # => #<ActionLogic::ActionContext expected_attribute1="example", expected_attribute2=123, status=:success, example_usecase1=true, example_task1=true, example_task2=true, example_task3=true>
By following the value of the shared context from the ActionUseCaseExample to each of the ActionTask classes, it is possible to see how the shared context
is mutated to accomodate the various attributes and their values each execution context adds to the context. It also reveals the order in which the ActionTasks
are evaluated, and indicates that the call method of the ActionUseCaseExample is invoked prior to any of the ActionTasks defined in the tasks method.
To help visualize the flow of execution when an ActionUseCase is invoked, this diagram aims to illustrate the relationship between ActionUseCase and ActionTasks
and the order in which operations are performed:
ActionCoordinator
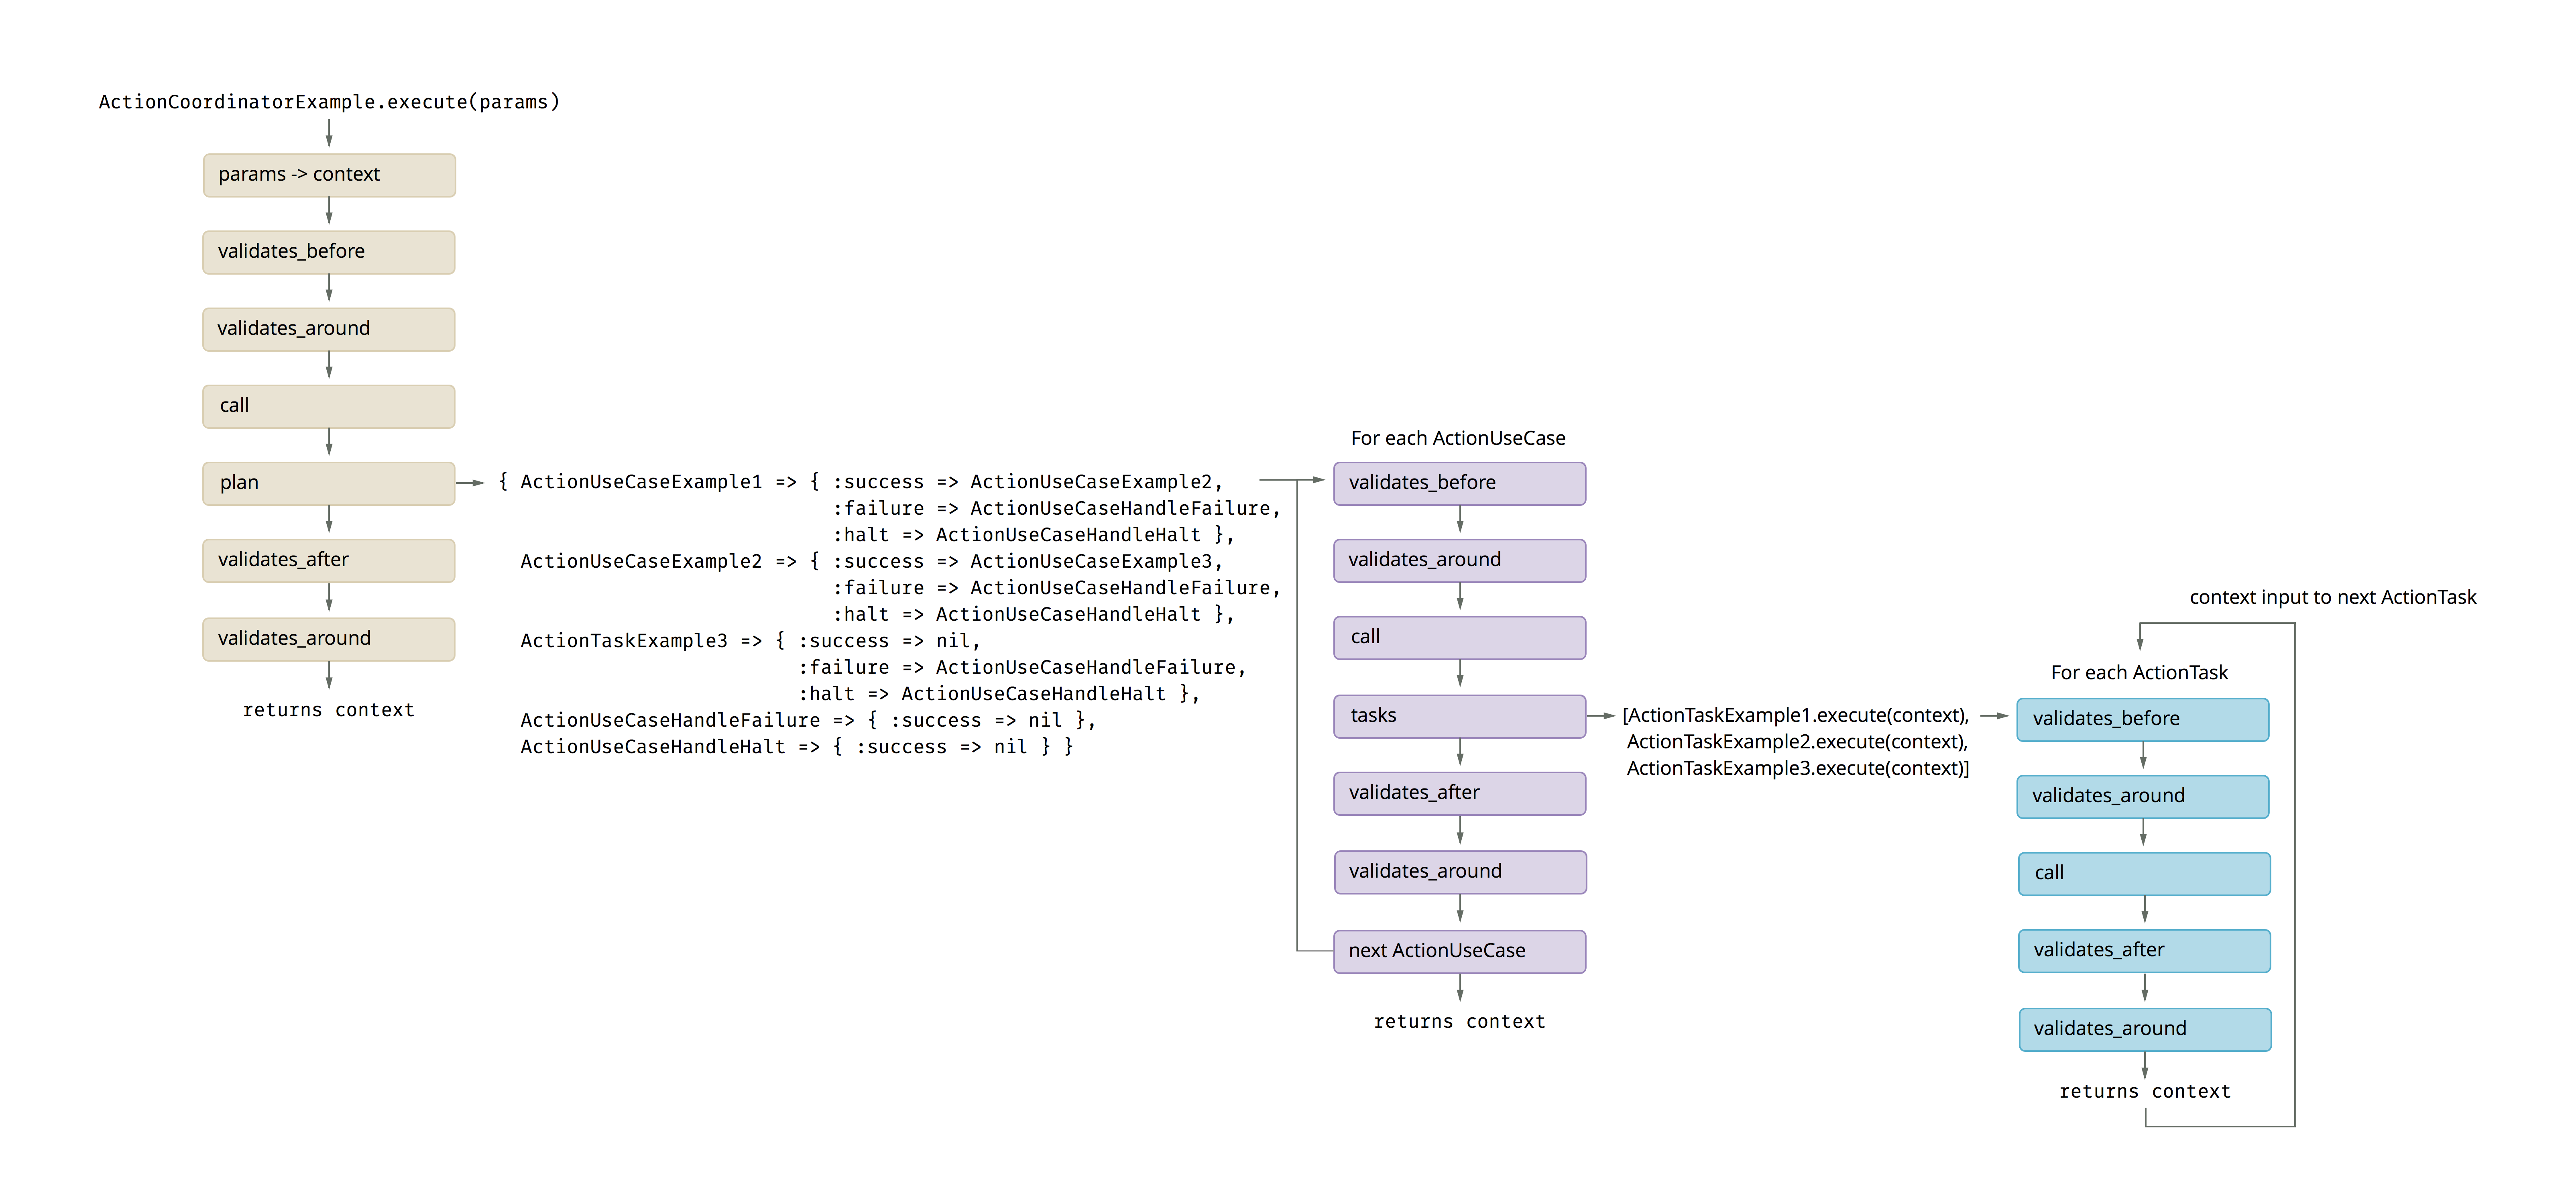
Sometimes the behavior we wish our Ruby or Rails application to provide requires us to coordinate work between various domains of our application’s business logic.
The ActionCoordinator abstraction is intended to help coordinate multiple ActionUseCases by allowing you to define a plan of which ActionUseCases to invoke
depending on the outcome of each ActionUseCase execution. The ActionCoordinator abstraction is the highest level of abstraction in ActionLogic.
To implement an ActionCoordinator class, you must define a call method in addition to a plan method. The purpose of the plan method is to define a state
transition map that links together the various ActionUseCase classes the ActionCoordinator is organizing, as well as allowing you to define error or halt
scenarios based on the result of each ActionUseCase. The following code example demonstrates a simple ActionCoordinator:
class ActionCoordinatorExample
  include ActionLogic::ActionCoordinator

  def call
    context.required_attribute1 = "required attribute 1"
    context.required_attribute2 = "required attribute 2"
  end

  def plan
    {
      ActionUseCaseExample1 => { :success => ActionUseCaseExample2,
                                 :failure => ActionUseCaseFailureExample },
      ActionUseCaseExample2 => { :success => nil,
                                 :failure => ActionUseCaseFailureExample },
      ActionUseCaseFailureExample => { :success => nil }
    }
  end
end

class ActionUseCaseExample1
  include ActionLogic::ActionUseCase

  validates_before :required_attribute1 => { :type => String }

  def call
    context # => #<ActionLogic::ActionContext status=:success, required_attribute1="required attribute 1", required_attribute2="required attribute 2">
    context.example_usecase1 = true
  end

  # Normally `tasks` would define multiple tasks, but in this example, I've used one ActionTask to keep the overall code example smaller
  def tasks
    [ActionTaskExample1]
  end
end

class ActionUseCaseExample2
  include ActionLogic::ActionUseCase

  validates_before :required_attribute2 => { :type => String }

  def call
    context # => #<ActionLogic::ActionContext status=:success, required_attribute1="required attribute 1", required_attribute2="required attribute 2", example_usecase1=true, example_task1=true>
    context.example_usecase2 = true
  end

  # Normally `tasks` would define multiple tasks, but in this example, I've used one ActionTask to keep the overall code example smaller
  def tasks
    [ActionTaskExample2]
  end
end

# In this example, we are not calling ActionUseCaseFailureExample, but is used to illustrate the purpose of the `plan` of our ActionCoordinator
# in the event of a failure in one of the consumed `ActionUseCases`
class ActionUseCaseFailureExample
  include ActionLogic::ActionUseCase

  def call
  end

  def tasks
    [ActionTaskLogFailure,
     ActionTaskEmailFailure]
  end
end

class ActionTaskExample1
  include ActionLogic::ActionTask
  validates_after :example_task1 => { :type => TrueClass, :presence => true }

  def call
    context # => #<ActionLogic::ActionContext status=:success, required_attribute1="required attribute 1", required_attribute2="required attribute 2", example_usecase1=true>
    context.example_task1 = true
  end
end

class ActionTaskExample2
  include ActionLogic::ActionTask
  validates_after :example_task2 => { :type => TrueClass, :presence => true }

  def call
    context # => #<ActionLogic::ActionContext status=:success, required_attribute1="required attribute 1", required_attribute2="required attribute 2", example_usecase1=true, example_task1=true, example_usecase2=true>
    context.example_task2 = true
  end
end

result = ActionCoordinatorExample.execute

result # => #<ActionLogic::ActionContext status=:success, required_attribute1="required attribute 1", required_attribute2="required attribute 2", example_usecase1=true, example_task1=true, example_usecase2=true, example_task2=true>
Succeeding an ActionContext
By default, the value of the status attribute of instances of ActionContext is :success. Normally this is useful information for the caller of an ActionTask,
ActionUseCase or ActionCoordinator because it informs the caller that the various execution context(s) were successful. In other words, a :success status
indicates that none of the execution contexts had a failure or halted execution.
Failing an ActionContext
Using context.fail! does two important things: it immediately stops the execution of any proceeding business logic (prevents any additional ActionTasks from executing)
and also sets the status of the context as :failure. This status is most applicable to the caller or an ActionCoordinator that might have a plan specifically for a :failure
status of a resulting ActionUseCase.
The following is a simple example to show how a context is failed within a call method:
class ActionTaskExample
  include ActionLogic::ActionTask

  def call
    if failure_condition?
      context.fail!
    end
  end

  def failure_condition?
    true
  end
end

result = ActionTaskExample.execute

result # => #<ActionLogic::ActionContext status=:failure, message="">
When failing a context it is possible to also specify a message:
class ActionTaskExample
  include ActionLogic::ActionTask

  def call
    if failure_condition?
      context.fail! "Something was invalid"
    end
  end

  def failure_condition?
    true
  end
end

result = ActionTaskExample.execute

result # => #<ActionLogic::ActionContext status=:failure, message="Something was invalid">

result.message # => "Something was invalid"
From the above example we see how it is possible to fail! a context while also specifying a clarifying message about the failure condition. Later, we retrieve
that failure message via the message attribute defined on the returned context.
Halting an ActionContext
Like, failing a context, Using context.halt! does two important things: it immediately halts the execution of any proceeding business logic (prevents any additional ActionTasks
from executing) and also sets the status of the context as :halted. The caller may use that information to define branching logic or an ActionCoordinator may use that
information as part of its plan.
However, unlike failing a context, halting is designed to indicate that no more processing is required, but otherwise execution was successful.
The following is a simple example to show how a context is halted within a call method:
class ActionTaskExample
  include ActionLogic::ActionTask

  def call
    if halt_condition?
      context.halt!
    end
  end

  def halt_condition?
    true
  end
end

result = ActionTaskExample.execute

result # => #<ActionLogic::ActionContext status=:halted, message="">
When failing a context it is possible to also specify a message:
class ActionTaskExample
  include ActionLogic::ActionTask

  def call
    if halt_condition?
      context.halt! "Something required a halt"
    end
  end

  def halt_condition?
    true
  end
end

result = ActionTaskExample.execute

result # => #<ActionLogic::ActionContext status=:halted, message="Something required a halt">

result.message # => "Something required a halt"
From the above example we see how it is possible to halt! a context while also specifying a clarifying message about the halt condition. Later, we retrieve
that halt message via the message attribute defined on the returned context.
Custom ActionContext Status
It is worthwhile to point out that you should not feel limited to only using the three provided statuses of :success, :failure or :halted. It is easy to implement your
own system of statuses if you prefer. For example, consider a system that is used to defining various status codes or disposition codes to indicate the result of some business
logic. Instances of ActionContext can be leveraged to indicate these disposition codes by using the status attribute, or by defining custom attributes. You are encouraged
to expirement and play with the flexibility provided to you by ActionContext in determining what is optimal for your given code contexts and your team.
class RailsControllerExample < ApplicationController
  def create
    case create_use_case.status
      when :disposition_1 then ActionUseCaseSuccess1.execute(create_use_case)
      when :disposition_2 then ActionUseCaseSuccess2.execute(create_use_case)
      when :disposition_9 then ActionUseCaseFailure.execute(create_use_case)
      else
        ActionUseCaseDefault.execute(create_use_case)
    end
  end

  private

  def create_use_case
    @create_use_case ||= ActionUseCaseExample.execute(params)
  end
end
Although this contrived example would be ideal for an ActionCoordinator (because the result of ActionUseCaseExample drives the execution of the next ActionUseCase), this
example serves to show that status can be used with custom disposition codes to drive branching behavior.
Error Handling
During execution of an ActionTask, ActionUseCase or ActionCoordinator you may wish to define custom behavior for handling errors. Within any of these classes
you can define an error method that receives as its input the error exception. Invoking an error method does not make any assumptions about the status of the
underlying context. Execution of the ActionTask, ActionUseCase or ActionCoordinator also stops after the error method returns, and execution of the work
flow continues as normal unless the context is failed or halted.
The following example is a simple illustration of how an error method is invoked for an ActionTask:
class ActionTaskExample
  include ActionLogic::ActionTask

  def call
    context.before_raise = true
    raise "Something broke"
    context.after_raise = true
  end

  def error(e)
    context.error = "the error is passed in as an input parameter: #{e.class}"
  end
end

result = ActionTaskExample.execute

# the status of the context is not mutated
result.status # => :success

result.error # => "the error is passed in as an input parameter: RuntimeError"

result.before_raise # => true

result.after_raise # => nil
It is important to note that defining an error method is not required. If at any point in the execution of an ActionTask, ActionUseCase or ActionCoordinator
an uncaught exception is thrown and an error method is not defined, the exception is raised to the caller.
Attribute Validations
The most simple and basic type of validation offered by ActionLogic is attribute validation. To require that an attribute be defined on an instance of ActionContext, you
need only specify the name of the attribute and an empty hash with one of the three validation types (before, after or around):
class ActionTaskExample
  include ActionLogic::ActionTask

  validates_before :required_attribute1 => {}

  def call
  end
end

result = ActionTaskExample.execute(:required_attribute1 => true)

result.status # => :success

result.required_attribute1 # => true
However, in the above example, if we were to invoke the ActionTaskExample without the required_attribute1 parameter, the before validation would fail and raise
an ActionLogic::MissingAttributeError and also detail which attribute is missing:
class ActionTaskExample
  include ActionLogic::ActionTask

  validates_before :required_attribute1 => {}

  def call
  end
end

ActionTaskExample.execute # ~> context: ActionTaskExample message: [:required_attribute1] (ActionLogic::MissingAttributeError)
Attribute validations are defined in the same way regardless of the timing of the validation (before, after or
around). Please refer to the relevant sections for examples of their usage.
Type Validations
In addition to attribute validations, ActionLogic also allows you to validate against the type of the value of the attribute you expect to be defined in an instance
of ActionContext. To understand the default types ActionLogic validates against, please see the following example:
class ActionTaskExample
  include ActionLogic::ActionTask

  validates_after :integer_test => { :type => Fixnum },
                  :float_test   => { :type => Float },
                  :string_test  => { :type => String },
                  :truthy_test  => { :type => TrueClass },
                  :falsey_test  => { :type => FalseClass },
                  :hash_test    => { :type => Hash },
                  :array_test   => { :type => Array },
                  :symbol_test  => { :type => Symbol },
                  :nil_test     => { :type => NilClass }

  def call
    context.integer_test = 123
    context.float_test   = 1.0
    context.string_test  = "test"
    context.truthy_test  = true
    context.falsey_test  = false
    context.hash_test    = {}
    context.array_test   = []
    context.symbol_test  = :symbol
    context.nil_test     = nil
  end
end

result = ActionTaskExample.execute

result # => #<ActionLogic::ActionContext status=:success,
            #                            integer_test=123,
            #                            float_test=1.0,
            #                            string_test="test",
            #                            truthy_test=true,
            #                            falsey_test=false,
            #                            hash_test={},
            #                            array_test=[],
            #                            symbol_test=:symbol,
            #                            nil_test=nil>
It’s important to point out that Ruby’s true and false are not Boolean but TrueClass and FalseClass respectively. Additionally, nil’s type is NilClass in Ruby.
Also potentially surprising to some is that Ruby’s integer type is of class Fixnum, but floats are of class Float.
As we saw with attribute validations, if an attribute’s value does not conform to the type expected, ActionLogic will raise an ActionLogic::AttributeTypeError
with a detailed description about which attribute’s value failed the validation:
class ActionTaskExample
  include ActionLogic::ActionTask

  validates_after :integer_test => { :type => Fixnum }

  def call
    context.integer_test = 1.0
  end
end

ActionTaskExample.execute # ~> context: ActionTaskExample message: Attribute: integer_test with value: 1.0 was expected to be of type Fixnum but is Float (ActionLogic::AttributeTypeError)
In addition to the above default types it is possible to also validate against user defined types.
Custom Type Validations
If you would like to validate the type of attributes on a given context with your application’s classes, ActionLogic is happy to provide that functionality.
Let’s consider the following example:
class ExampleClass
end

class ActionTaskExample
  include ActionLogic::ActionTask

  validates_after :example_attribute => { :type => ExampleClass }

  def call
    context.example_attribute = ExampleClass.new
  end
end

result = ActionTaskExample.execute

result # => #<ActionLogic::ActionContext status=:success, example_attribute=#<ExampleClass:0x007f95d1922bd8>>
In the above example, a custom class ExampleClass is defined. In order to type validate against this class, the required format for the name of the class is simply
the class constant ExampleClass.
If a custom type validation fails, ActionLogic provides the same ActionLogic::AttributeTypeError with a detailed explanation about what attribute is in violation
of the type validation:
class ExampleClass
end

class OtherClass
end

class ActionTaskExample
  include ActionLogic::ActionTask

  validates_after :example_attribute => { :type => ExampleClass }

  def call
    context.example_attribute = OtherClass.new
  end
end

ActionTaskExample.execute # ~> context: ActionTaskExample message: Attribute: example_attribute with value: #<OtherClass:0x007fb5ca04edb8> was expected to be of type ExampleClass but is OtherClass (ActionLogic::AttributeTypeError)
Attribute and type validations are very helpful, but in some situations this is not enough. Additionally, ActionLogic provides presence validation so you can also verify that
a given attribute on a context not only has the correct type, but also has a value that is considered present.
Presence Validations
ActionLogic also allows for presence validation for any attribute on an instance of ActionContext. Like other validations, presence validations can be specified in before, after or
around validations.
By default, presence validations simply check to determine if an attribute’s value is not nil or is not false. To define a presence validation, you need only specify :presence => true
for the attribute you wish to validate against:
class ActionTaskExample
  include ActionLogic::ActionTask

  validates_before :example_attribute => { :presence => true }

  def call
  end
end

result = ActionTaskExample.execute(:example_attribute => 123)

result # => #<ActionLogic::ActionContext example_attribute=123, status=:success>
However, if a presence validation fails, ActionLogic will raise an ActionLogic::PresenceError with a detailed description about the attribute failing the presence validation
and why:
class ActionTaskExample
  include ActionLogic::ActionTask

  validates_before :example_attribute => { :presence => true }

  def call
  end
end

ActionTaskExample.execute(:example_attribute => nil) # ~> context: ActionTaskExample message: Attribute: example_attribute is missing value in context but presence validation was specified (ActionLogic::PresenceError)
Custom Presence Validations
Sometimes when wanting to validate presence of an attribute with an aggregate type (like Array or Hash), we may want to validate that such a type is not empty. If
you wish to validate presence for a type that requires inspecting the value of the attribute, ActionLogic allows you the ability to define a custom Proc to validate
an attribute’s value against.
class ActionTaskExample
  include ActionLogic::ActionTask

  validates_before :example_attribute => { :presence => ->(attribute) { attribute.any? } }

  def call
  end
end

result = ActionTaskExample.execute(:example_attribute => ["element1", "element2", "element3"])

result # => #<ActionLogic::ActionContext example_attribute=["element1", "element2", "element3"], status=:success>
In the example above, we define a lambda that accepts as input the value of the attribute on the context. In this case, we are interested in verifying that
example_attribute is not an empty Array or an empty Hash. This passes our before validation because ActionTaskExample is invoked with an example_attribute
whose value is an array consisting of three elements.
However, if a custom presence validation fails, ActionLogic will raise an ActionLogic::PresenceError with a detailed description about the attribute failing
the custom presence validation:
class ActionTaskExample
  include ActionLogic::ActionTask

  validates_before :example_attribute => { :presence => ->(attribute) { attribute.any? } }

  def call
  end
end

ActionTaskExample.execute(:example_attribute => []) # ~> context: ActionTaskExample message: Attribute: example_attribute is missing value in context but custom presence validation was specified (ActionLogic::PresenceError)
In the above example, we have failed to pass the presence validation for example_attribute because the value of example_attribute is an empty array. When
the custom presence validation lambda is called, the lambda returns false and the ActionLogic::PresenceError is thrown, with an error message indicating
the attribute that failed the presence validation while also indicating that a custom presence validation was specified.
Before Validations
If you combine Rails ActionController’s before_filter and ActiveModel’s validates then you have approximately what ActionLogic defines as validates_before.
Before validations can be defined in any of the ActionLogic abstractions (ActionTask, ActionUseCase and ActionCoordinator). In each abstraction a validates_before
operation is performed before invoking the call method.
Before validations allow you to specify a required attribute and optionally its type and / or presence. The following example illustrates how to specify a before
validation on a single attribute:
class ActionTaskExample
  include ActionLogic::ActionTask

  validates_before :example_attribute => { :type => Array, :presence => ->(attribute) { attribute.any? } }

  def call
  end
end

result = ActionTaskExample.execute(:example_attribute => [1, 2, 3])

result # => #<ActionLogic::ActionContext example_attribute=[1, 2, 3], status=:success>
The following example illustrates how to specify a before validation for multiple attributes:
class ActionTaskExample
  include ActionLogic::ActionTask

  validates_before :example_attribute => { :type => Array, :presence => ->(attribute) { attribute.any? } },
                   :example_attribute2 => { :type => Fixnum }

  def call
  end
end

result = ActionTaskExample.execute(:example_attribute => [1, 2, 3], :example_attribute2 => 1)

result # => #<ActionLogic::ActionContext example_attribute=[1, 2, 3], example_attribute2=1, status=:success>
After Validations
If you combine Rails ActionController’s after_filter and ActiveModel’s validates then you have approximately what ActionLogic defines as validates_after.
After validations can be defined in any of the ActionLogic abstractions (ActionTask, ActionUseCase and ActionCoordinator). In each abstraction a validates_after
operation is performed after invoking the call method.
After validations allow you to specify a required attribute and optionally its type and / or presence. The following example illustrates how to specify an after
validation on a single attribute:
class ActionTaskExample
  include ActionLogic::ActionTask

  validates_after :example_attribute => { :type => Array, :presence => ->(attribute) { attribute.any? } }

  def call
    context.example_attribute = [1, 2, 3]
  end
end

result = ActionTaskExample.execute

result # => #<ActionLogic::ActionContext example_attribute=[1, 2, 3], status=:success>
The following example illustrates how to specify an after validation for multiple attributes:
class ActionTaskExample
  include ActionLogic::ActionTask

  validates_after :example_attribute => { :type => Array, :presence => ->(attribute) { attribute.any? } },
                  :example_attribute2 => { :type => Fixnum }

  def call
    context.example_attribute = [1, 2, 3]
    context.example_attribute2 = 1
  end
end

result = ActionTaskExample.execute

result # => #<ActionLogic::ActionContext example_attribute=[1, 2, 3], example_attribute2=1, status=:success>
Around Validations
If you combine Rails ActionController’s around_filter and ActiveModel’s validates then you have approximately what ActionLogic defines as validates_around.
Around validations can be defined in any of the ActionLogic abstractions (ActionTask, ActionUseCase and ActionCoordinator). In each abstraction a validates_around
operation is performed before and after invoking the call method.
Around validations allow you to specify a required attribute and optionally its type and / or presence. The following example illustrates how to specify an around
validation on a single attribute:
class ActionTaskExample
  include ActionLogic::ActionTask

  validates_around :example_attribute => { :type => Array, :presence => ->(attribute) { attribute.any? } }

  def call
  end
end

result = ActionTaskExample.execute(:example_attribute => [1, 2, 3])

result # => #<ActionLogic::ActionContext example_attribute=[1, 2, 3], status=:success>
The following example illustrates how to specify an around validation for multiple attributes:
class ActionTaskExample
  include ActionLogic::ActionTask

  validates_around :example_attribute => { :type => Array, :presence => ->(attribute) { attribute.any? } },
                   :example_attribute2 => { :type => Fixnum }

  def call
  end
end

result = ActionTaskExample.execute(:example_attribute => [1, 2, 3], :example_attribute2 => 1)

result # => #<ActionLogic::ActionContext example_attribute=[1, 2, 3], example_attribute2=1, status=:success>
Benchmarking
At some point you may want to benchmark and profile the performance of your code. ActionLogic allows for benchmarking that
range from simple defaults to highly customizable options depending on your use case and needs.
Enable Benchmarking
Because benchmarking negatively impacts performance, we must explicitly tell ActionLogic that we want to benchmark (otherwise
it defaults to ignore benchmarking). To do this, we configure ActionLogic using the configure method. With the provided
config object, we explicitly enable benchmarking by setting config.benchmark = true:
ActionLogic.configure do |config|
  config.benchmark = true
end
Benchmark Logging
Additionally, ActionLogic writes a benchmark log to $stdout by default, or you can override this default configuration
by specifying a log file. To do this, you configure ActionLogic to use a File object for logging benchmark results via the
ActionLogic.configure method:
ActionLogic.configure do |config|
  config.benchmark = true
  config.benchmark_log = File.open("benchmark.log", "w")
end
Benchmark Log Formatting
By default, ActionLogic formats benchmark logs in the following format:
context:ValidateAroundPresenceTestUseCase user_time:0.000000 system_time:0.000000 total_time:0.000000 real_time:0.000135
...
The default format is intended to be machine readable for easy parsing and is not intended to be used for human reading.
However, if you wish to change the format of the log output, ActionLogic allows you to override the default formatter by
allowing you to provide your own formatter:
ActionLogic.configure do |config|
  config.benchmark = true
  config.benchmark_log = File.open("benchmark.log", "w")
  config.benchmark_formatter = YourCustomFormatter
end
Where YourCustomFormatter subclasses ActionLogic::ActionBenchmark::DefaultFormatter:
class CustomFormatter < ActionLogic::ActionBenchmark::DefaultFormatter

  def log_coordinator(benchmark_result, execution_context_name)
    benchmark_log.puts("The ActionCoordinator #{execution_context_name} took #{benchmark_result.real} to complete.")
  end

  def log_use_case(benchmark_result, execution_context_name)
    benchmark_log.puts("The ActionUseCase #{execution_context_name} took #{benchmark_result.real} to complete.")
  end

  def log_task(benchmark_result, execution_context_name)
    benchmark_log.puts("The ActionTask #{execution_context_name} took #{benchmark_result.real} to complete.")
  end

end
From the example above, you can see that a custom formatter is required to define three methods: log_coordinator, log_use_case and log_task. The log_t cqcoordinator
method is called when a ActionCoordinator context is benchmarked. The use_case and task methods are invoked when ActionUseCase and ActionTask
contexts are benchmarked, respectively.
Each of the three log methods receives two input parameters: benchmark_result and execution_context_name where benchmark_result is a Ruby
standard library Benchmark result object, and execution_context_name is the class name of the ActionLogic context.
Once configured, you can verify that the formatter outputs to the specified log file by executing your ActionLogic contexts
and verifying that the log file is written to with the correct format:
The ActionUseCase TestUseCase2 took 0.00011722202179953456 to complete.
The ActionTask TestTask3 took 4.570698365569115e-05 to complete.
...
Custom Benchmark Handling
By default, ActionLogic benchmarks execution contexts using Ruby’s Benchmark module. If you are content with a Benchmark result object, then
you do not need to specify a custom benchmark handler. However, if you wish to have maximum control, or you require something different than Ruby’s
Benchmark module, you can define a custom handler like so:
class CustomHandler
  def call
    # custom logic
    yield
    # custom logic
  end
end
Your custom handler is free to define any custom logic, but you must yield during the body of the call method. This is what triggers the execution
context and will allow your custom handler to measure the length of execution. If you do not yield, the relevant ActionCoordinator, ActionUseCase
or ActionTask will not be executed and will result in no execution to benchmark.
Additionally, you must register your custom handler with ActionLogic using ActionLogic.configure:
ActionLogic.configure do |config|
  config.benchmark = true
  config.benchmark_log = File.open("benchmark.log", "w")
  config.benchmark_handler = CustomHandler.new
end
Installation
Add ActionLogic to your project’s Gemfile:
gem 'action_logic'
Don’t forget to bundle:
$ bundle
Contributing
Interested in contributing to ActionLogic? If so that is awesome! ❤️
Please see the contributing doc for details.