:wrench: :package: Tools to use Artifactory as a Debian (APT) repository, and dput DEB packages into it, or upload them to Bintray.
 Debian Repositories in Artifactory
artifactory-debian offers tools to use Artifactory as a Debian (APT) repository,
and conveniently upload DEB packages to Artifactory or Bintray. Also see the wiki.
| dput-webdav | Open HUB |
|---|---|
  |
Table of Contents
- Motivation and Overview
- Repository Setup
- Installing Packages from Artifactory Repositories
- Package Uploading
- Acknowledgements
Motivation and Overview
Principles of Continuous Delivery mandate that you propagate a binary artifact,
once it’s built, unchanged through the different quality gates and deployment stages of
your delivery pipeline. The need for keeping them in ideally a single place becomes obvious
pretty fast, together with similar build artifacts like Java JARs.
Artifactory is a repository server for binaries that can provide such a place, and offers the
additional advantage of attribute management on top of storing the contained files.
With that you can for example add cryptographic signatures of passed quality gates and the like,
when a candidate release progresses through the pipeline.
| 📣 | Starting with version 3.3, Artifactory can handle Debian repositories natively (see RTFACT-4613). This project enabled you to manage your Debian packages within Artifactory before that, and still provides the dput plugin for easy uploading to a repository using the standard Debian tool chain. |
|---|
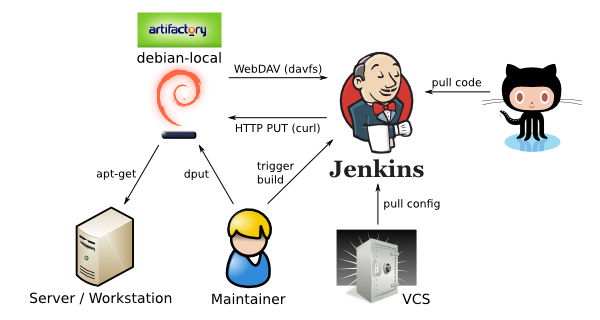
The following diagram shows a typical setup and how the components interact.
When a package maintainer uploads to Artifactory using dput,
a post_upload_command remotely triggers a Jenkins job that pulls
the repository configuration (from a local SCM) and the indexing code (from GitHub).
That job then scans the available repositories using a read-only davfs2 mount,
creates new index files, and finally uploads those back into Artifactory.
Users can then download the index files via apt-get update and install available packages as usual,
without realizing they’re accessing an Artifactory server, except for the specific apt source definition syntax
(for details see Installing Packages from Artifactory Repositories).
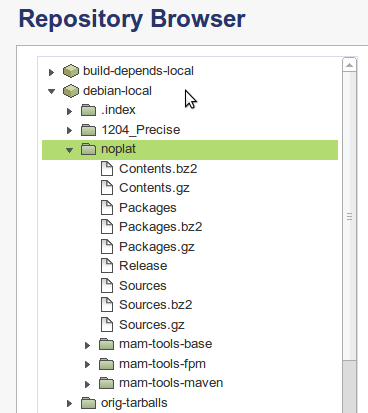
In the Artifactory web interface, the final result after following the setup instructions below will look like this…
Repository Setup
Detailed information about the initial repository setup can be found at
Configuration of Artifactory and Repository Indexing.
What follows is a shorter, no-nonsense version.
Artifactory Configuration
To create your Debian repositories in Artifactory, follow these steps:
- Login with an administrator account.
- Add a Repository Layout named
debian-defaultwith this Artifact Path Pattern:
[orgPath]/[module]/[baseRev]/[module]-[baseRev](-[patchLevel<[.~0-9a-zA-Z]+>])(_[archTag<\w+>]).[ext]
- Set the layout’s Folder/File Integration Revision RegExp fields to
.*, and save it. - Create a new Artifactory repository named
debian-localusing the new layout.
Now you can instantly start to upload packages into debian-local.
Indexing Host Configuration
In order for apt-get to find packages, index data needs to be generated (what apt-get update downloads).
This is what the script deb-index.sh does; the script and a configuration example can be found in the
indexing directory.
You can use any host that has network access to your Artifactory server for indexing, and
run the index task via either a crontab entry, or as a job on a continuous integration server.
This describes a Jenkins setup, for using cron just adapt the Jenkins configuration steps accordingly.
On your workstation
- Describe your repositories in the
apt-ftparchive.confandrepo-«reponame».confconfiguration files;
see the provided examples andman apt-ftparchivefor details. Commit them to your local version control.
On a Jenkins slave
- Open a shell session on the indexing host, and copy or clone this git repository.
- Call the script with the
setupargument like this:
sudo ./deb-index.sh setup "http://repo.example.com/artifactory/"
- When your configured editor pops up with
/etc/davfs2/secrets, fill in Artifactory credentials for read-only access.
In the Jenkins web interface
- Install the
EnvInjectJenkins plugin, if you don’t already have it. - Create a Jenkins job bound to the slave where you called
deb-index.sh setup:- Set the workspace checkout location to the configuration files you just committed.
- Add the
ARTIFACTORY_CREDENTIALSenvironment variable with an account (user:pwd) having uploading permission, at the Inject passwords to the build as environment variables setting of Build Environment. - Add a Shell Build Step like follows:
export ARTIFACTORY_URL="http://repo.example.com/artifactory/"

test -d artifactory-debian \
    && ( cd artifactory-debian && git pull --ff-only ) \
    || git clone "https://github.com/jhermann/artifactory-debian.git"

artifactory-debian/indexing/deb-index.sh refresh
- Start the job via Build Now.
- Check in the Jenkins log and Artifactory web interface that the index files were generated and uploaded (cf. above screenshot).
And you’re now ready to use your shiny new toy…
Installing Packages from Artifactory Repositories
The resulting repositories can be added to a machine like this:
echo "deb http://repo.example.com/artifactory/debian-local noplat/" \
    >/etc/apt/sources.list.d/artifactory-noplat.list
apt-get update
Then to give it a spin, try to list some packages only found in your new repository, using apt-cache search.
Or simply install a package via apt-get.
Package Uploading
‘webdav’ Upload Method for ‘dput’
dput conveniently provides a plugin directory for uploading methods,
so we just use that to add Artifactory support.
The http plugin of dput could be used to PUT packages into Artifactory,
but is thoroughly broken (at least the one I get on Ubuntu 12.04).
Besides that, it lacks some features I consider essential, so I decided to write a new webdav plugin
specifically with Artifactory in mind. It tries to be compatible to the http plugin,
and offers the following new features:
logincredentials can include the password.incomingcan be a full URL, also containing dynamic (package) metadata.- HTTPS support is provided by simply using a
https://…URL. - Some extended features like mapping distributions to repository names.
Support for dput-ng might be a good idea, when that one gets more traction
(didn’t even know about it before I searched for existing dput plugins).
Installing the ‘webdav’ Plugin
Package Installation
To install a release version via adding Bintray as a package source, run these commands as root:
echo "deb http://dl.bintray.com/jhermann/deb /" \
    >/etc/apt/sources.list.d/bintray-jhermann.list
apt-get update
apt-get install -o "APT::Get::AllowUnauthenticated=yes" dput-webdav
If you need to build from source, change into the dput-webdav directory
of this project, and call dpkg-buildpackage -uc -us.
The package files will be created in the project root, use dpkg -i … to install.
Manual Installation
If for some reason you can’t use a packaged installation,
or have a version of dput other than 0.9.6 installed,
copy the plugin from GitHub using this command:
sudo bash -c "umask 0133; curl -skSL -o /usr/share/dput/webdav.py \
    https://raw.github.com/jhermann/artifactory-debian/master/dput-webdav/webdav.py"
Other Installation Options
For an in-depth discussion of options, see the
Detailed Install Instructions
wiki page.
‘webdav’ Plugin Configuration
Your ~/.dput.cf needs a section describing your Artifactory service,
and the upload credentials are placed in an extra file, for easier permission management.
So all you need is to create two files:
- Edit
~/.dput.cfto include the following snippet (with the appropriatefqdn):
[DEFAULT]
default_host_main = artifactory-debian
progress_indicator = 2

[artifactory-debian]
method = webdav
fqdn = repo.example.com:80
login = file:~/.artifactory.credentials
incoming = http://{fqdn}/artifactory/debian-local/{repo}/{source}/{upstream}/#mindepth=3&overwrite=0
allow_unsigned_uploads = 1
#run_lintian = 1
#check_version = 1
# repo_mappings = unstable=snapshots *-experimental=snapshots *=incoming

# trigger Jenkins reindex job after successful upload
#post_upload_command = curl -k "<JENKINS_URL>/job/artifactory-debian-reindex/build?token=DOIT&cause=dput+upload"
-
Call
⍽ echo -n "«username»:«password»" >~/.artifactory.credentials; chmod 600 ~/.artifactory.credentialswith your credentials filled in (put a space in front to exclude the command from shell history).It’s recommended to use your “Encrypted Password” instead of the cleartext password. That password starts with
APand is revealed after you unlock the “User Profile” page in the web UI.Of course, you can also use the
~/.netrcfile, instead of a specific~/.artifactory.credentialsone, as outlined in the next section.
The above ~/.dput.cf works with the indexing solution contained in this project.
If by now you use the built-in Debian repository type of Artifactory,
remove or comment the post_upload_command (it’s not longer needed, indexing is automatic),
and change the incoming value as follows:
incoming = http://{fqdn}/artifactory/debian-local/pool/{source}/{upstream};deb.architecture={deb_architecture};deb.component=local;deb.distribution={repo}#mindepth=3&overwrite=0
Replace the debian-local path component if you named your repository differently.
To fully understand the dput WebDAV plugin configuration and be able to customize it,
read WebDAV Plugin Configuration.
Also refer to man dput.cf for the common configuration options shared by all upload methods.
Uploading to Bintray
To use the webdav plugin for uploads to Bintray,
add this configuration to your workstation’s user account:
- Extend your
~/.dput.cfwith this snippet:
[bintray]
method = webdav
fqdn = api.bintray.com
login = netrc:
incoming = https://{fqdn}/content/{loginuser}/deb/{source}/{upstream}/#mindepth=0&overwrite=1
allow_unsigned_uploads = 1
- Put your login name and API key into
~/.netrc(and don’t forget tochmod 600that file); the API key you’ll find in your profile when you click onAPI Keyin the sidebar menu:
machine api.bintray.com
    login YOURUSERNAME
    password 00...YOURAPIKEY...ff
As an example, the following is the log of the first release, where dput-webdav uploaded itself:
$ dput bintray dput-webdav*changes
Uploading to bintray (via webdav to api.bintray.com):
  Uploading dput-webdav_1.0.dsc:  done.
  Uploading dput-webdav_1.0.tar.gz: / done.
  Uploading dput-webdav_1.0_all.deb: / done.
  Uploading dput-webdav_1.0_amd64.changes: / done.
Successfully uploaded packages.
Acknowledgements
Thanks to…