基于Worker的在线剪贴板和文件分享服务,支持 Markdown、阅后即焚、文本/大文件分享、密码保护等功能,支持多种部署方式,可作为WebDav挂载
CloudPaste - Online Clipboard 📋
中文 | English | Español | français | 日本語

Cloudflare-based online clipboard and file sharing service with Markdown editing and file upload support


📸 Showcase • ✨ Features • 🚀 Deployment Guide • 🔧 Tech Stack • 💻 Development • 📄 License
📸 Showcase
 |
 |
 |
 |
 |
 |
 |
 |
✨ Features
📝 Markdown Editing and Sharing
- Powerful Editor: Integrated with Vditor, supporting GitHub-flavored Markdown, math formulas, flowcharts, mind maps, and more
- Secure Sharing: Content can be protected with access passwords
- Flexible Expiration: Support for setting content expiration times
- Access Control: Ability to limit maximum view count
- Customization: Personalized share links and notes
- Support for Raw text direct links: Similar to GitHub’s Raw direct links, used for services launched via YAML configuration files
- Multi-format export: Supports export to PDF, Markdown, HTML, PNG images, and Word documents
- Easy Sharing: One-click link copying and QR code generation
- Auto-save: Support for automatic draft saving
📤 File Upload and Management
- Multiple Storage Support: Compatible with various S3 storage services (Cloudflare R2, Backblaze B2, AWS S3, etc.)
- Storage Configuration: Visual interface for configuring multiple storage spaces, flexible switching of default storage sources
- Efficient Upload: Direct upload to S3 storage via presigned URLs
- Real-time Feedback: Real-time upload progress display
- Custom Limits: Single upload limits and maximum capacity restrictions
- Metadata Management: File notes, passwords, expiration times, access restrictions
- Data Analysis: File access statistics and trend analysis
- Direct Server Transfer: Supports calling APIs for file upload, download, and other operations.
🛠 Convenient File/Text Operations
- Unified Management: Support for file/text creation, deletion, and property modification
- Online Preview: Online preview and direct link generation for common documents, images, and media files
- Sharing Tools: Generation of short links and QR codes for cross-platform sharing
- Batch Management: Batch operations and display for files/text
🔄 WebDAV and Mount Point Management
- WebDAV Protocol Support: Access and manage the file system via standard WebDAV protocol
- Network Drive Mounting: Support for mounting by some third-party clients
- Flexible Mount Points: Support for creating multiple mount points connected to different storage services
- Permission Control: Fine-grained mount point access permission management
- API Key Integration: WebDAV access authorization through API keys
- Large File Support: Automatic use of multipart upload mechanism for large files
- Directory Operations: Full support for directory creation, upload, deletion, renaming, and other operations
🔐 Lightweight Permission Management
Administrator Permission Control
- System Management: Global system settings configuration
- Content Moderation: Management of all user content
- Storage Management: Addition, editing, and deletion of S3 storage services
- Permission Assignment: Creation and permission management of API keys
- Data Analysis: Complete access to statistical data
API Key Permission Control
- Text Permissions: Create/edit/delete text content
- File Permissions: Upload/manage/delete files
- Storage Permissions: Ability to select specific storage configurations
- Read/Write Separation: Can set read-only or read-write permissions
- Time Control: Custom validity period (from hours to months)
- Security Mechanism: Automatic expiration and manual revocation functions
💫 System Features
- High Adaptability: Responsive design, adapting to mobile devices and desktops
- Multilingual: Chinese/English bilingual interface support
- Visual Modes: Bright/dark theme switching
- Secure Authentication: JWT-based administrator authentication system
- Offline Experience: PWA support, allowing offline use and desktop installation
🚀 Deployment Guide
Prerequisites
Before starting deployment, please ensure you have prepared the following:
- [ ] Cloudflare account (required)
- [ ] If using R2: Activate Cloudflare R2 service and create a bucket (requires payment method)
- [ ] If using Vercel: Register for a Vercel account
- [ ] Configuration information for other S3 storage services:
S3_ACCESS_KEY_IDS3_SECRET_ACCESS_KEYS3_BUCKET_NAMES3_ENDPOINT
👉 View Complete Deployment Guide
📑 Table of Contents
Action Automated Deployment
Using GitHub Actions enables automatic deployment of the application after code is pushed.
Configure GitHub Repository
- Fork or clone the repository https://github.com/ling-drag0n/CloudPaste
- Go to your GitHub repository settings
- Navigate to Settings → Secrets and variables → Actions → New Repository secrets
- Add the following Secrets:
| Secret Name | Required | Purpose |
|---|---|---|
CLOUDFLARE_API_TOKEN |
✅ | Cloudflare API token (requires Workers, D1, and Pages permissions) |
CLOUDFLARE_ACCOUNT_ID |
✅ | Cloudflare account ID |
ENCRYPTION_SECRET |
❌ | Key for encrypting sensitive data (if not provided, one will be automatically generated) |
Obtain Cloudflare API Token
-
Visit Cloudflare Dashboard
-
Create a new API token
-
Select the “Edit Cloudflare Workers” template, and add D1 database edit permission

Backend Automated Deployment
Fork the repository, fill in the secrets, and then run the workflow!!!
Deployment is automatically triggered whenever files in the backend directory are changed and pushed to the main or master branch. The workflow proceeds as follows:
- Automatically create D1 database (if it doesn’t exist)
- Initialize database with schema.sql (create tables and initial data)
- Set ENCRYPTION_SECRET environment variable (obtained from GitHub Secrets or automatically generated)
- Automatically deploy Worker to Cloudflare
- It is recommended to set up a custom domain to replace the original Cloudflare domain (otherwise it may not be accessible in certain regions)
⚠️ Remember your backend domain name
Frontend Automated Deployment
Cloudflare Pages (Recommended)
Fork the repository, fill in the secrets, and then run the workflow.
Deployment is automatically triggered whenever files in the frontend directory are changed and pushed to the main or master branch. After deployment, you need to set environment variables in the Cloudflare Pages control panel:
-
Log in to Cloudflare Dashboard
-
Navigate to Pages → Your project (e.g., “cloudpaste-frontend”)
-
Click “Settings” → “Environment variables”
-
Add environment variable:
-
Name:
VITE_BACKEND_URL -
Value: Your backend Worker URL (e.g.,
https://cloudpaste-backend.your-username.workers.dev) without trailing “/”. It is recommended to use a custom worker backend domain. -
Make sure to enter the complete backend domain name in “https://xxxx.com” format
-
-
Important step: Then run the frontend workflow again to complete loading the backend domain!!!

Please follow the steps strictly, otherwise the backend domain loading will fail
Vercel
For Vercel, it’s recommended to deploy as follows:
- Import your GitHub project after forking
- Configure deployment parameters:
Framework Preset: Vite
Build Command: npm run build
Output Directory: dist
Install Command: npm install
- Configure the environment variables below: Enter: VITE_BACKEND_URL and your backend domain
- Click the “Deploy” button to deploy
☝️ Choose one of the above methods
Manual Deployment
Backend Manual Deployment
- Clone the repository
git clone https://github.com/ling-drag0n/CloudPaste.git
cd CloudPaste/backend
-
Install dependencies
npm install -
Log in to Cloudflare
npx wrangler login -
Create D1 database
npx wrangler d1 create cloudpaste-dbNote the database ID from the output.
-
Modify wrangler.toml configuration
[[d1_databases]] binding = "DB" database_name = "cloudpaste-db" database_id = "YOUR_DATABASE_ID" -
Deploy Worker
npx wrangler deployNote the URL from the output; this is your backend API address.
-
Initialize database (automatic)
Visit your Worker URL to trigger initialization:https://cloudpaste-backend.your-username.workers.dev
⚠️ Security reminder: Please change the default administrator password immediately after system initialization (Username: admin, Password: admin123).
Frontend Manual Deployment
Cloudflare Pages
-
Prepare frontend code
cd CloudPaste/frontend npm install -
Configure environment variables
Create or modify the.env.productionfile:VITE_BACKEND_URL=https://cloudpaste-backend.your-username.workers.dev VITE_APP_ENV=production VITE_ENABLE_DEVTOOLS=false -
Build frontend project
npm run build -
Deploy to Cloudflare Pages
Method 1: Via Wrangler CLI
npx wrangler pages deploy dist --project-name=cloudpaste-frontendMethod 2: Via Cloudflare Dashboard
- Log in to Cloudflare Dashboard
- Select “Pages”
- Click “Create a project” → “Direct Upload”
- Upload files from the
distdirectory - Set project name (e.g., “cloudpaste-frontend”)
- Click “Save and Deploy”
Vercel
-
Prepare frontend code
cd CloudPaste/frontend npm install -
Install and log in to Vercel CLI
npm install -g vercel vercel login -
Configure environment variables, same as for Cloudflare Pages
-
Build and deploy
vercel --prodFollow the prompts to configure the project.
ClawCloud CloudPaste Deployment Tutorial
10GB free traffic per month, suitable for light usage only
Step 1:
Registration link: Claw Cloud (no #AFF)
No credit card required, as long as your GitHub registration date is more than 180 days, you get $5 credit every month.
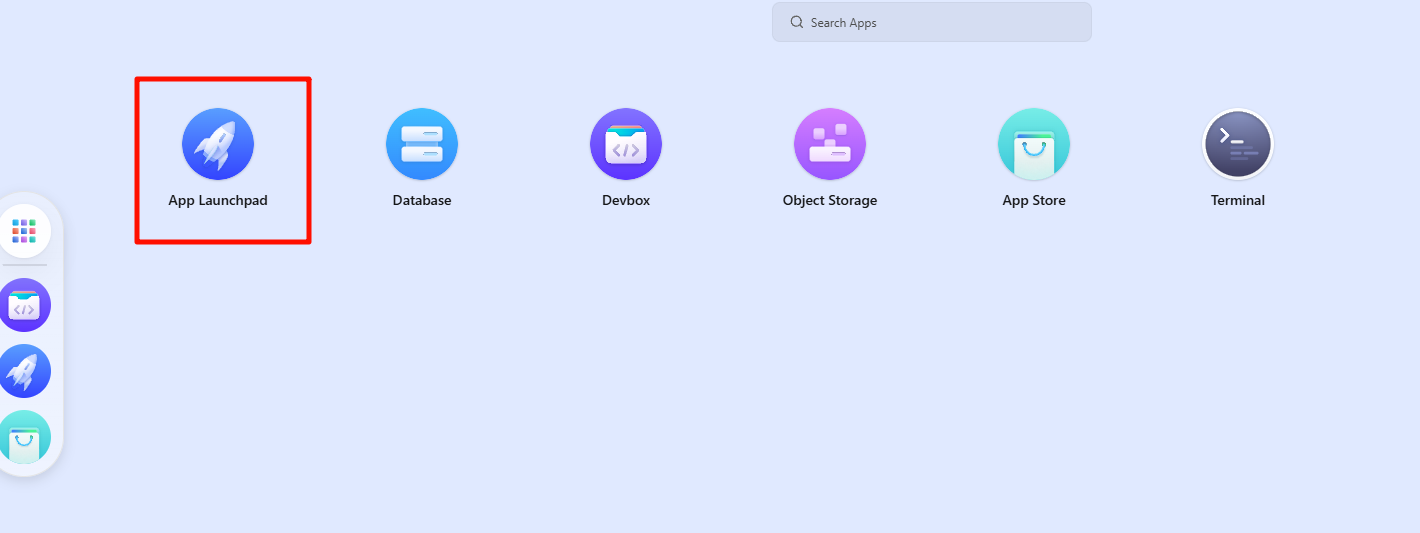
Step 2:
After registration, click APP Launchpad on the homepage, then click create app in the upper right corner
Step 3:
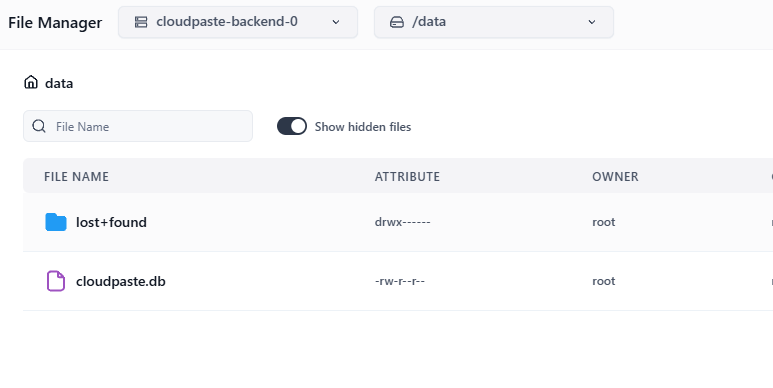
First deploy the backend, as shown in the figure (for reference only):

Backend data storage is here:
Step 4:
Then the frontend, as shown in the figure (for reference only):
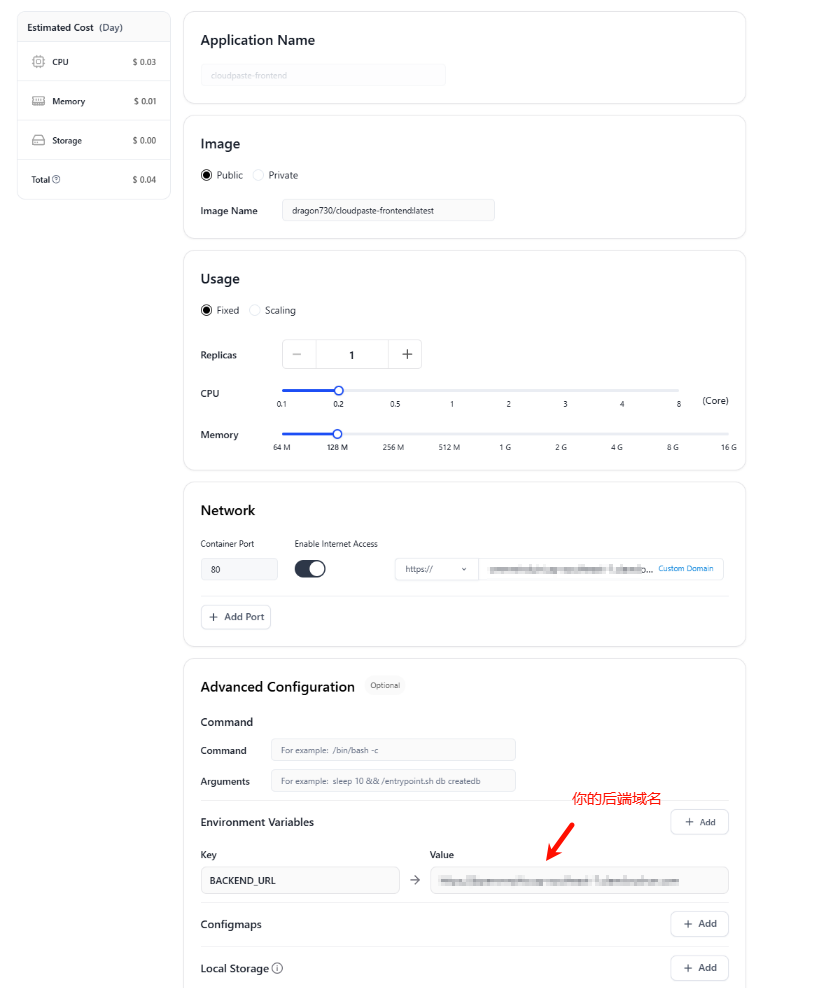
Deployment is complete and ready to use, custom domain names can be configured as needed
👉 Docker Deployment Guide
📑 Table of Contents
Docker Command Line Deployment
Backend Docker Deployment
CloudPaste backend can be quickly deployed using the official Docker image.
-
Create data storage directory
mkdir -p sql_data -
Run the backend container
docker run -d --name cloudpaste-backend \
  -p 8787:8787 \
  -v $(pwd)/sql_data:/data \
  -e ENCRYPTION_SECRET=your-encryption-key \
  -e NODE_ENV=production \
  -e RUNTIME_ENV=docker \
  dragon730/cloudpaste-backend:latest
Note the deployment URL (e.g.,
http://your-server-ip:8787), which will be needed for the frontend deployment.
⚠️ Security tip: Be sure to customize ENCRYPTION_SECRET and keep it safe, as this key is used to encrypt sensitive data.
Frontend Docker Deployment
The frontend uses Nginx to serve and configures the backend API address at startup.
docker run -d --name cloudpaste-frontend \
  -p 80:80 \
  -e BACKEND_URL=http://your-server-ip:8787 \
  dragon730/cloudpaste-frontend:latest
⚠️ Note: BACKEND_URL must include the complete URL (including protocol http:// or https://)
⚠️ Security reminder: Please change the default administrator password immediately after system initialization (Username: admin, Password: admin123).
Docker Image Update
When a new version of the project is released, you can update your Docker deployment following these steps:
-
Pull the latest images
docker pull dragon730/cloudpaste-backend:latest docker pull dragon730/cloudpaste-frontend:latest -
Stop and remove old containers
docker stop cloudpaste-backend cloudpaste-frontend docker rm cloudpaste-backend cloudpaste-frontend -
Start new containers using the same run commands as above (preserving data directory and configuration)
Docker Compose One-Click Deployment
Using Docker Compose allows you to deploy both frontend and backend services with one click, which is the simplest recommended method.
- Create a
docker-compose.ymlfile
version: "3.8"

services:
  frontend:
    image: dragon730/cloudpaste-frontend:latest
    environment:
      - BACKEND_URL=https://xxx.com # Fill in the backend service address
    ports:
      - "8080:80" #"127.0.0.1:8080:80"
    depends_on:
      - backend # Depends on backend service
    networks:
      - cloudpaste-network
    restart: unless-stopped

  backend:
    image: dragon730/cloudpaste-backend:latest
    environment:
      - NODE_ENV=production
      - RUNTIME_ENV=docker
      - PORT=8787
      - ENCRYPTION_SECRET=custom-key # Please modify this to your own security key
    volumes:
      - ./sql_data:/data # Data persistence
    ports:
      - "8787:8787" #"127.0.0.1:8787:8787"
    networks:
      - cloudpaste-network
    restart: unless-stopped

networks:
  cloudpaste-network:
    driver: bridge
- Start the services
docker-compose up -d
⚠️ Security reminder: Please change the default administrator password immediately after system initialization (Username: admin, Password: admin123).
- Access the services
Frontend: http://your-server-ip:80
Backend: http://your-server-ip:8787
Docker Compose Update
When you need to update to a new version:
-
Pull the latest images
docker-compose pull -
Recreate containers using new images (preserving data volumes)
docker-compose up -d --force-recreate
💡 Tip: If there are configuration changes, you may need to backup data and modify the docker-compose.yml file
Nginx Reverse Proxy Example
server {
    listen 443 ssl;
    server_name paste.yourdomain.com;  # Replace with your domain name

    # SSL certificate configuration
    ssl_certificate     /path/to/cert.pem;  # Replace with certificate path
    ssl_certificate_key /path/to/key.pem;   # Replace with key path

    # Frontend proxy configuration
    location / {
        proxy_pass http://localhost:80;  # Docker frontend service address
        proxy_set_header Host $host;
        proxy_set_header X-Real-IP $remote_addr;
    }

    # Backend API proxy configuration
    location /api {
        proxy_pass http://localhost:8787;  # Docker backend service address
        proxy_set_header Host $host;
        proxy_set_header X-Real-IP $remote_addr;
        client_max_body_size 0;

        # WebSocket support (if needed)
        proxy_http_version 1.1;
        proxy_set_header Upgrade $http_upgrade;
        proxy_set_header Connection "upgrade";
    }

    # WebDAV Configuration
    location /dav {
        proxy_pass http://localhost:8787/dav;  # Points to your backend service

        # WebDAV necessary headers
        proxy_set_header Host $host;
        proxy_set_header X-Real-IP $remote_addr;
        proxy_set_header X-Forwarded-For $proxy_add_x_forwarded_for;

        # WebDAV method support
        proxy_pass_request_headers on;

        # Support all WebDAV methods
        proxy_method $request_method;

        # Necessary header processing
        proxy_set_header Destination $http_destination;
        proxy_set_header Overwrite $http_overwrite;

        # Handle large files
        client_max_body_size 0;

        # Timeout settings
        proxy_connect_timeout 3600s;
        proxy_send_timeout 3600s;
        proxy_read_timeout 3600s;
    }
}
⚠️ Security tip: It is recommended to configure HTTPS and a reverse proxy (such as Nginx) to enhance security.
👉 S3 Cross-Origin Configuration Guide
R2 API Retrieval and Cross-Origin Configuration
-
Log in to Cloudflare Dashboard
-
Click R2 Storage and create a bucket.
-
Create API token


-
Save all data after creation; you’ll need it later
-
Configure cross-origin rules: click the corresponding bucket, click Settings, edit CORS policy as shown below:
[
  {
    "AllowedOrigins": ["http://localhost:3000", "https://replace-with-your-frontend-domain"],
    "AllowedMethods": ["GET", "PUT", "POST", "DELETE", "HEAD"],
    "AllowedHeaders": ["*"],
    "ExposeHeaders": ["ETag"],
    "MaxAgeSeconds": 3600
  }
]
B2 API Retrieval and Cross-Origin Configuration
-
If you don’t have a B2 account, register one first, then create a bucket.

-
Click Application Key in the sidebar, click Create Key, and follow the illustration.

-
Configure B2 cross-origin; B2 cross-origin configuration is more complex, take note

-
You can try options 1 or 2 first, go to the upload page and see if you can upload. If F12 console shows cross-origin errors, use option 3. For a permanent solution, use option 3 directly.

Regarding option 3 configuration, since the panel cannot configure it, you need to configure manually by downloading B2 CLI tool. For more details, refer to: “https://docs.cloudreve.org/zh/usage/storage/b2”.
After downloading, in the corresponding download directory CMD, enter the following commands:
b2-windows.exe account authorize   //Log in to your account, following prompts to enter your keyID and applicationKey
b2-windows.exe bucket get <bucketName> //You can execute to get bucket information, replace <bucketName> with your bucket name
Windows configuration, Use “.\b2-windows.exe xxx”,
Python CLI would be similar:
b2-windows.exe bucket update <bucketName> allPrivate --cors-rules "[{\"corsRuleName\":\"CloudPaste\",\"allowedOrigins\":[\"*\"],\"allowedHeaders\":[\"*\"],\"allowedOperations\":[\"b2_upload_file\",\"b2_download_file_by_name\",\"b2_download_file_by_id\",\"s3_head\",\"s3_get\",\"s3_put\",\"s3_post\",\"s3_delete\"],\"exposeHeaders\":[\"Etag\",\"content-length\",\"content-type\",\"x-bz-content-sha1\"],\"maxAgeSeconds\":3600}]"
Replace
- Cross-origin configuration complete
MinIO API Access and Cross-Origin Configuration
-
Deploy MinIO Server
Use the following Docker Compose configuration (reference) to quickly deploy MinIO:
version: "3"

services:
  minio:
    image: minio/minio:RELEASE.2025-02-18T16-25-55Z
    container_name: minio-server
    command: server /data --console-address :9001 --address :9000
    environment:
      - MINIO_ROOT_USER=minioadmin # Admin username
      - MINIO_ROOT_PASSWORD=minioadmin # Admin password
      - MINIO_BROWSER=on
      - MINIO_SERVER_URL=https://minio.example.com # S3 API access URL
      - MINIO_BROWSER_REDIRECT_URL=https://console.example.com # Console access URL
    ports:
      - "9000:9000" # S3 API port
      - "9001:9001" # Console port
    volumes:
      - ./data:/data
      - ./certs:/root/.minio/certs # SSL certificates (if needed)
    restart: always
Run
docker-compose up -dto start the service. -
Configure Reverse Proxy (Reference)
To ensure MinIO functions correctly, especially file previews, configure reverse proxy properly. Recommended OpenResty/Nginx settings:
MinIO S3 API Reverse Proxy (minio.example.com):
location / {
    proxy_pass http://127.0.0.1:9000;
    proxy_set_header Host $host;
    proxy_set_header X-Real-IP $remote_addr;
    proxy_set_header X-Forwarded-For $proxy_add_x_forwarded_for;
    proxy_set_header X-Forwarded-Proto $scheme;

    # HTTP optimization
    proxy_http_version 1.1;
    proxy_set_header Connection "";  # Enable HTTP/1.1 keepalive

    # Critical: Resolve 403 errors & preview issues
    proxy_cache off;
    proxy_buffering off;
    proxy_request_buffering off;

    # No file size limit
    client_max_body_size 0;
}
MinIO Console Reverse Proxy (console.example.com):
location / { proxy_pass http://127.0.0.1:9001; proxy_set_header Host $host; proxy_set_header X-Real-IP $remote_addr; proxy_set_header X-Forwarded-For $proxy_add_x_forwarded_for; proxy_set_header X-Forwarded-Proto $scheme; # WebSocket support proxy_http_version 1.1; proxy_set_header Upgrade $http_upgrade; proxy_set_header Connection "upgrade"; # Critical settings proxy_cache off; proxy_buffering off; # No file size limit client_max_body_size 0; } -
Access Console to Create Buckets & Access Keys
For detailed configuration, refer to official docs:
https://min.io/docs/minio/container/index.html
CN: https://min-io.cn/docs/minio/container/index.html
-
Additional Configuration (Optional)
Allowed origins must include your frontend domain.

-
Configure MinIO in CloudPaste
- Log in to CloudPaste admin panel
- Go to “S3 Storage Settings” → “Add Storage Configuration”
- Select “Other S3-compatible service” as provider
- Enter details:
- Name: Custom name
- Endpoint URL: MinIO service URL (e.g.,
https://minio.example.com) - Bucket Name: Pre-created bucket
- Access Key ID: Your Access Key
- Secret Key: Your Secret Key
- Region: Leave empty
- Path-Style Access: MUST ENABLE!
- Click “Test Connection” to verify
- Save settings
-
Troubleshooting
- Note: If using Cloudflare’s CDN, you may need to add
proxy_set_header Accept-Encoding "identity", and there are caching issues to consider. It is recommended to use only DNS resolution. - 403 Error: Ensure reverse proxy includes
proxy_cache off&proxy_buffering off - Preview Issues: Verify
MINIO_SERVER_URL&MINIO_BROWSER_REDIRECT_URLare correctly set - Upload Failures: Check CORS settings; allowed origins must include frontend domain
- Console Unreachable: Verify WebSocket config, especially
Connection "upgrade"
- Note: If using Cloudflare’s CDN, you may need to add
More S3-related configurations to come…
👉 WebDAV Configuration Guide
WebDAV Configuration and Usage Guide
CloudPaste provides simple WebDAV protocol support, allowing you to mount storage spaces as network drives for convenient access and management of files directly through file managers.
WebDAV Service Basic Information
- WebDAV Base URL:
https://your-backend-domain/dav - Supported Authentication Methods:
- Basic Authentication (username+password)
- Supported Permission Types:
- Administrator accounts - Full operation permissions
- API keys - Requires enabled mount permission (mount_permission)
Permission Configuration
1. Administrator Account Access
Use administrator account and password to directly access the WebDAV service:
- Username: Administrator username
- Password: Administrator password
2. API Key Access (Recommended)
For a more secure access method, it is recommended to create a dedicated API key:
- Log in to the management interface
- Navigate to “API Key Management”
- Create a new API key, ensure “Mount Permission” is enabled
- Usage method:
- Username: API key value
- Password: The same API key value as the username
NGINX Reverse Proxy Configuration
If using NGINX as a reverse proxy, specific WebDAV configuration needs to be added to ensure all WebDAV methods work properly:
# WebDAV Configuration
location /dav {
    proxy_pass http://localhost:8787;  # Points to your backend service

    # WebDAV necessary headers
    proxy_set_header Host $host;
    proxy_set_header X-Real-IP $remote_addr;
    proxy_set_header X-Forwarded-For $proxy_add_x_forwarded_for;

    # WebDAV method support
    proxy_pass_request_headers on;

    # Support all WebDAV methods
    proxy_method $request_method;

    # Necessary header processing
    proxy_set_header Destination $http_destination;
    proxy_set_header Overwrite $http_overwrite;

    # Handle large files
    client_max_body_size 0;

    # Timeout settings
    proxy_connect_timeout 3600s;
    proxy_send_timeout 3600s;
    proxy_read_timeout 3600s;
}
Common Issues and Solutions
-
Connection Problems:
- Confirm the WebDAV URL format is correct
- Verify that authentication credentials are valid
- Check if the API key has mount permission
-
Permission Errors:
- Confirm the account has the required permissions
- Administrator accounts should have full permissions
- API keys need to have mount permission specifically enabled
-
⚠️⚠️ WebDAV Upload Issues:
- In presigned upload mode, attention needs to be paid to the cross-origin configuration of the corresponding S3 storage
- In WebDAV’s automatic recommendation mode, files smaller than 10MB use direct upload mode, files between 10-50MB use multipart upload mode, and files larger than 50MB use presigned upload mode
- Regarding Cloudflare Worker upload limitations, it is recommended to use presigned or direct upload mode, and avoid using multipart uploads
- For Docker deployments, just pay attention to the nginx proxy configuration, any upload mode is acceptable
- Windows, Raidrive and other clients do not yet support drag-and-drop uploads, everything else works
🔧 Tech Stack
Frontend
- Framework: Vue.js 3 + Vite
- Styling: TailwindCSS
- Editor: Vditor
- Internationalization: Vue-i18n
- Charts: Chart.js + Vue-chartjs
Backend
- Runtime: Cloudflare Workers
- Framework: Hono
- Database: Cloudflare D1 (SQLite)
- Storage: Multiple S3-compatible services (supports R2, B2, AWS S3)
- Authentication: JWT tokens + API keys
💻 Development
API Documentation
Server Direct File Upload API Documentation - Detailed description of the server direct file upload interface
Local Development Setup
-
Clone project repository
git clone https://github.com/ling-drag0n/cloudpaste.git cd cloudpaste -
Backend setup
cd backend npm install # Initialize D1 database wrangler d1 create cloudpaste-db wrangler d1 execute cloudpaste-db --file=./schema.sql -
Frontend setup
cd frontend npm install -
Configure environment variables
- In the
backenddirectory, create awrangler.tomlfile to set development environment variables - In the
frontenddirectory, configure the.env.developmentfile to set frontend environment variables
- In the
-
Start development servers
# Backend
cd backend
npm run dev

# Frontend (in another terminal)
cd frontend
npm run dev
Project Structure
CloudPaste/
├── frontend/                # Frontend Vue.js application
│   ├── src/                 # Source code
│   │   ├── components/      # Vue components
│   │   ├── api/             # API clients and services
│   │   ├── i18n/            # Internationalization resource files
│   │   ├── utils/           # Utility functions
│   │   └── assets/          # Static assets
│   └── ...
└── backend/                 # Cloudflare Workers backend
    ├── worker.js            # Main Worker file
    ├── schema.sql           # D1 database schema
    └── ...
Custom Docker Build
If you want to customize Docker images or debug during development, you can follow these steps to build manually:
-
Build backend image
# Execute in the project root directory docker build -t cloudpaste-backend:custom -f docker/backend/Dockerfile . # Run the custom built image docker run -d --name cloudpaste-backend \ -p 8787:8787 \ -v $(pwd)/sql_data:/data \ -e ENCRYPTION_SECRET=development-test-key \ cloudpaste-backend:custom -
Build frontend image
# Execute in the project root directory docker build -t cloudpaste-frontend:custom -f docker/frontend/Dockerfile . # Run the custom built image docker run -d --name cloudpaste-frontend \ -p 80:80 \ -e BACKEND_URL=http://localhost:8787 \ cloudpaste-frontend:custom -
Development environment Docker Compose
Create a
docker-compose.dev.ymlfile:version: "3.8" services: frontend: build: context: . dockerfile: docker/frontend/Dockerfile environment: - BACKEND_URL=http://backend:8787 ports: - "80:80" depends_on: - backend backend: build: context: . dockerfile: docker/backend/Dockerfile environment: - NODE_ENV=development - RUNTIME_ENV=docker - PORT=8787 - ENCRYPTION_SECRET=dev_secret_key volumes: - ./sql_data:/data ports: - "8787:8787"Start the development environment:
docker-compose -f docker-compose.yml up --build
📄 License
Apache License 2.0
This project is licensed under the Apache License 2.0 - see the LICENSE file for details.
❤️ Contribution
-
Sponsorship: Maintaining a project is not easy. If you like this project, consider giving the author a little encouragement. Every bit of your support is my motivation to keep going~

-
Sponsors: A huge thank you to the following sponsors for their support of this project!
-
Contributors: Thank you to the following contributors for their selfless contributions to this project!
Star History
If you think the project is good I hope you can give a free star✨✨, Thank you very much!