:earth_africa: Compass helps you setup a central navigation system for your application
⚠️ DEPRECATED, NO LONGER MAINTAINED
![]()

![]()


![]()
Compass helps you setup a central navigation system for your application.
This has many benefits, one of them being that controllers can now be
decoupled, meaning that the list that presents the detail no longer knows
about what its presenting. Controllers become agnostic and views stay
stupid. The user experience stays the same but the logic and separation of
concerns become clearer. The outcome is that your application will become
more modular by default. Anything could potentially be presented from
anywhere, but remember, with great power comes great responsibility.
Getting Started
Below are tutorials on how to use Compass
- URL Routing in iOS apps: Compass Beginner Guide: basic introduction to Compass, how to use Router and multiple use cases for deep linking, push notifications
Setup
Step 1
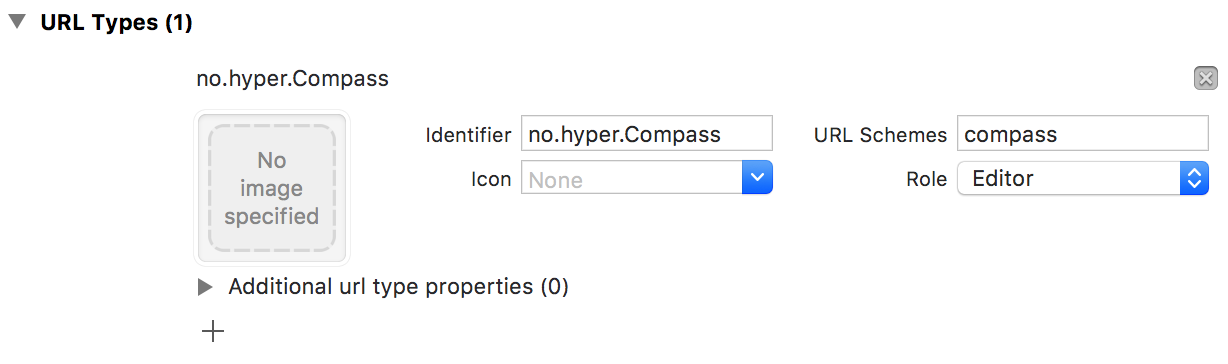
First you need to register a URL scheme for your application.
Step 2
Now you need to configure Compass to use that URL scheme, a good place
to do this is in your AppDelegate. Then configure all the routes you wish you support.
func application(_ application: UIApplication,
                 didFinishLaunchingWithOptions launchOptions: [UIApplicationLaunchOptionsKey: Any]?) -> Bool {
  Navigator.scheme = "compass"
  Navigator.routes = ["profile:{username}", "login:{username}", "logout"]
  return true
}
Step 3
Register your location request handler
Navigator.handle = { [weak self] location in
  let arguments = location.arguments

  let rootController = self?.window.rootViewController as? UINavigationController

  switch location.path {
    case "profile:{username}":
      let profileController = ProfileController(title: arguments["username"])
      rootController?.pushViewController(profileController, animated: true)
    case "login:{username}":
      let loginController = LoginController(title: arguments["username"])
      rootController?.pushViewController(loginController, animated: true)
    case "logout":
      self?.clearLoginSession()
      self?.switchToLoginScreen()
    default:
      break
  }
}
Step 4
Anywhere in your application, you can just use Navigator to navigate
@IBOutlet func logoutButtonTouched() {
  Navigator.navigate(urn: "logout")
}
Step 5
Optional. If you want to support deep linking, set up your application to respond to the URLs. Setting it up this way would mean that
you could open any view from a push notification depending on the contents of the payload.
func application(_ app: UIApplication,
                 open url: URL,
                 options: [UIApplicationOpenURLOptionsKey : Any]) -> Bool {
  do {
    try Navigator.navigate(url: url)
  } catch {
    // Handle error
  }

  return true
}
Compass life hacks
Tip 1. Router
We also have some conventional tools for you that could be used to organize your
route handling code and avoid huge switch cases.
- Implement
Routableprotocol to keep your single route navigation code
in one place:
struct ProfileRoute: Routable {

  func navigate(to location: Location, from currentController: CurrentController) throws {
    guard let username = location.arguments["username"] else { return }

    let profileController = ProfileController(title: username)
    currentController.navigationController?.pushViewController(profileController, animated: true)
  }
}
- Create a
Routerinstance and register your routes. Think ofRouteras a compositeRoutable
let router = Router()
router.routes = [
  "profile:{username}": ProfileRoute(),
  "logout": LogoutRoute()
]
- Parse URL with Compass and navigate to the route with a help of your
Routerinstance.
func application(_ app: UIApplication,
                 open url: URL,
                 options: [UIApplicationOpenURLOptionsKey : Any]) -> Bool {

  return handle(url)
}

func handle(_ url: URL) -> Bool {
  guard let location = Navigator.parse(url) else {
    return false
  }

  router.navigate(to: location, from: navigationController)

  return true
}
Tip 2. Multiple routers
You could set up multiple routers depending on app states. For example, you could have 2 routers for pre and post login.
let preLoginRouter = Router()
preLoginRouter.routes = [
  "profile:{username}" : ProfileRoute()
]

let postLoginRouter = Router()
postLoginRouter.routes = [
  "login:{username}" : LoginRoute()
]

let router = hasLoggedIn ? postLoginRouter : preLoginRouter
router.navigate(to: location, from: navigationController)
Installation
Compass is available through CocoaPods. To install
it, simply add the following line to your Podfile:
pod 'Compass'
Compass is also available through Carthage.
To install just write into your Cartfile:
github "hyperoslo/Compass"
Author
Hyper Interaktiv AS, [email protected]
Credits
The idea behind Compass came from John Sundell’s tech talk “Components & View Models in the Cloud - how Spotify builds native, dynamic UIs”
License
Compass is available under the MIT license. See the LICENSE file for more info.