A guide to best practices in production Django deployment, plus a set of Chef scripts to create a solid configuration.
#Idiomatic Django Deployment - The Definitely Definitive Guide
###By George London and Adam Burns
Wow, this guide is long. Why not skip it? [George](mailto:[email protected]?subject=Help me deploy Django&body=Gee, I’m already writing this email. I guess I might as well hire you.) and [Adam](mailto:[email protected]?subject=Help me deploy Django&body=Gee, I’m already writing this email. I guess I might as well hire you.) are both available to freelance.
Or, if you’re kind of excited by how long this guide is, consider following George on Twitter or subscribing to his newsletter.
Overview
By the end of this guide, you should be have a simple but stable actually deployed
Django website accessible at a public URL. So anyone in the world will be
able to visit “www.yourapp.com” and see a page that says “Hello World!”
You’ll go through the following steps:
- Setting up a host server for your webserver and your database.
- Installing and configuring the services your site will need.
- Automating deployment of your code.
- Learning what to do when things go wrong
- Next time: Going beyond the basics with caching, monitoring etc.
Updated August 9th, 2015 to use Django 1.8.
This guide is also available with colors and syntax highlighting on George’s blog.
###Why This Guide Is Needed
A few years ago, George taught himself to program in order to
build his first startup, LinerNotes. He
started out expecting that the hardest part would be getting his head
around the sophisticated algorithmic logic of programming. To his
surprise, he’s actually had to do very little difficult algorithmic work.[1] Instead, the hardest part was getting proficient at using the
many different tools in the programmer’s utility belt. From emacs to
gunicorn, building a real project requires dozens of different
tools. Theoretically, one can a priori reason through a red-black
tree but there’s just no way to learn emacs without the reading the
manual. LinerNotes is actually a lot more complicated under the hood
than it looks on the surface and so he had to read quite a lot of
manuals.
The point of this guide is to save you some of that trouble. Sometimes
trouble is good – struggling to design and implement an API builds
programming acumen. But struggling to configure nginx is just a waste
of time. We’ve found many partial guides to Django deployment but
haven’t found any single, recently updated resource that lays out the
simple, Pythonic way of deploying a Django site in
production. This post will walk you through creating such a set
up. But it won’t introduce you to basic DevOps 101 concepts. See the bottom for a glossary of acronyms and explanatory footnotes (because Github breaks my intra-page links).[2]
Disclaimer: We’re definitely not the most qualified people to write this post. We’re just the only one dumb enough to try. If you object to anything in this post or get confused or find something broken, help make it better.
Leave a helpful comment (or even better submit a pull request to the Github repo.) The full text of this post is available in the repo and we’ll update this guide as appropriate.
Second disclaimerIf you’re working on a small project, aren’t doing anything unusual or custom with Django, and don’t anticipate needing to handle a large volume of traffic or expanding the scope of your project then you should seriously consider using a PaaS (platform as a service) provider like Heroku or Gondor.io. For a monthly fee, they handle all of the messy configuration (i.e. this guide) for you (as long as your app is structured according to their specifications.) They’re not necessarily easier to get started with than this guide, but they do save you from a lot of down-the-road hassle of administering your own servers (e.g. doing security patches.)
###Overview of the Final Architecture
Our example site is just a “hello world” app, but this is going to be the most well-implemented, stable, and scalable
“hello world” application on the whole world wide web. Here’s a diagram of how
your final architecture will look:
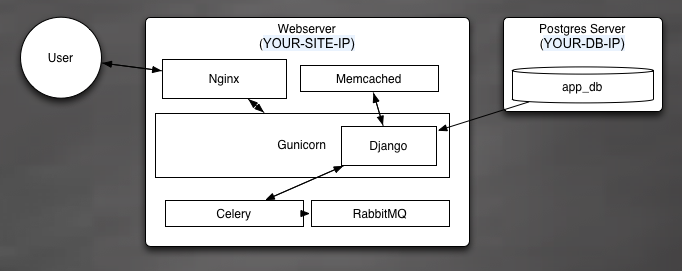
Basically, users send HTTP requests to your server, which are intercepted and
routed by the nginx load balancer. Requests for dynamic content will be routed to
your WSGI[3] server (Gunicorn) and requests for static content will be served
directly off the server’s file system. Gunicorn has a few helpers, memcached and celery,
which respectively offer a cache for repetitive tasks and an asynchronous queue
for long-running tasks.
We’ve also got our Postgres database (for all your lovely models) which we run on a
separate EC2 server.[4]
See below for a more detailed description of what each component
actually does.
###Set up AWS/EC2
Since this guide is trying to get you to an actual publicly accessible site,
we’re going to go ahead and build our site on the smallest, freest Amazon EC2 instance available, the trusty “micro”. If you don’t want to use
EC2, you can set up a local virtual machine on your laptop using
Vagrant or use your own existing server (you’ll have to tweak my scripts a little). The Docker project has been picking up steam lately but at this point we believe that running Django inside of Docker on EC2 (i.e. running a virtual machine inside a virtual machine) is an unnecessary complication. But don’t be Docker-sad! We will be using Docker to run our deployment tools in an isolated, virtual container on our laptops.
Anyway, we’re going to use EC2 to set up the smallest possible host for our webserver and another
one for our database.
For this tutorial, you’ll need an existing EC2 account. There are many tutorials on setting up an account so I’m not going to walk you through the account setup.
Python has a very nice library called boto for administering AWS
from within code. And another nice tool called Fabric for creating
command-line directives that execute Python code that can itself execute
shell commands on local or remote servers. We’re going to use Fabric
to definite all of our administrative operations, from
creating/bootstrapping servers up to pushing code. I’ve read that Chef (which we’ll use below) also has a plugin to launch EC2 servers but I’m going to prefer boto/Fabric because they give us the option of embedding all our “command” logic into Python and editing it directly as needed.
Start off by cloning the Github repo for this project onto your local machine.
git clone [email protected]:rogueleaderr/definitive_guide_to_django_deployment.git
cd definitive_guide_to_django_deployment
The github repo includes a fabfile.py[7] which provides all the
commandline directives we’ll need. But fabfiles are pretty intuitive
to read so try to follow along with what each command is doing.
First, we need to define AWS settings. In keeping
with the principles of the Twelve Factor App
we store configuration either in environment variables or in config files which
are not tracked by VCS. You can find your AWS access and secret keys on your
AWS security page.
echo '
AWS_ACCESS_KEY_ID=<YOUR KEY HERE>
AWS_SECRET_ACCESS_KEY=<YOUR SECRET KEY HERE>
AWS_DEFAULT_REGION=<YOUR REGION HERE, e.g. us-east-1>
AWS_SECURITY_GROUP_NAME=<YOUR SECURITY GROUP NAME>
AWS_INSTANCE_TYPE=t2.micro
AWS_AMI_ID=<SEE http://cloud-images.ubuntu.com/locator/ec2/>
AWS_SSH_KEY_NAME=<YOUR EC2 KEY NAME>
AWS_SSH_PORT=22' > deploy/environment
chmod 600 deploy/environment
Make sure you fill out the values between angle brackets with <your own values>.
These settings will be exported as enviornment variables in the docker
container where both fabric and the AWS CLI will read them. We recommend using
an AMI for a “free-tier” eligible Ubuntu 14.04 LTS image.
If you already have an EC2 SSH key pair that you want to use, make sure you copy it to the deploy folder (otherwise skip this step and we’ll create one for you automatically):
cp -p <PATH TO YOUR EC2 KEY> deploy/ssh
We’re also going to create a settings file that contains all the configuration for our actual app.
echo '{}' > deploy/settings.json
chmod 600 deploy/settings.json
Now it’s time for Docker. Follow one of the guides for installing Docker and its pre-requisites on your development machine.
Docker runs a “container”, i.e. a lightweight virtual machine running (in this case) Ubuntu in an isolated environment on your development machine. So we can safely install all the tools we need for this guide inside the container without needing to worry about gumming up your development machine (or other things on your machine causing incompatibilities with these tools.)
If you’re on OSX then as of this writing the two ways to start a Docker container are using Boot2Docker or Kitematic. For either of those, you’ll need to open the app inside your Applications folder. This will start (or give you the opportunity to start) the VM that Docker uses to create its container VM’s. It may also push you into a new terminal, so be sure to
cd <YOUR GUIDE DIRECTORY>
…if you’re not already there.
Now we can build and run the container for our deploy tools:
docker build -t django_deployment .
docker run --env-file=deploy/environment -tiv $(pwd):/project/django_deployment django_deployment /bin/bash
This step may take a while to download everything, so why not watch a PyCon video while you wait?
Once the process finishes, you’ll be at a bash shell in a container with all the tools installed. The
project’s root directory has been mounted inside the container so un-tracked
files like settings will be stored on your workstation but will still be
available to fab and other tools.
If Docker is giving you errors about being unable to connect and you’re on OSX, make sure that you’re running these commands in a terminal tab that was opened by Boot2Docker or Kitematic.
Warning: If you are running boot2docker on OS X you may need to restart
the boot2docker daemon on your host when you move to new networks (e.g. from
home to a coffee shop).
Now we’re going to use a Fabric directive to setup our AWS account [6] by:
- Configuring a keypair ssh key that will let us log in to our servers
- Setting up a security group that defines access rules to our servers
To use our first fabric directive and setup our AWS account, go to the directory where our fabfile lives and
do
fab setup_aws_account
###Launch Some EC2 Servers
We’re going to launch two Ubuntu 14.04 LTS servers, one for our web host
and one for our database. We’re using Ubuntu because it it seems to be
the most popular linux distro right now, and 14.04 because it’s a (L)ong (T)erm (S)upport
version, meaning we have the longest period before it’s officially
deprecated and we’re forced to deal with an OS upgrade. Depending on what AMI you choose in your settings, you may end up with a different version. (If in doubt, choose a i386 ebs-ssd LTS version.)
With boto and Fabric, launching a new instance is very easy:
fab create_instance:webserver
fab create_instance:database
These commands tell Fabric to use boto to create a new “micro”
(i.e. free for the first year) instance on EC2, with the name you
provide. You can also provide a lot more configuration options to this
directive at the command line but the defaults are sensible for now.
It may be a few minutes before new instances are fully started. EC2 reports
them online when the virtual hardware is up but Linux takes some time to boot
after that.
Now you can ssh into a server:
fab ssh:webserver
If you create an instance by mistake, you can terminate it with
fab terminate_instance:webserver
#Install and Configure Your Services
We need a project to deploy. Your easiest option is to use the sample project I’ve created. The deployment will clone it onto webservers automatically, but you might want your own local clone so you can follow along:
git clone [email protected]:rogueleaderr/django_deployment_example_project.git
If you don’t do that, then you need to…
###Make sure your project is set up correctly:
This guide assumes a standard Django 1.5+ project layout with a few small tweaks:
-
Your settings should be comprised of three files:
  app
  \--settings
      \--__init__.py # tells python how to import your settings
       --base.py # your default settings
       --local_settings.py # settings that will be dynamically generated from your settings.json. don't track in git
And your __init__.py should consist of:
  # application_python cookbook expects manage.py in a top level
  # instead of app level dir, so the relative import can fail
  try:
      from .<PROJECT_NAME>.<PROJECT_NAME>.settings.base import *
  except ImportError:
      from <PROJECT_NAME>.settings.base import *

  try:
      from local_settings import *
  except ImportError:
      pass
Our bootstrapping process will create a local_settings.py but to develop locally you’ll need to make one manually with your database info etc. (Don’t check it into git.)
-
We’re serving static files with dj-static. To use dj-static, you need a couple project tweaks:
In base.py, set
  STATIC_ROOT = 'staticfiles'
  STATIC_URL = '/static/'
Modify your wsgi.py:
from django.core.wsgi import get_wsgi_application from dj_static import Cling application = Cling(get_wsgi_application()) -
Your installed apps must contain your project app and also
djcelery.
###Understand the services
Our stack is made up of a number of services that run
semi-independently:
Gunicorn: Our WSGI webserver. Gunicorn receives HTTP requests fowarded to it from nginx, executes
our Django code to produce a response, and returns the response which nginx transmits back to the client.
Nginx: Our
load balancer (a.k.a. “reverse proxy server”). Nginx takes requests from the open internet and decides
whether they should be passed to Gunicorn, served a static file,
served a “Gunicorn is down” error page, or even blocked (e.g. to prevent denial-of-service
requests.) If you want to spread your requests across several Gunicorn nodes, it just takes a tiny change to your nginx configuration.
Memcached: A simple in-memory key/value caching system. Can save
Gunicorn a lot of effort regenerating rarely-changed pages or objects.
Celery: An async task system for Python. Can take longer-running
bits of code and process them outside of Gunicorn without jamming up
the webserver. Can also be used for “poor man’s” concurrency in Django.
RabbitMQ: A queue/message broker that passes asynchronous tasks
between Gunicorn and Celery.
Supervisor: A process manager that attempts to make sure that all key services stay
alive and are automatically restarted if they die for any reason.
Postgres: The main database server (“cluster” in Postgres
parlance). Contains one or more “logical” databases containing our
application data / model data.
###Install the services
We could install and configure each service individually, but instead
we’re going to use a “configuration automation” tool called
Chef. Chef lets us write simple Ruby
programs (sorry Python monogamists!) called Cookbooks that automatically
install and configure services.
Chef can be a bit intimidating. It provides an entire Ruby-based
DSL for expressing configuration. And it
also provides a whole system (Chef server) for controlling the
configuration of remote servers (a.k.a. “nodes”) from a central location. The DSL is
unavoidable but we can make things a bit simpler by using “Chef Solo”, a stripped down version of Chef that does away with the whole central server and leaves us with
just a single script that we run on our remote servers to bootstrap our
configuration.
(Hat tip to several authors for blog posts about using Chef for Django[8])
####Wait, a complicated ruby tool? Really?
Yes, really. Despite being in Ruby[9], Chef has some great advantages that make it worth learning (at least enough to follow this guide.)
- It lets us fully automate our deployment. We only need to edit one configuration file and run two commands and our entire stack configures itself automatically. And if your servers all die you can redeploy from scratch with the same two commands (assuming you backed up your database).
- It lets us lock the versions for all of our dependencies. Every package installed by this process has its version explicitly specified. So this guide/process may become dated but it should continue to at least basically work for a long time.
- It lets us stand on the shoulders of giants. Opscode (the creators of Chef) and some great OSS people have put a lot of time into creating ready-to-use Chef “cookbooks” for nearly all our needs. Remember, DRW-EWTMOTWWRS (Don’t Re-Invent the Wheel, Especially When the Maker of the Wheel Was Really Smart).
Okay, buckle up. We’re going to need to talk a little about how Chef works. But it’ll be worth it.
At the root, Chef is made up of small Ruby scripts called recipes that express
configuration. Chef declares configuration rather than executing a
series of steps (the way Fabric does). A recipe is supposed to describe all the resources that
are available on a server (rather than just invoking installation
commands.) If a resource is missing when a recipe is run, Chef will
try to figure out how to install that resource. If a configuration file has the wrong information, Chef will fix(/brutally overwrite) it. Recipes are
(supposed to be) idempotent, meaning that if you run a recipe and
then run it again then the second run will have no effects.
But which recipes to run? Chef uses cookbooks that
group together recipes for deploying a specific tool (e.g. “the git
cookbook”). And Chef has a concept called “roles” that let you specify
which cookbooks should be used on a given server. So for example, we
can define a “webserver” role and tell Chef to use the “git”, “nginx”
and “django” cookbooks. Opscode (the makers of Chef) provide a bunch
of pre-packaged and (usually well maintained) cookbooks for common
tools like git. And although Chef cookbooks can get quite complicated, they are just code and so they can be version controlled with git.
###Chef, make me a server-which.
We use some tools that simplify working with Chef:
We’re going to have two nodes, a webserver and a database. We’ll have four roles:
- base.rb (common configuration that both will need, like apt and git)
- application_server.rb (webserver configuration)
- database.rb (database configuration)
- deploy.rb (to save time, a stripped down role that just deploys app code to the app server)
The role definitions live in chef_files/roles. Now we just need to tell Chef which roles apply to which nodes, and we do that in our chef_files/nodes folder in files named “{node name}_node.json”. If you use names other than “webserver” and “database” for your nodes, you must rename these node files.
Any production Django installation is going to have some sensitive
values (e.g. database passwords). Chef has a construct called data
bags for isolating and storing sensitive information. And these bags
can even be encrypted so they can be stored in a VCS. Knife solo lets us create a databag and encrypt
it. Fabric will automatically upload our databags to the server where
they’ll be accessible to our Chef solo recipe.
Start by loading the values we need into our settings.json file. Be sure to
update settings anytime you create new servers.
APP_NAME should be the name of the project in your repo, as it would appear
in a Python import path.
echo '{
"id": "config_1",
"POSTGRES_PASS": "<YOUR DB PASSWORD>",
"DEBUG": "False",
"DOMAIN": "<YOUR DOMAIN NAME>",
"APP_NAME": "<NAME OF PYTHON PACKAGE INSIDE YOUR REPO: e.g. deployment_example_project>",
"DATABASE_NAME": "<YOUR DATABASE NAME>",
"REPO": "<YOUR GITHUB REPO NAME: e.g. django_deployment_example_project>",
"GITHUB_USER": "<YOUR GITHUB USERNAME: e.g. rogueleaderr>",
"DATABASE_IP": "DB_IP_SLUG",
"EC2_DNS": "WEB_IP_SLUG"
}' \
| sed -e s/DB_IP_SLUG/`cat deploy/fab_hosts/database.txt`/ \
| sed -e s/WEB_IP_SLUG/`cat deploy/fab_hosts/webserver.txt`/ \
> deploy/settings.json
Now we need an encryption key (which we will NOT store in Github):
cd chef_files
openssl rand -base64 512 > data_bag_key
cd ..
# if you aren't using my repo's .gitingore, add the key
echo "chef_files/data_bag_key" >> .gitignore
Now we can use the knife-solo to create an encrypted data bag from our settings.json file:
cd chef_files
knife solo data bag create config config_1 --json-file ../deploy/settings.json
cd ..
Our chef_files repo contains a file Berksfile that lists all the cookbooks we are going to install on our server, along with specific versions. Knife solo will install all of these with a tool called Berkshelf, which I honestly assume is named after this. If a cookbook becomes dated, just upgrade the version number in chef_files/Berksfile.
Now we’re going to use Fabric to tell Chef to first bootstrap our database and then bootstrap our webserver. Do:
fab bootstrap:database
fab bootstrap:webserver
This will:
- Install Chef
- Tell Chef to configure the server
A lot of stuff is going to happen so this may take a while. Don’t worry if the process seems to pause for a while. But if it exits with an error please create an issue on Github describing what went wrong (or better yet, leave a pull a request to fix it.)
####What is this magic?
Chef actually does so much that you might be reluctant to trust it. You may(/should) want to understand the details of your deployment. Or you may just distrust Ruby-scented magic. So here’s a rough walk-through of everything the bootstrap scripts do.
#####Database
The database role first installs the essential base packages specified in base.rb, i.e. apt, gcc, etc, and sets up our ubuntu admin user with passwordless sudo.
Then we run our custom database recipe that:
-
Installs Postgres on the server
-
Modifies the default postgresql.conf settings to take full advantage of the node’s resources (dynamically calculated using a cookbook called ohai.) Changes the Linux shmmax/shmall paramaters as necessary.
-
Tells Postgres to listen on all ports and accept password authenticated connections from all IP’s (which is okay because we use Amazon’s firewall to block any connection to the Postgres node from outside our security group.)
-
Creates our application database using a password and database name read in from our settings.json file.
-
Restarts Postgres to pick up the configuration changes.
#####Webserver
Again, install base packages per base.rb.
Then runs our main application server setup recipe:
-
Runs Opscode cookbooks to install basic packages, including: git, nginx, python-dev, rabbit-mq, memcached, and postgres-client.
-
Reads configuration variables from our encrypted data bag (made from settings.json)
-
Updates Ubuntu and installs the bash-completion package. Creates a .bashrc from a template.
-
Creates an nginx configuration for our site from a template, load it into nginx’s configuration folder and restart nginx.
-
Deploy our Django app, which consists of:
-
Create a folder called
/srv/<APP_NAME>that will hold our whole deployment -
Create a folder called
/srv/<APP_NAME>/sharedwith will hold our virtualenv and some key configuration files -
Download our latest copy of our Github repo to
/srv/<APP_NAME>/shared/cached-copy -
Create a
local_settings.pyfile from a template and include information to connect to the database we created above (details loaded from our data bag.) -
“Migrate” (i.e. sync) the database with
manage.py syncdb. The sync command can be overwritten if you want to use South. -
Install all our Python packages with pip from
requirements/requirements.txt. -
Run
manage.py collectstaticto copy our static files (css, js, images) into a single static folder -
Install gunicorn and create a configuration file from a template. The config file lives at
/srv/<APP_NAME>/shared/gunicorn_config.py. -
Bind gunicorn to talk over a unix socket named after our app
-
Install celery, along with celery’s built-in helpers celerycam and celerybeat. Create a configuration file from a template. The config lives at
/srv/<APP_NAME>/shared/celery_settings.py. -
Create “supervisor” stubs that tell supervisor to manage our gunicorn and celery processes.
-
Copy the ‘cached-copy’ into a
/srv/<APP_NAME>/releases/<SHA1_HASH_of_release>folder’. Then symlink the latest release into/srv/<APP_NAME>/currentwhich is where where the live app ultimately lives.
-
-
Create a “project.settings” file that contains the sensitive variables (e.g. database password) for our Django app.
Hopefully this list makes it a bit more clear why we’re using Chef. You certainly could do each of these steps by hand but it would be much more time consuming and error-prone.
###Make it public.
If Chef runs all the way through without error (as it should) you’ll now have a ‘Hello World’ site accessible by opening your browser and visiting the “public DNS” of your site (which you can find from the EC2 management console or by doing cat deploy/fab_hosts/webserver.txt). But you probably don’t want visitors to have to type in “103.32.blah-blah.ec2.blah-blah”. You want them to just visit “myapp.com” and to do that you’ll need to visit your domain registrar (e.g. GoDaddy or Netfirms) and change your A-Record to point to the IP of your webserver (which can also be gotten from the EC2 console or by doing):
ec2-describe-instances | fgrep `cat deploy/fab_hosts/webserver.txt` | cut -f17
Domain registrars vary greatly on how to change the A-record so check your registrar’s instructions.
By default, EC2 provides a “public DNS” listing for instances which looks like ec2-54-166-68-245.compute-1.amazonaws.com
Any time you stop and then start an EC2 instance, the DNS address gets re-assigned. If you’re putting your website on one of these nodes, that’s not ideal
because you would have to update your A-Record every time you need to stop the instance for any reason. (And it’s even worse because A-Records updates can take 24-48 hours to
propogate through the internet so your site may be unreachable for a while.)
To avoid that problem, Amazon lets you associate an “Elastic IP” with a given server. An Elastic IP is a fixed IP address that will
stay with the the server even if it’s stopped.
To associate an elastic IP with your webserver, you can do
fab associate_ip:webserver
Note: AWS has a soft limit of 5 elastic IP’s per account. So if you already have elastic IP’s allocated, you may need to delete or reassign them in your AWS management console.
After you change the IP, you’ll also need to change your ALLOWED_HOSTS django setting. The fab command updates the host settings in your config files in the local guide directory you’ve been working in,
but to push those changes to your server you’ll need to update your secret databag:
cd chef_files
knife solo data bag create config config_1 --json-file ../deploy/settings.json
cd ..
And re-bootstrap the server to update the settings:
fab bootstrap:webserver
#Automatically Deploy Your Code
Well, this is simple. Just commit your repo and do
git push origin master
Then back in the deployment guide folder, do:
fab deploy:webserver
Deploy
- If you edit
deploy/settings.json, remember to regenerate the chef data bag. - If you terminate and re-launch an instance, remember to update the
IPandDNSfields indeploy/settings.json. - The vars defined in
deploy/environmentare read when the docker container starts. If you edit them, exit and re-run the docker container so they’re re-read. - The cache in
chef_files/cookbookscan get outdated. If you’re seeing Chef errors, try deleting the contents of that directory and starting over. - By default Chef will try to roll back failed launches, but that can make it hard to figure out why the launch failed. To disable rollback, add
rollback_on_error falsetochef_files/site-cookbooks/django_application_server/recipes/default.rbin the same place as itsrepositoryandrevisionoptions.
###Nginx
Nginx is the proxy server that routes HTTP traffic. It has never once gone
down for me. It should start automatically if the EC2 server restarts.
If you need to start/restart nginx, log in to the webserver and do:
sudo service nginx restart
If nginx misbehaves, logs are at:
/var/log/nginx/
If, for some reason, you need to look at the nginx conf it’s at:
sudo emacs /etc/nginx/sites-available/<APP_NAME>.conf
If you need to edit it, avoid making changes to any conf files on the server, instead change:
chef_files/site-cookbooks/django_application_server/templates/default/nginx-conf.erb
And rerun the Chef bootstrap process. It’s idempotent so it won’t change anything else (unless you’ve been tinkering directly with the server in which case your changes will be “reeducated”).
###RabbitMQ
Another service that’s started automatically. I have literally never had to interact
directly with it. But if can also be restarted by
sudo service restart rabbitmq
###Memcached
Memcached is also a service and starts automatically if the EC2 node restarts. Unless you’ve designed a monstrosity, your site
should also continue to function if it dies (just be slow). Caching issues can sometimes
cause weird page content, so if something seems unusually bizarre try flushing the cache
by restarting memcached:
sudo service restart memcached
Memcached is pretty fire and forget…since it’s in memory it’s theoretically possible it
could fill up and exhaust the memory on the webserver (I don’t have a size cap and I make my TTL’s
very long) but that has never happened so far. If it does, just reset memcached and it
will clear itself out.
To start Gunicorn/Celery:
Gunicorn and the Celery Workers are controlled by Supervisor, which is a Linux process runner/controller. Supervisor will automatically restart them if
they’re terminated abnormally.
The Supervisor configuration is located at:
/etc/supervisor/conf.d/<APP_NAME>.conf
To restart gunicorn and celery together, simply do:
fab restart
To restart manually, you can use a Supervisor utility called supervisorctl that lets you check the status of and
restart processes. So if you need to restart gunicorn or celery, you can do:
sudo supervisorctl restart <APP_NAME>
sudo supervisorctl restart <APP_NAME>-celeryd
Or to check process status, just do
sudo supervisorctl status
Supervisor routes all log output from managed processes to /var/log/supervisor/<process-name-and-long-character-string>. So if your server is behaving badly you can start there.
I keep a GNU screen active in the log directory so
I can get there quickly if I need to. You can get there with
screen -r <MY SCREEN>
###Postgres
Postgres is a very stable program but can be a bit touchy on a small server under heavy load. It’s probably
the most likely component to give you trouble (and sadly basically your whole site becomes totally
non-operational if it goes down.)
Postgres runs as a service so if you need to restart it (try not to need to do this) you
can do:
sudo service postgresql restart
The disk can also fill (especially if something gets weird with the logging.) To check disk space:
df -h
If a disk is 99% full, find big files using
find / -type f -size +10M -exec ls -l {} \;
EC2 instances (larger than our micro type) all have “instance store” disks on /mnt, so you can copy obviously
suspicious files onto the instance store and let me sort it out later.
If that’s not enough, check the logs for the service at /var/log/postgresql/
#Future Crimes of Configuration
This guide has gotten long enough for now, so I’m going to see how it’s recieved before delving into advanced topics. But here are a few quick suggestions:
###Set Up Monitoring
There are a bunch of open and closed source solutions. They’re all a bit more complicated than I’d like to set up. But here’s what I personally use:
####Datadog Monitoring
Datadog makes pretty metric dashboards. It will automatically monitor server CPU/memory/etc status. Datadog can send an
alert if there’s no CPU activity from the webserver or the database (probably meaning the
EC2 servers are down.) And it can also hook into a custom statsd library and lets you emit/graph whatever metrics you want from anywhere in your app. You just have to decorate your code by hand.
####Notifications / PagerDuty
PagerDuty is a website that will call or email you if something goes wrong with a
server. I’ve configured it to email/SMS if anything goes wrong with my site.
Django by default automatically emits error emails, which I:
- route to PagerDuty so it automatically sets up an “incident” and SMS’s me
- sends an email to me with the details of the error
Occasionally these emails are for non-serious issues but there’s no easy way to
filter. It can be a bit chatty if you haven’t chased down all the random non-critical errors in your app, but it helps save you from being unaware your site was down for 12 hours.
###Connection pooling
As of Django 1.5, Django opens a new Postgres connection for every request, which requires a ~200ms SSL renegotiation. Skip that overhead by using a connection pooler like django-postgrespool. You can also use PgBouncer on your Postgres server to make sure you don’t get overwhelmed with incoming connections.
Apparently Django 1.6 includes a built-in connection pooler.
###Cache Settings
A lot of what Django does from request to request is redundant. You can hugely increase responsiveness and decrease server load by caching aggressively. Django has built in settings to cache views (but you have to enable caching yourself.) You can also use cache-machine to cache your models and significantly reduce your database load.
###Backup
The nice thing about this Chef setup is that if anything goes wrong with your webserver, it might actually be faster to deploy a new one from scratch and fail over than to try to restore your broken server. But you’ve still got to back up your database. Nothing can help you with deleted data. Postgres has a number of options, including streaming replication and (w)rite(a)head (l)og WAL shipping to S3.
###South migrations
Just use them. Also apparently baked into Django 1.6.
###Gevent
In my experience, by far the biggest cause of slowness in Django is I/O or network requests (e.g. calling an external API to supply some data for a widget.) By default, Python blocks the thread making the call until it’s done. Gunicorn gives you “workers” which run in separate threads, but if you have four workers and they all block waiting for a long database query then your whole site will just hang until a worker is free (or the request times out.)
You can make things way faster by using “green threading” via gevent. Green threading is conceptually complicated (and occasionally buggy) but the basic idea is that one thread can contain many “green” threads. One one green thread runs at a time, but if it needs to wait for I/O it cedes control to another green thread. So your server can accommodate way more requests by never blocking the gunicorn worker threads.
#Wrap up
And there you go. You’ve got a production-ready Django website. It’s reasonable secure, easy to update, cheap to run, fully customizable and should be able to easily handle the kind of traffic a new site is likely to get. If you need more power, just shutdown your EC2 instances and upgrade to a larger instance type. Or get fancy by spinning up more webservers and using the load balancer to route requests among them.
Anyway, thanks for making it this far! If you’ve got any suggestions for how to do anything in this guide better, please leave a comment or a pull request! And if you build any custom Chef code for your own deployment, please consider contributing it back to this guide or to the official application_python cookbook.
And if you enjoy this kind of material, consider following me on Twitter or subscribing to my newsletter.
###Notes
[1] And Python has existing libraries that implement nearly any algorithm better than I could anyway.
[2] I’ll
try to be gentle but won’t simplify where doing so would hurt the
quality of the ultimate deployment. If you
don’t know what a load balancer or an SSH key is, you’re going to have
a hard time following along. But Google can help you with that. Don’t worry, I’ll be here when you get back.
[3] You can run Postgres on the same VM, but putting it on a
separate box will avoid resource contention and make your app more scalable. You also can run nginx and celery on their own VM’s which will make your site super scalable. But if you need this guide then you’re probably not seeing enough traffic to make that worth the added complexity.
[4] More about WSGI
[6] For development I enjoy VirtualenvWrapper which makes switching between venv’s easy. But it installs venvs by default in a ~/Envs home directory and for deployment we want to keep as much as possible inside of one main project directory (to make everything easy to find.)
[7] Hat tip to garnaat for
his AWS recipe to setup an account with boto
[8] Hat tip to Martha Kelly for her post on using Fabric/Boto to deploy EC2
[*] Yes, there are other configuration automation tools. Puppet is widely used, but I find it slightly more confuing and it seems less popular in the Django community. There is also a tool called Salt that’s even in Python. But Salt seems substantially less mature than Chef at this point.
###Glossary
Rob Golding on deploying Django