固定高度与动态高度的虚拟无限滚动实现。online-demo ⏬
title: 剖析无限滚动虚拟列表的实现原理
date: ‘2020-08-26’
spoiler: 长列表渲染的终极优化手段
TL;DR:「虚拟列表」的本质就是仅将需要显示在视窗中的列表节点挂载到 DOM,是一种优化长列表加载的技术手段。其中按照节点的高度是否固定又分为「固定高度的虚拟列表」和「动态高度的虚拟列表」。这是本文对两种虚拟列表场景实现的 demo(页面托管在 github pages 可能需要爬梯子) 和 代码库(基于 Vue 2.x)。
在进行前端业务开发时,很容易遇到需要加载巨大列表的场景。比如微博的信息流、微信的朋友圈和直播平台的聊天框等,这些列表通常具有两个显著的特点:
- 不能分页;
- 只要用户愿意就可以无限地滚动下去。
在这种场景下,如果直接加载一个数量级很大的列表,会造成页面假死,使用传统的上拉分页加载模式或者 window.requestAnimationFrame空闲加载模式可以在一定程度上缓解这种情况,但是在加载到一定量级的页面时,会因为页面同时存在大量的 DOM 元素而出现过渡占用内存、页面卡顿等性能问题,带来糟糕的用户体验。因此必须对这种业务场景做相应的加载优化,只加载需要显示的元素是这种情况的唯一解,「虚拟列表」的概念应运而生。
什么是虚拟列表?
首先,来说说「虚拟列表」的定义,它的本质就是仅将需要显示在视窗中的列表节点挂载到 DOM,以达到「减少一次性加载节点数量」和「减少滚动容器内总挂载节点数量」的目的,也即:
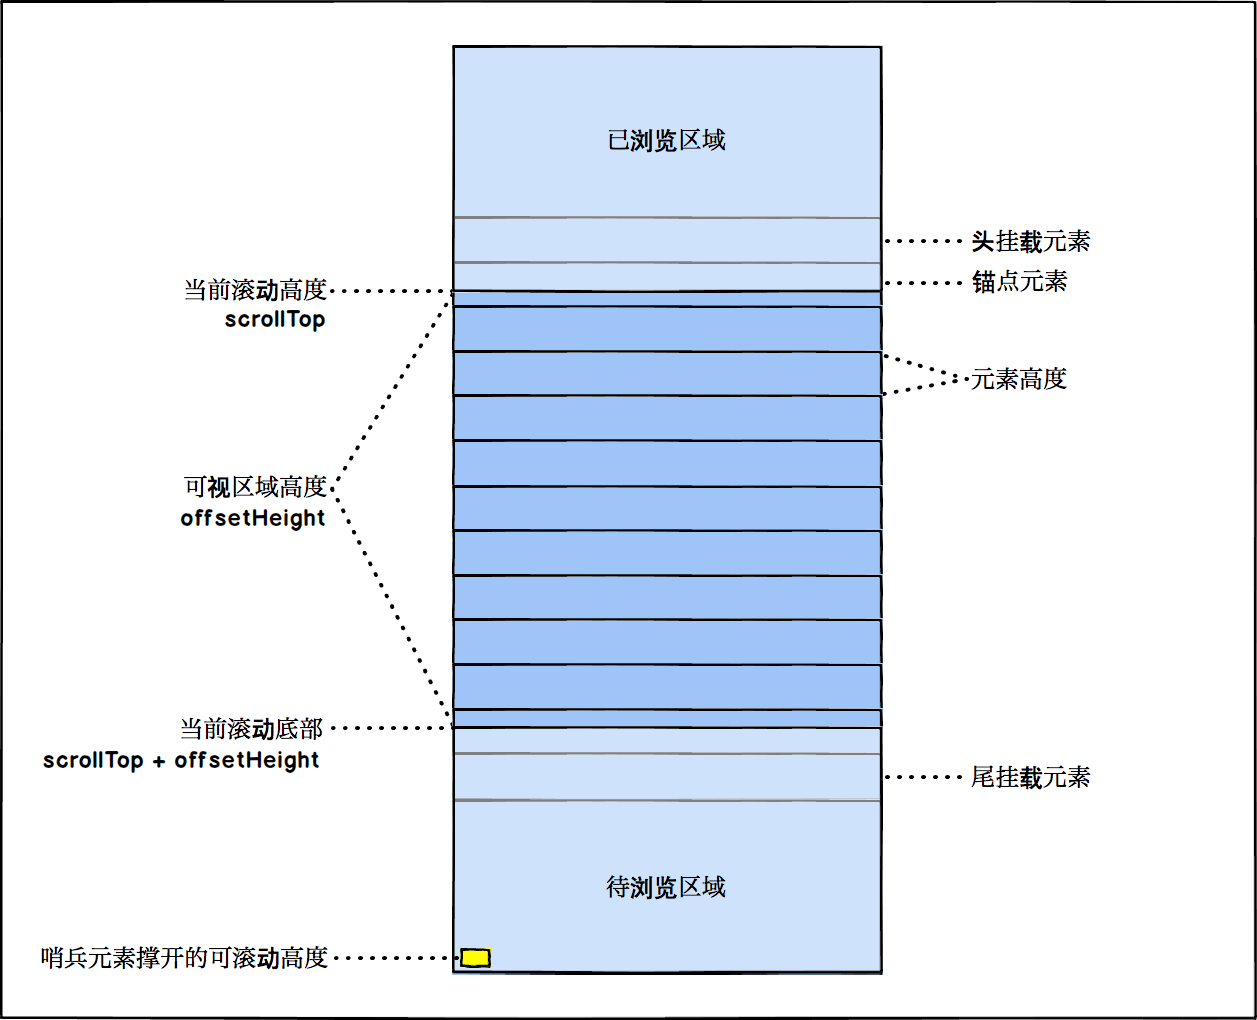
通过「单个元素高度」计算当前列表全部加载时的高度作为「滚动容器」的「可滚动高度」,按该「可滚动高度」撑开「滚动容器」。并根据「当前滚动高度」,在「可视区域」内按需加载列表元素。
相关概念
上面的描述提到了几个关键的概念,它们分别是:
-
单个元素高度:列表内每个独立元素的高度,它可以是固定的或者是动态的。
-
滚动容器:意指挂载列表元素的 DOM 对象,它可以是自定义的元素或者
window对象(默认)。 -
可滚动高度:滚动容器可滚动的纵向高度。当滚动容器的高度(宽度),小于它的子元素所占的总高度(宽度)且该滚动容器的
overflow不为hidden时,此时滚动容器的scrollHeight为可滚动高度。 -
可视区域:滚动容器的视觉可见区域。如果容器元素是
window对象,可视区域就是浏览器的视口大小(即视觉视口);如果容器元素是某个 ul 元素,其高度是 300,右侧有纵向滚动条可以滚动,那么视觉可见的区域就是可视区域,也即是该滚动容器的offsetHeight。 -
当前滚动高度:与平常的滚动高度概念一致。虽然虚拟列表仅加载需要显示在可视区域内的元素,但是为了维持与常规列表一致的滚动体验,必须通过监听当前滚动高度来动态更新需要显示的元素。
参考下图加深理解:
实现逻辑步骤
因此,实现「虚拟列表」可以简单理解为就是在列表发生滚动时,改变「可视区域」内的渲染元素。大概的文字逻辑步骤如下:
- 根据单个元素高度计算出滚动容器的可滚动高度,并撑开滚动容器;
- 根据可视区域计算总挂载元素数量;
- 根据可视区域和总挂载元素数量计算头挂载元素(初始为 0)和尾挂载元素;
- 当发生滚动时,根据滚动差值和滚动方向,重新计算头挂载元素和尾挂载元素。
根据这些步骤,下面开始通过实际代码对「虚拟列表」进行实现。
固定高度的虚拟列表
准备工作
首先,创建列表元素组件,约定它的高度固定为180px:
<template>
  <li class="item" ref="item">
    <div class="item__wrapper">
      <div class="item__info">
        <img :src="data.avatar" class="item__avatar" />
        <p class="item__name">{{ index }}. {{ data.name }}</p>
        <p class="item__date">{{ data.dob }}</p>
      </div>
      <p class="item__text">E-mail: {{ data.email }}</p>
      <p class="item__text">Phone: {{ data.phone }}</p>
      <p class="item__text">City: {{ data.address.city }}</p>
      <p class="item__text">Street: {{ data.address.street }}</p>
    </div>
  </li>
</template>
<script>
  export default {
    name: 'item',
    props: {
      index: {
        type: Number, // 元素下标
        default: 0,
      },
      data: {
        type: Object,
        default: () => ({}),
      },
    },
  };
</script>
<style scoped lang="scss">
  .item {
    height: 180px;
    /* ... */
  }
</style>
通过faker.js来生成一些随机数据,以满足分页加载的测试情况:
import faker from 'faker';

export function fetchData(count = 30) {
  const result = [];
  for (let i = 0; i < count; i++) {
    const item = faker.helpers.contextualCard();
    item.paragraph = faker.lorem.paragraph();
    result.push(item);
  }
  return result;
}
最后,创建滚动容器组件,引入item组件和随机数据,渲染列表:
<template>
  <ul class="height-fixed" ref="scroller">
    <item class="height-fixed__item" v-for="item in listData" :data="item" :index="item.index" :key="item.username + item.phone" />
  </ul>
</template>
<script>
  import Item from './components/item';
  import { fetchData } from './helpers';

  const FIXED_HEIGHT = 180;

  export default {
    name: 'height-fixed',
    data() {
      return {
        listData: [],
      };
    },
    mounted() {
      this.fetchData();
    },
    methods: {
      fetchData() {
        this.listData.push(...this.setItemIndex(fetchData()));
      },
      // 给每个列表元素设置固定的下标
      setItemIndex(list) {
        let latestIndex = this.listData.length;
        for (let i = 0; i < list.length; i++) {
          const item = list[i];
          item.index = latestIndex + i;
          Object.freeze(item);
        }
        return list;
      },
    },
    components: { Item },
  };
</script>
<style scoped lang="scss">
  .height-fixed {
    width: 100%;
    height: 100%;
    overflow-x: hidden;
    overflow-y: scroll;
    /* ... */
  }
</style>
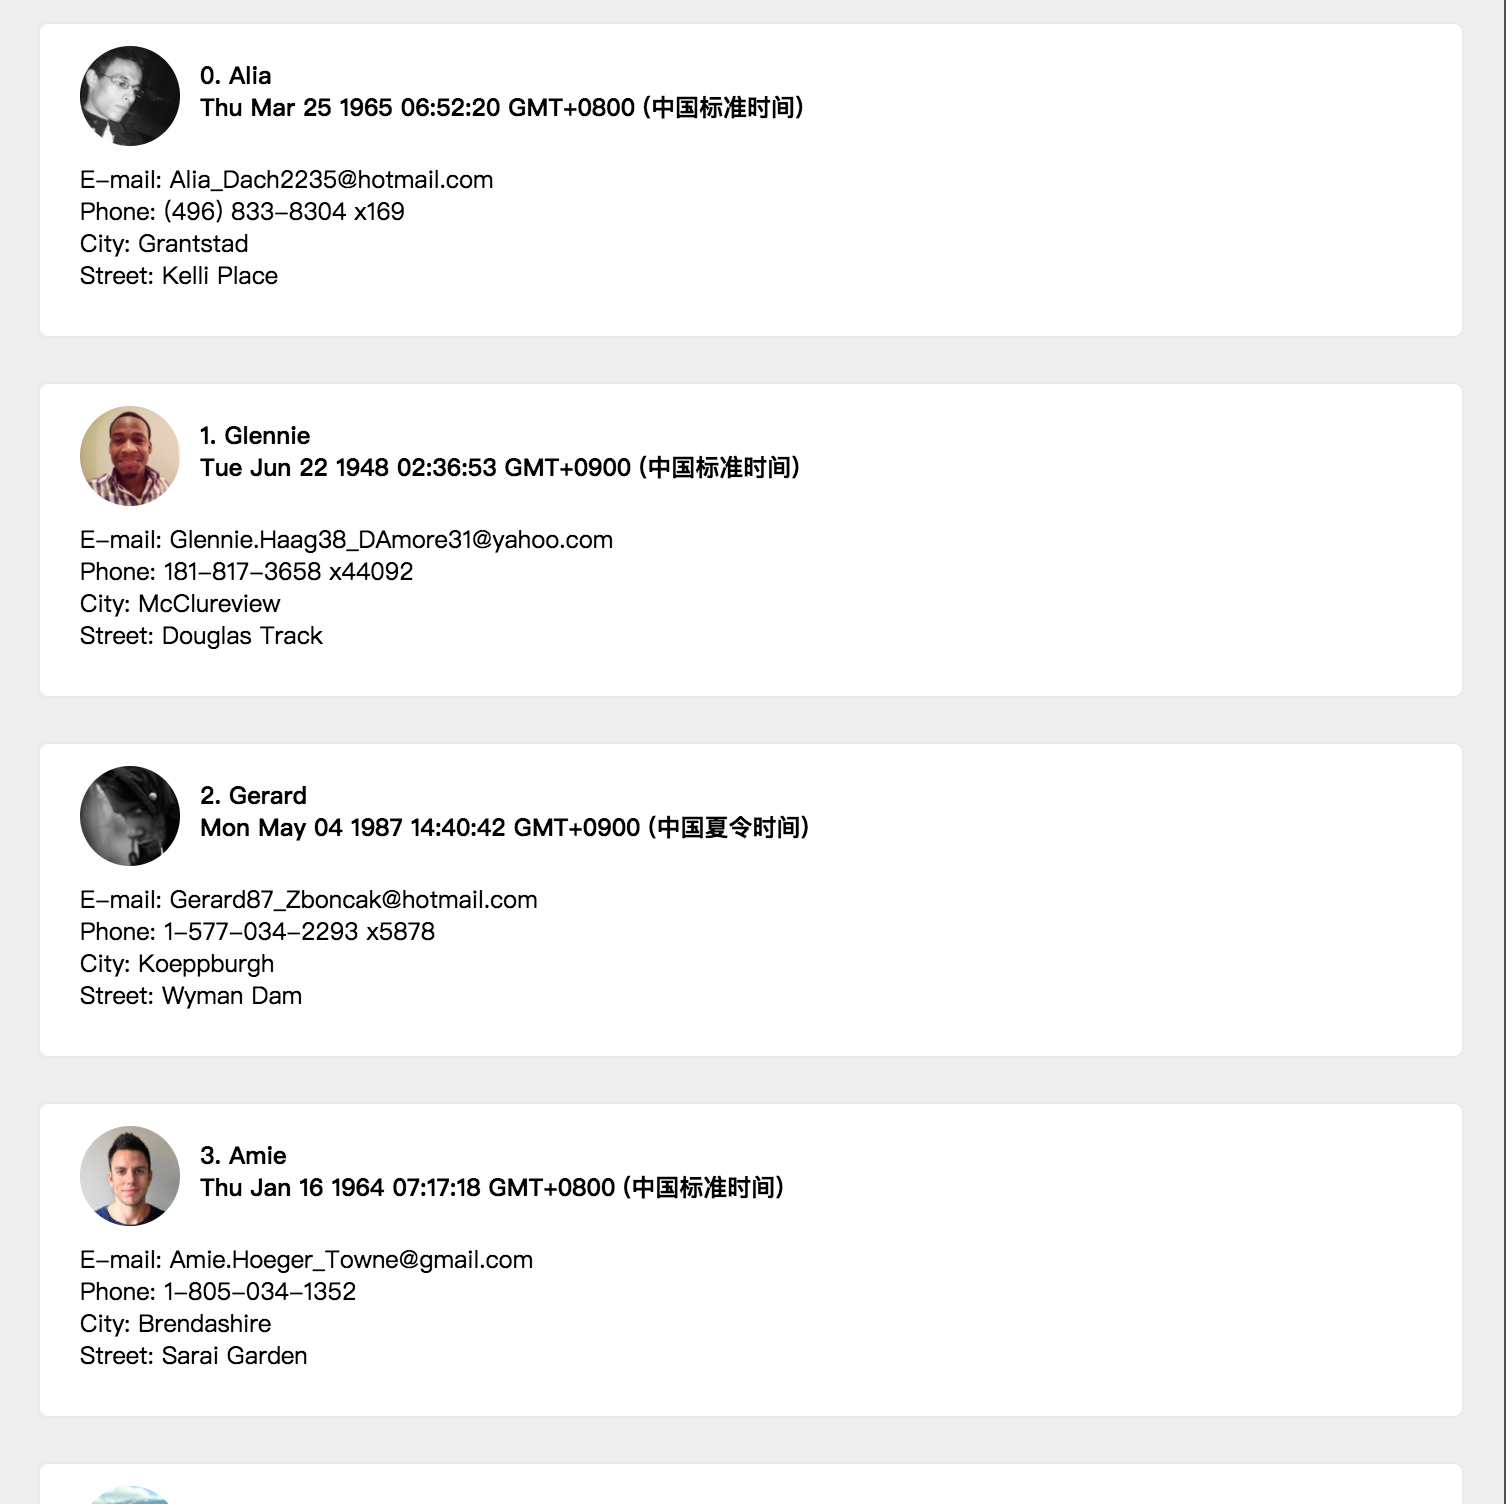
通过路由挂载后,完成一个常规列表的渲染,如下图:
计算「可滚动高度」
因为元素高度是固定,所以在拿到列表数据时就可以通过 列表长度 * 元素高度 获得「可滚动高度」,然后使用此高度撑开滚动容器。通过上文图一可以得知,可滚动高度由「可视区域」+「已浏览区域」+「待浏览区域」组成,关于如何撑开「已浏览区域」和「待浏览区域」,有两种常规的做法:
- 直接使用 padding 撑开列表高度;
- 在列表可视区域外部放置哨兵元素撑开高度。
为了更好地理解后文「动态高度的虚拟列表」的内容,这里选用第二种方法。
新增scrollRunwayEnd属性,在列表获取后计算总高度:
export default {
  // ...
  data() {
    return {
      // ...
      scrollRunwayEnd: 0,
    };
  },
  methods: {
    fetchData() {
      this.listData.push(...this.setItemIndex(fetchData()));
      this.scrollRunwayEnd = this.listData.length * FIXED_HEIGHT;
    },
  },
  // ...
};
在模板内增加scroll-runway元素,根据scrollRunwayEnd,使用transform: translateY的方式撑开「滚动容器」高度:
<template>
  <ul class="height-fixed" ref="scroller" @scroll="handleScroll">
    <li class="height-fixed__scroll-runway" :style="`transform: translate(0, ${scrollRunwayEnd}px)`"></li>
    <item class="height-fixed__item" v-for="item in listData" :data="item" :index="item.index" :key="item.username + item.phone" />
  </ul>
</template>
<!-- ... -->
<style scoped lang="scss">
  .height-fixed {
    /* ... */
    &__scroll-runway {
      position: absolute;
      width: 1px;
      height: 1px;
      transition: transform 0.2s;
    }
  }
</style>
计算初始「可视元素」
「可视元素」使用visibleData表示,visibleData可使用「头挂载元素」和「尾挂载元素」分别代表的元素下标在原始的listData进行动态截取。
根据固定的元素高度和「滚动容器」的高度,可以轻松得出「可视元素」的个数为 滚动容器高度 / 单个元素高度,使用VISIBLE_COUNT表示。同时,为了在快速滚动的情况下也能获得较为良好的数据现实体验,可以适当设置「缓冲区元素」,使用BUFFER_SIZE表示。
新增visibleData数组,用于「可视元素」的装载。页面初次挂载时,「头挂载元素」firstAttachedItem必定为 0,再根据VISIBLE_COUNT和BUFFER_SIZE可得「尾挂载元素」lastAttachedItem:
// ...
const BUFFER_SIZE = 3; // 「缓冲区元素」个数
let VISIBLE_COUNT = 0;

export default {
  name: 'height-fixed',
  data() {
    return {
      // ...
      visibleData: [],
      firstAttachedItem: 0, // 「头挂载元素」
      lastAttachedItem: 0, // 「尾挂载元素」
    };
  },
  mounted() {
    VISIBLE_COUNT = Math.ceil(this.$refs.scroller.offsetHeight / FIXED_HEIGHT);
    this.lastAttachedItem = VISIBLE_COUNT + BUFFER_SIZE;
    this.visibleData = this.listData.slice(this.firstAttachedItem, this.lastAttachedItem);
  },
};
将listData更改为visibleData:
<template>
  <ul class="height-fixed" ref="scroller">
    <li class="height-fixed__scroll-runway" :style="`transform: translate(0, ${scrollRunwayEnd}px)`"></li>
    <item class="height-fixed__item" v-for="item in visibleData" :data="item" :index="item.index" :key="item.username + item.phone" />
  </ul>
</template>
在获得了visibleData后,下一步需要改变列表元素的显示方式。对每个列表元素使用绝对定位,使其脱离文档流,然后使用transform: translateY的方式来对元素进行定位。
将setItemIndex方法更改为calItemScrollY,并根据下标,赋值给每个元素固定的scrollY:
// setItemIndex(list) {
//   let latestIndex = this.listData.length;
//   for (let i = 0; i < list.length; i++) {
//     const item = list[i];
//     item.index = latestIndex + i;
//     Object.freeze(item);
//   }
//   return list;
// }
calItemScrollY(list) {
  let latestIndex = this.listData.length;
  for (let i = 0; i < list.length; i++) {
    const item = list[i];
    item.index = latestIndex + i;
    item.scrollY = this.scrollRunwayEnd + i * FIXED_HEIGHT;
    Object.freeze(item);
  }
  return list;
},
<template>
  <!-- ... -->
  <item
    class="height-fixed__item"
    v-for="item in visibleData"
    :data="item"
    :index="item.index"
    :key="item.username + item.phone"
    :style="`transform: translate(0, ${item.scrollY}px)`"
  />
  <!-- ... -->
</template>
<!-- ... -->
<style scoped lang="scss">
  .height-fixed {
    /* ... */
    &__item {
      position: absolute;
      contain: layout;
      will-change: transform;
    }
  }
</style>
滚动更新「可视元素」
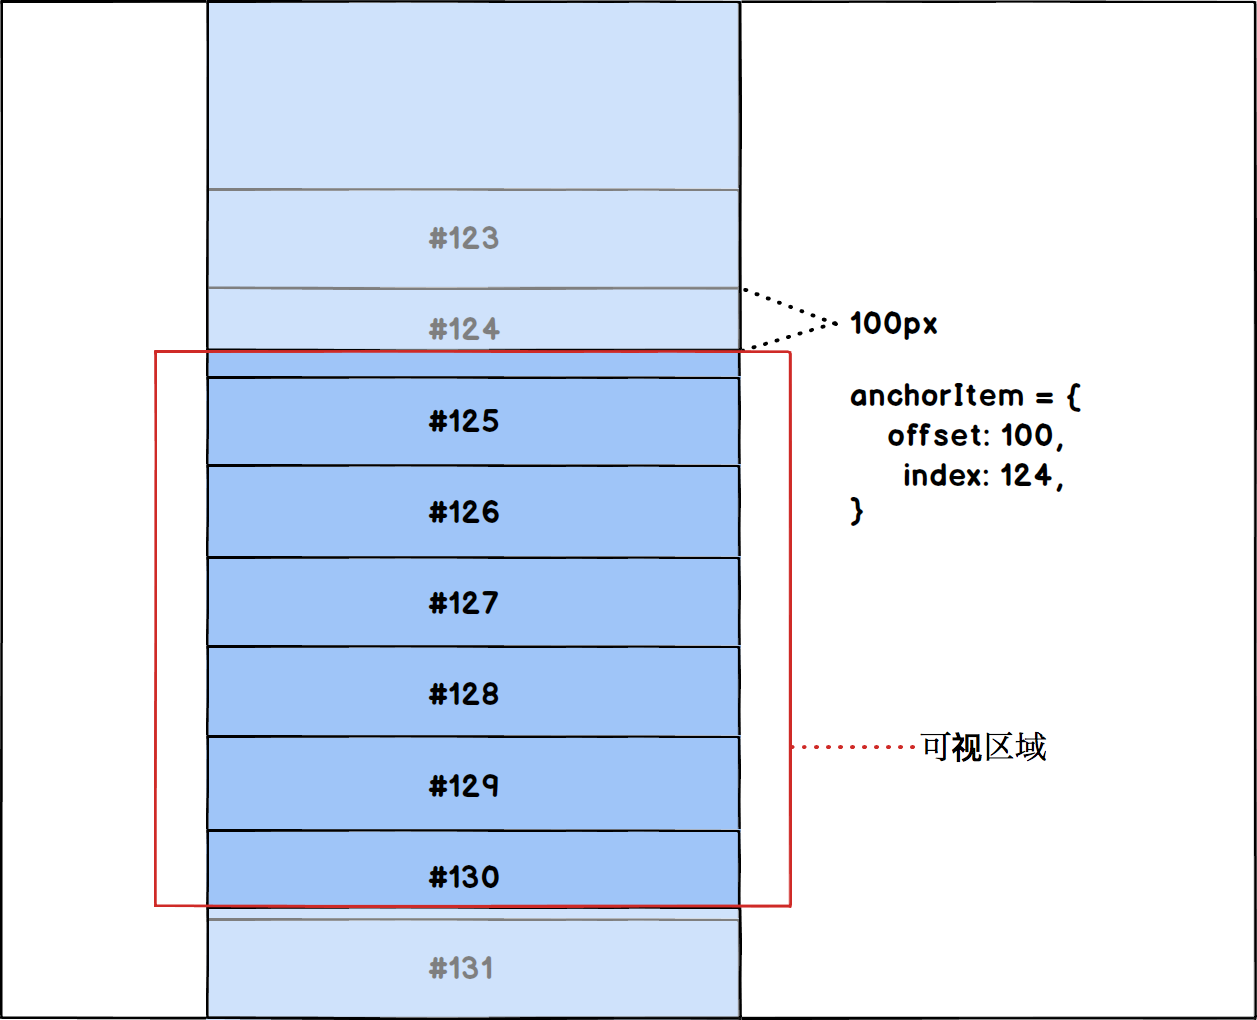
在处理滚动逻辑之前,先引入一个概念:「锚点元素」,即处于「滚动容器」的「可视区域」内的第一个元素。我们需要在滚动时候,根据每一次滚动事件的滚动差值和方向来更新「锚点元素」,计算出「锚点元素」后,就可以根据新的「锚点元素」下标和缓冲区值BUFFER_SIZE、VISIBLE_COUNT来计算「头挂载元素」和「尾挂载元素」。
「锚点元素」= 「当前滚动高度」/ FIXED_HEIGHT // 当偏移量绝对值大于 FIXED_HEIGHT 时需要重新计算;
「头挂载元素」=「锚点元素」- BUFFER_SIZE // 不能小于 0,即第一个元素;
「尾挂载元素」= 「头挂载元素」+ VISIBLE_COUNT + BUFFER_SIZE // 不能大于列表长度,即最后一个元素;
「锚点元素」大部分情况下处于被部分遮盖的状态,被遮盖的部分为它的偏移量offset,其中包含指向具体元素的下标index,如下图所示:
了解了「锚点元素」概念之后,接下来就可以处理「滚动容器」的滚动行为了,首先监听滚动事件:
<template>
  <ul ref="scroller" class="height-fixed" @scroll="handleScroll">
    <!-- ... -->
  </ul>
</template>
根据滚动方向和偏移量,按顺序更新「锚点元素」→「头挂载元素」→「尾挂载元素」→「可视元素」:
// ...
export default {
  // ...
  data() {
    return {
      // ...
      anchorItem: { index: 0, offset: 0 }, // 「锚点元素」初始值
      lastScrollTop: 0, // 记录上次滚动事件时「滚动容器」的「滚动高度」
    };
  },
  methods: {
    // 「锚点元素」更新方法
    updateAnchorItem() {
      const index = Math.floor(this.$refs.scroller.scrollTop / FIXED_HEIGHT);
      const offset = this.$refs.scroller.scrollTop - index * FIXED_HEIGHT;
      this.anchorItem = { index, offset };
    },
    handleScroll() {
      // 滚动差值
      const delta = this.$refs.scroller.scrollTop - this.lastScrollTop;
      this.lastScrollTop = this.$refs.scroller.scrollTop;

      // 更新「锚点元素」偏移量
      this.anchorItem.offset += delta;
      const isPositive = delta >= 0;
      // 判断滚动方向
      if (isPositive) {
        // 1.当「锚点元素」偏移量大于等于固定高度时,说明视图滚动条向下,并超过一个元素,需要更新「锚点元素」
        if (this.anchorItem.offset >= FIXED_HEIGHT) {
          this.updateAnchorItem();
        }
        // 2.计算「头挂载元素」
        if (this.anchorItem.index - this.firstAttachedItem >= BUFFER_SIZE) {
          this.firstAttachedItem = Math.min(this.listData.length - VISIBLE_COUNT, this.anchorItem.index - BUFFER_SIZE);
        }
      } else {
        if (this.$refs.scroller.scrollTop <= 0) {
          // 特殊情况:处理滚动到顶部,更新「锚点元素」为初始值
          this.anchorItem = { index: 0, offset: 0 };
        } else if (this.anchorItem.offset < 0) {
          // 1.当「锚点元素」偏移量小于零时,说明视图滚动条向上,并超过一个元素,需要更新「锚点元素」
          this.updateAnchorItem();
        }
        // 2.计算「头挂载元素」
        if (this.anchorItem.index - this.firstAttachedItem < BUFFER_SIZE) {
          this.firstAttachedItem = Math.max(0, this.anchorItem.index - BUFFER_SIZE);
        }
      }
      // 3.更新「尾挂载元素」
      this.lastAttachedItem = Math.min(this.firstAttachedItem + VISIBLE_COUNT + BUFFER_SIZE * 2, this.listData.length);
      // 4.更新「可视元素」
      this.visibleData = this.listData.slice(this.firstAttachedItem, this.lastAttachedItem);
    },
  },
};
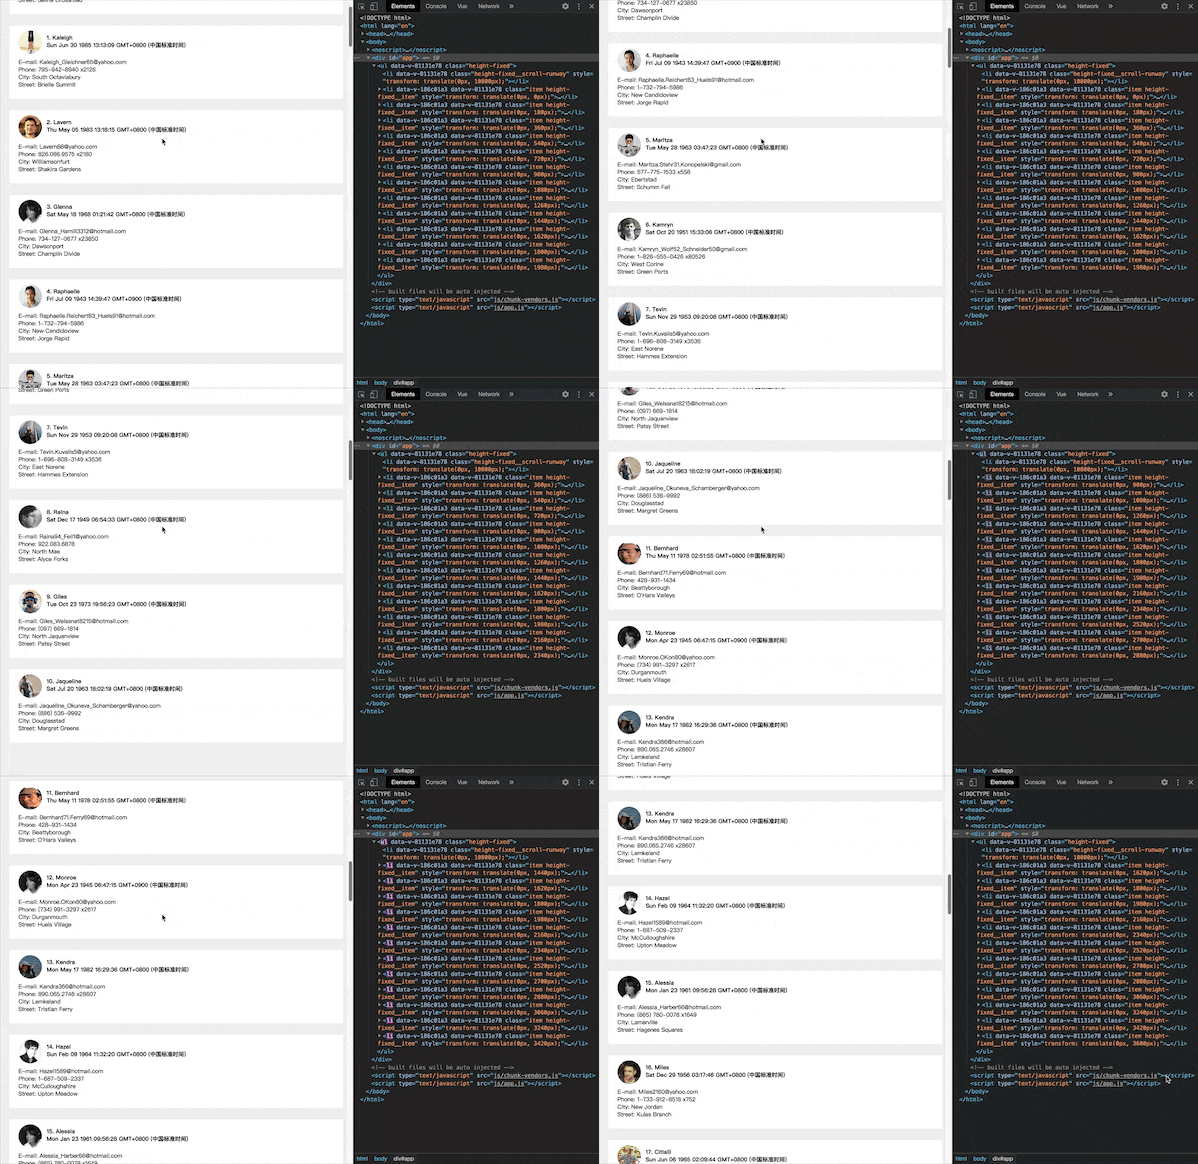
至此,一个简单的「固定高度虚拟滚动」就实现了,打开开发者工具,可以观察到就算滚动条一直向下,列表元素的个数是恒定的:
你可以点击此处进行体验。
动态高度的虚拟列表
因为不再具有固定的元素高度,所以「可滚动高度」和「可视元素」很难像实现固定高度的虚拟列表那样,可以在获取数据后进行一次性计算就完事。下面来说说动态高度虚拟列表的关键难点:
关键点一:如何获得元素的动态高度?
按常规情况,一个列表元素高度为动态的情况大致分为三种:
- 列表元素内初始渲染时高度就不确定。比如不定行数的多行文本、列表元素内包含不定长度的内嵌列表等;
- 列表元素内初始渲染后因用户操作而高度发生变化。比如展开一个收缩项目、删除或增加子元素等;
- 列表元素内包含异步渲染元素。比如未缓存过的图片、异步组件等。
由于这些复杂的情况可能同时存在一个列表元素内,所以只能够实时监听每一个处于可视区域内的元素的高度。现阶段 ECMA DOM 规范下,有两个 API 可以达到这个目的:MutationObserver和 ResizeObserver。
这两个 API 都存在一定的兼容性问题,caniuse#ResizeObserver | caniuse#MutationObserver,可以使用对应的polyfill进行解决,因为ResizeObserver可以更直观地达到监听元素高度变动的目的,所以这里选择使用ResizeObserver。ResizeObserver的 polyfill。
关键点二:如何模拟「可滚动高度」?
因为列表元素的高度不再是固定的,所以「可滚动高度」不能再通过「列表元素个数」*「固定元素高度」简单逻辑关系来获得。此时,只能基于业务的实际情况,给每个列表元素定一个「估算高度」:ESTIMATED_HEIGHT。
同时,还需要新增一个cachedHeight数组,根据上一关键点提到的元素高度变化事件,以每一个列表元素对应的下标记录最后一次变化的高度。如果元素未渲染或者被略过渲染时,用ESTIMATED_HEIGHT进行暂时代替。
由此可得知,「可滚动高度」scrollRunwayEnd只能是「动态」且「大致准确」的。在 vue 里,可以用一个「计算属性」进行实时估值:
  // ...
  data() {
    return {
      // ...
      // scrollRunwayEnd: 0,
    };
  },
  computed: {
    scrollRunwayEnd() {
      // 根据当前已渲染的元素高度,求得当前所有元素总高度
      const maxScrollY = this.cachedHeight.reduce((sum, h) => (sum += h || ESTIMATED_HEIGHT), 0);
      // 根据当前所有元素总高度,求得元素平均高度
      const currentAverageH = maxScrollY / this.cachedHeight.length;
      // 返回估算高度
      return maxScrollY + (this.listData.length - this.cachedHeight.length) * currentAverageH;
    },
  },
  // ...
关键点三:如何计算每一个元素的「scrollY」?
这一步是最难的,因为除了第一个元素外的每一个元素的「scrollY」可能都会因为下面几种情况而失效:
- 当前元素的上一个元素高度发生了变化。 这种情况意味着从当前元素开始,每一个后续元素都需要按上一个元素的高度差值进行「scrollY」计算。
- 用户快速拖动滚动条至底部或顶部。 由于略过了中间元素的渲染,
cachedHeight会缺少略过元素的真实高度,所以只能用上文的ESTIMATED_HEIGHT进行代替。这种情况下用户再缓慢滚动到顶部时,略过元素的初次渲染会更新cachedHeight中对应的记录。此时更新的高度肯定是大于或者小于ESTIMATED_HEIGHT的,所以当用户持续滚动缓慢滚动到scrollTop为 0 时,可能会出现 上部滚动区域「不足」或者「多余」的情况。因此,必须在保证当前页面滚动情况不变的前提下,提前对这两种情况进行实时修正,也即修正scrollTop的同时重新计算「锚点元素」。 - 屏幕宽度发生改变。 手机屏幕横竖方向改变和手动改变浏览器窗口大小都可能导致「滚动容器」的宽度发生变化,「滚动容器」的宽度决定了列表元素的高度,这种情况下每一个元素的「scrollY」都将失效,需要重新计算。同时,为了更好地的用户体验,我们应该在宽度发生变化时,保持「锚定元素」的
offset不变,举一个 twitter 例子:

因此,这里我们不再将「scrollY」直接赋予每一个列表元素,而是新增一个cachedScrollY数组用于存储所有列表元素的临时「scrollY」。在每一次滚动事件发生时,根据滚动差值是否超过「锚点元素」对应的cachedHeight去判断是否需要更新「锚点元素」。如果「锚点元素」发生改变,以「锚点元素」为基点,用每一个「可视元素」对应的cachedHeight叠加「锚点元素」的「scrollY」去计算自身的「scrollY」,然后更新每个列表元素对应cachedScrollY,最后渲染到「可视区域」。
准备工作
修改随机数据函数,给每个元素增加随机图片和该图片的随机宽度:
export function fetchData(count = 30) {
  const result = [];
  for (let i = 0; i < count; i++) {
    const item = faker.helpers.contextualCard();
    item.paragraph = faker.lorem.paragraph();
    item.img = {
      src: `/images/${faker.random.number({ min: 1, max: 20 })}.jpeg`, // 从给定的 20 张图片内随机
      width: `${faker.random.number({ min: 100, max: 700 })}px`, // 从 100px - 700px 范围内随机
    };
    result.push(item);
  }
  return result;
}
修改item组件,注意加载的两张图片:一张为正常加载的图片,一张为人工延时加载的图片:
<template>
  <li class="item" ref="item">
    <div class="item__wrapper" :class="{ 'is-fixed': fixedHeight }">
      <!-- ... -->
      <template v-if="fixedHeight">
        <!-- ... -->
      </template>
      <template v-else>
        <p class="item__paragraph">{{ data.paragraph }}</p>
        <!-- 模拟延时加载图片 -->
        <img class="item__img" :src="defferImgSrc" :style="{width: data.img.width}" />
        <!-- 正常加载图片 -->
        <img class="item__img" :src="data.img.src" :style="{width: data.img.width}" />
      </template>
    </div>
  </li>
</template>
<script>
  // ...
  export default {
    // ...
    props: {
      // ...
      fixedHeight: {
        type: Boolean,
        default: true,
      },
    },
    data() {
      return {
        defferImgSrc: '',
      };
    },
    created() {
      // 模拟图片加载时间
      if (this.data.img.isDeffer) {
        this.defferImgSrc = this.data.img.src;
      } else {
        setTimeout(() => {
          this.defferImgSrc = this.data.img.src;
          this.data.img.isDeffer = true;
        }, faker.random.number({ min: 300, max: 5000 }));
      }
    },
  };
</script>
最后,在mounted钩子内使用 resize-observer-polyfill 监听元素高度变化:
import ResizeObserver from 'resize-observer-polyfill';

export default {
  // ...
  mounted() {
    if (this.fixedHeight) return;

    const ro = new ResizeObserver((entries, observer) => {
      // 高度发生变化时,将 'size-change' 事件 emit 到父组件
      this.$emit('size-change', this.index);
    });
    ro.observe(this.$refs.item);
    this.$once('hook:beforeDestroy', ro.disconnect.bind(ro));
  },
  // ...
};
通过路由挂载后,完成一个动态高度元素列表的渲染,如下图:

监听元素高度变化
在每一次「可视元素」的高度发生变化时,以「锚点元素」为基点,计算出「锚点元素」的scrollY,然后按「锚点元素」之前和之后的元素进行区别计算,得出所有「可视元素」的最新scrollY。
注意:列表元素的初次渲染和后续的高度变化都会触发ResizeObserver事件
<template>
  <ul ref="scroller" class="height-dynamic" @scroll="handleScroll">
    <!-- ... -->
    <item
      class="height-dynamic__item"
      v-for="item in visibleData"
      ref="items"
      :data="item"
      :fixed-height="false"
      :key="item.username + item.phone"
      :index="item.index"
      :style="`transform: translate(0, ${cachedScrollY[item.index]}px)`"
      @size-change="handleSizeChange"
    />
  </ul>
</template>
<script>
  export default {
    // ...
    methods: {
      handleSizeChange(index) {
        this.calItemScrollY();
      },
      // 计算每一个「可视元素」的 scrollY
      async calItemScrollY() {
        await this.$nextTick();
        // 修正 vue diff 算法导致「可视元素」顺序不正确的问题
        this.$refs.items.sort((a, b) => a.index - b.index);

        // 获取「锚点元素」在「可视元素」中的序号
        const anchorDomIndex = this.$refs.items.findIndex(item => item.index === this.anchorItem.index);
        const anchorDom = this.$refs.items[anchorDomIndex];
        const anchorDomHeight = anchorDom.$el.getBoundingClientRect().height;

        // 通过「滚动容器」的「当前滚动高度」和「锚点元素」的 offset 算出其 scrollY
        this.$set(this.cachedScrollY, this.anchorItem.index, this.$refs.scroller.scrollTop - this.anchorItem.offset);
        this.$set(this.cachedHeight, this.anchorItem.index, anchorDomHeight);

        // 计算 anchorItem 后面的列表元素 scrollY
        for (let i = anchorDomIndex + 1; i < this.$refs.items.length; i++) {
          const item = this.$refs.items[i];
          const { height } = item.$el.getBoundingClientRect();
          this.$set(this.cachedHeight, item.index, height);
          // 当前元素的 scrollY 是上一个元素的 scrollY + 上一个元素的高度
          const scrollY = this.cachedScrollY[item.index - 1] + this.cachedHeight[item.index - 1];
          this.$set(this.cachedScrollY, item.index, scrollY);
        }
        // 计算 anchorItem 前面的列表元素 scrollY
        for (let i = anchorDomIndex - 1; i >= 0; i--) {
          const item = this.$refs.items[i];
          const { height } = item.$el.getBoundingClientRect();
          this.$set(this.cachedHeight, item.index, height);
          // 当前元素的 scrollY 是下一个元素的 scrollY - 当前元素的高度
          const scrollY = this.cachedScrollY[item.index + 1] - this.cachedHeight[item.index];
          this.$set(this.cachedScrollY, item.index, scrollY);
        }
      },
      // ...
    },
    // ...
  };
</script>
滚动更新「可视元素」
「可滚动高度」的计算已经在上面提过,而初始「可视元素」和固定高度的虚拟列表的计算是类似的,所以这里跳过这两点,只描述如何处理滚动更新「可视元素」。
根据滚动方向和偏移量,按顺序更新「锚点元素」→「头挂载元素」→「尾挂载元素」→「可视元素」:
// ...
export default {
  // ...
  methods: {
    // ...
    handleScroll() {
      const delta = this.$refs.scroller.scrollTop - this.lastScrollTop;
      this.lastScrollTop = this.$refs.scroller.scrollTop;
      // 1.更新「锚点元素」
      this.updateAnchorItem(delta);
      // 更新「头挂载元素」→「尾挂载元素」→「可视元素」
      this.updateVisibleData();
    },
    async updateAnchorItem(delta) {
      const lastIndex = this.anchorItem.index;
      const lastOffset = this.anchorItem.offset;
      delta += lastOffset;

      let index = lastIndex;
      const isPositive = delta >= 0;
      // 判断滚动方向
      if (isPositive) {
        // 用 delta 一直减去从「锚点元素」开始向下方向的「可视元素」高度,每减一次 index 前进一位
        while (index < this.listData.length && delta > (this.cachedHeight[index] || ESTIMATED_HEIGHT)) {
          // 当 this.cachedHeight[index] 不存在时,说明可能被快速拖动滚动条而略过渲染,此时需要填充估计高度
          if (!this.cachedHeight[index]) {
            this.$set(this.cachedHeight, index, ESTIMATED_HEIGHT);
          }
          delta -= this.cachedHeight[index];
          index++;
        }
        if (index >= this.listData.length) {
          this.anchorItem = { index: this.listData.length - 1, offset: 0 };
        } else {
          this.anchorItem = { index, offset: delta };
        }
      } else {
        // 用 delta 一直叠加从「锚点元素」开始向上方向的「可视元素」高度,每加一次 index 后退一位
        while (delta < 0) {
          // 当 this.cachedHeight[index] 不存在时,说明可能被快速拖动滚动条而略过渲染,此时需要填充估计高度
          if (!this.cachedHeight[index - 1]) {
            this.$set(this.cachedHeight, index - 1, ESTIMATED_HEIGHT);
          }
          delta += this.cachedHeight[index - 1];
          index--;
        }
        if (index < 0) {
          this.anchorItem = { index: 0, offset: 0 };
        } else {
          this.anchorItem = { index, offset: delta };
        }
      }
    },
    updateVisibleData() {
      // 2.更新「头挂载元素」,注意不能小于 0
      const start = (this.firstAttachedItem = Math.max(0, this.anchorItem.index - BUFFER_SIZE));
      // 3.更新「尾挂载元素」
      this.lastAttachedItem = this.firstAttachedItem + VISIBLE_COUNT + BUFFER_SIZE * 2;
      const end = Math.min(this.lastAttachedItem, this.listData.length);
      // 4.更新「可视元素」
      this.visibleData = this.listData.slice(start, end);
    },
    // ...
  },
  // ...
};
修正滚动条
到这一步,这个「动态高度虚拟列表」已经大致可用了,但是还有一个问题,就是当用户快速拖动滚动条,因为「滚动差值」很大,所以会略过中间元素的渲染,此时这些略过的元素在cachedHeight中用ESTIMATED_HEIGHT进行存储,因此会出现两种情况:
- 估算的「可滚动高度」小于实际的「可滚动高度」。比如略过了中间 20 个元素,这些略过元素的估算高度总值为 ESTIMATED_HEIGHT(180) * 20 = 3600,而假设实际元素真正渲染时的平均高度为 300,即略过元素的实际高度总值为 300 * 20 = 6000。可以得知差值为 3600 - 6000 = -2400,滚动到顶部时,无法滚动到第一个元素。
- 估算的「可滚动高度」大于实际的「可滚动高度」。比如略过了中间 20 个元素,这些略过元素的估算高度总值为 ESTIMATED_HEIGHT(180) * 20 = 3600,而假设实际元素真正渲染时的平均高度为 100,即略过元素的实际高度总值为 100 * 20 = 2000。可以得知差值为 3600 - 2000 = 1600,滚动到顶部时会有空白部分。
考虑在这种情况下,可能会有往回滚动的场景,所以必须在发现「可滚动高度」过小或过大的时候,必须进行及时修正。修改原来的handleScroll、updateAnchorItem和calItemScrollY方法,添加相关逻辑。
export default {
  data() {
    return {
      // ...
      revising: false,
    };
  },
  // ...
  methods: {
    // ...
    handleScroll() {
      if (this.revising) return; // 修正滚动条时,屏蔽滚动逻辑
      // ...
    },
    async updateAnchorItem(delta) {
      // ...
      // 修正拖动过快导致的滚动到顶端滚动条不足的偏差
      if (this.cachedScrollY[this.firstAttachedItem] <= -1) {
        console.log('revising insufficient');
        this.revising = true;
        // 需要的修正的滚动高度为「锚点元素」之前的元素总高度 + 「锚点元素」的 offset
        const actualScrollTop =
          this.cachedHeight.slice(0, Math.max(0, this.anchorItem.index)).reduce((sum, h) => (sum += h), 0) + this.anchorItem.offset;
        this.$refs.scroller.scrollTop = actualScrollTop;
        this.lastScrollTop = this.$refs.scroller.scrollTop;
        if (this.$refs.scroller.scrollTop === 0) {
          this.anchorItem = { index: 0, offset: 0 };
        }
        // 更改了 lastScrollTop 后,需要重新计算「可视元素」的 scrollY
        this.calItemScrollY();
        this.revising = false;
      }
    },
    // 计算每一个「可视元素」的 scrollY
    async calItemScrollY() {
      // ...
      // 修正拖动过快导致的滚动到顶端有空余的偏差
      if (this.cachedScrollY[0] > 0) {
        console.log('revising redundant');
        this.revising = true;
        // 第一个列表元素的 cachedScrollY 即为多出的量
        const delta = this.cachedScrollY[0];
        const last = Math.min(this.lastAttachedItem, this.listData.length);
        for (let i = 0; i < last; i++) {
          this.$set(this.cachedScrollY, i, this.cachedScrollY[i] - delta);
        }
        const scrollTop = this.cachedScrollY[this.anchorItem.index - 1]
          ? this.cachedScrollY[this.anchorItem.index - 1] + this.anchorItem.offset
          : this.anchorItem.offset;
        this.$refs.scroller.scrollTop = scrollTop;
        this.lastScrollTop = this.$refs.scroller.scrollTop;
        this.revising = false;
      }
    },
    // ...
  },
  // ...
};
打完收工,「动态高度虚拟列表」实现完成,打开开发者工具,可以观察到就算滚动条一直向下,列表元素的个数都是恒定的,而且无论是快速拖动滚动条还是实时改变窗口宽度,整个列表都能正确地渲染:
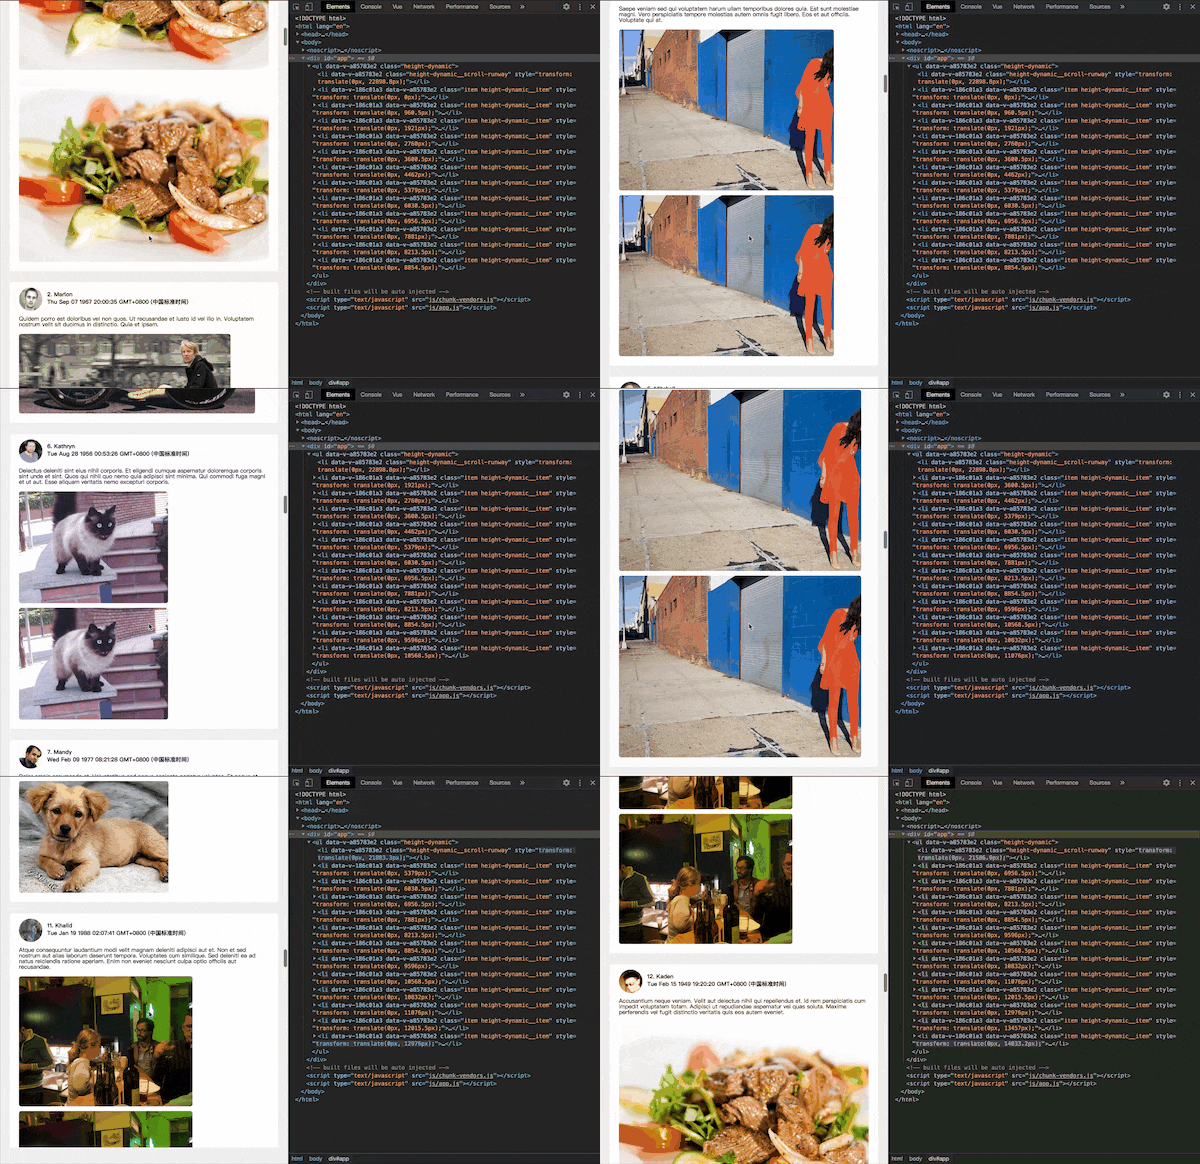
你可以点击此处进行体验。
总结
本文介绍了前端业务开发中长列表的常规优化手段「虚拟列表」的定义和它在 Vue 环境中的实现,就「固定高度虚拟列表」和「动态高度虚拟列表」两个场景下以一个简单的 demo 详细讲述了虚拟列表的实现思路。
阅读完本文后可以发现,以本文的思路实现「虚拟列表」的关键在于「锚点元素」的计算和更新,理解了这一点之后就可以发现后续的实现都是按部就班的。
文字表达可能会有疏漏,建议通过下载本文的代码库(基于 Vue 2.x)运行调试,加深理解。
如果有不正确或难以理解的地方,欢迎通过邮件和留言进行指正讨论。
重要提示: 本文所有代码及示例项目只用于探讨虚拟列表的实现原理,请勿直接使用于生产。
戳这里访问原文地址,以获得更好的阅读体验。