Reactive State Management Powered by RxJS
Juliette
![]()


Reactive State Management Powered by RxJS
Contents
Overview
Juliette is a reactive state management library inspired by NgRx.
It reduces Redux boilerplate, eliminates reducer’s conditional branching, simplifies
the configuration and introduces NgRx-like architecture into the framework-agnostic world.
Juliette is a TypeScript friendly library and can be used in Angular, React or any JavaScript application.
Reduced Boilerplate Without Conditional Branching
Juliette reduces Redux boilerplate by merging the action, and the reducer into one component called handler.
To better understand the benefits of the handler, let’s first look at how actions and reducers are defined by using NgRx.
Old NgRx Approach
// users.actions.ts

export const FETCH_USERS = '[Users] Fetch Users';
export const FETCH_USERS_SUCCESS = '[Users] Fetch Users Success';
export const FETCH_USERS_ERROR = '[Users] Fetch Users Error';

export class FetchUsers implements Action {
  readonly type = FETCH_USERS;
}

export class FetchUsersSuccess implements Action {
  readonly type = FETCH_USERS_SUCCESS;

  constructor(public payload: User[]) {}
}

export class FetchUsersError implements Action {
  readonly type = FETCH_USERS_ERROR;
}

export type Action = FetchUsers | FetchUsersSuccess | FetchUsersError;

// users.reducer.ts

import * as UsersActions from './users.actions';

export interface State {
  users: User[];
  loading: boolean;
}

const initialState: State = {
  users: [],
  loading: false,
};

export function reducer(state = initialState, action: UsersActions.Action): State {
  switch (action.type) {
    case UsersActions.FETCH_USERS:
      return { ...state, loading: true };
    case UsersActions.FETCH_USERS_SUCCESS:
      return { ...state, users: action.payload, loading: false };
    case UsersActions.FETCH_USERS_ERROR:
      return { ...state, users: [], loading: false };
    default:
      return state;
  }
}
TypeScript code above shows the old NgRx syntax and it is pretty similar to the traditional Redux approach.
As you can see, it’s too much code for three simple actions. Then, NgRx team introduced a new way
to define actions and reducers.
New NgRx Approach
// users.actions.ts

export const fetchUsers = createAction('[Users] Fetch Users');
export const fetchUsersSuccess = createAction(
  '[Users] Fetch Users Success',
  props<{ users: User[] }>(),
);
export const fetchUsersError = createAction('[Users] Fetch Users Error');

// users.reducer.ts

import * as UsersActions from './users.actions';

export interface State {
  users: User[];
  loading: boolean;
}

const initialState: State = {
  users: [],
  loading: false,
};

export const reducer = createReducer(
  initialState,
  on(UsersActions.fetchUsers, state => ({ ...state, loading: true })),
  on(UsersActions.fetchUsersSuccess, (state, { users }) => ({
    ...state,
    users,
    loading: false,
  })),
  on(UsersActions.fetchUsersError, state => ({
    ...state,
    users: [],
    loading: false,
  })),
);
With new NgRx syntax, less amount of code is needed to define actions and reducers. Conditional
branching for actions in the reducer is masked by the on operator, but it is still present.
Let’s now look at how the same example is implemented using Juliette handlers.
Juliette Approach
// users.handlers.ts

export const featureKey = 'users';

export interface State {
  users: User[];
  loading: boolean;
}

export const initialState: State = {
  users: [],
  loading: false,
};

export const fetchUsers = createHandler<State>(
  '[Users] Fetch Users',
  featureKey,
  state => ({ ...state, loading: true }),
);
export const fetchUsersSuccess = createHandler<State, { users: User[] }>(
  '[Users] Fetch Users Success',
  featureKey,
  (state, { users }) => ({ ...state, users, loading: false }),
);
export const fetchUsersError = createHandler<State>(
  '[Users] Fetch Users Error',
  featureKey,
  state => ({ ...state, users: [], loading: false }),
);
As you can see, Juliette way is declarative. Also, the least amount of code is required to define the same logic.
Instead of creating actions and then adding new conditional branches to the reducer, Juliette’s handler creator accepts
the reducer function on-site.
Simplified Configuration
You don’t need to register reducers to the store anymore!
Framework Agnostic
Core features of Juliette are implemented in pure TypeScript. The library is small-sized and has RxJS as the only production dependency.
All framework specific stuff is in separate libraries.
We currently support Angular and React via dedicated plugins. They provide core functionalities adapted to the framework design.
Of course, Juliette can be used in Angular or React without plugins, but that way wouldn’t be native.
Architecture
Juliette is a great solution for large-scale applications, because merging action and reducer into the handler will reduce the boilerplate,
but won’t make a mess in complex systems. Let’s look at the diagram.
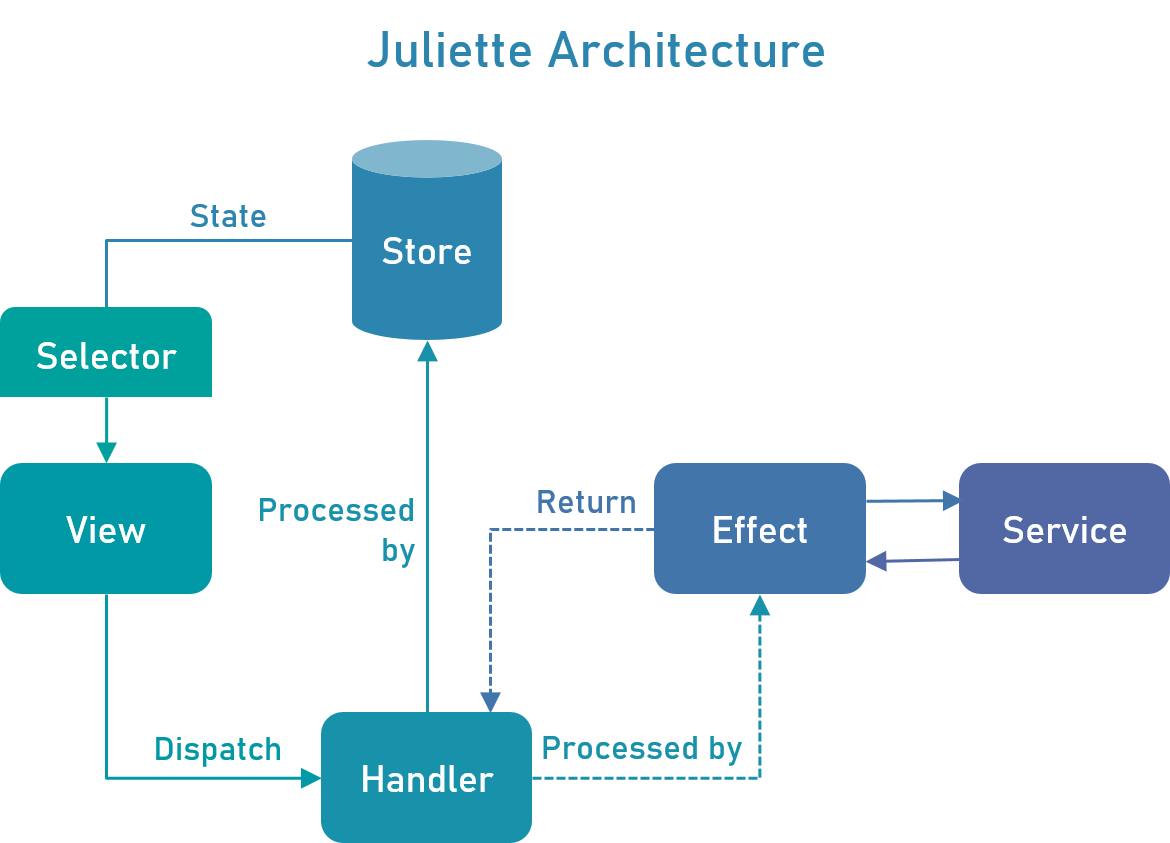
When an event occurs on the view, it will dispatch the handler. Then, if the handler has a reducer function, it will be executed by the store
and new state will be reflected in the view through the selector. After that, if the handler has a side effect, that effect will be performed.
Lastly, if the effect returns a new handler, the execution process will be repeated.
Installation
Run npm install juliette to install core Juliette library.
For Angular, install an additional package by running npm install juliette-ng command.
For React, install an additional package by running npm install juliette-react command.
Guide
Handlers
As already mentioned, handler is the component that merges the action and the reducer. You can create the handler by using createHandler
function and there are four different ways to do this. Let’s look at the simplest first.
const showCreateTodoDialog = createHandler('[Todos] Show Create Todo Dialog');
createHandler requires only type as an argument. type is similar to Redux action type and must be unique at the application
level. Another case is when the handler requires a payload whose type must be passed as a generic argument.
const createTodo = createHandler<{ todo: Todo }>('[Todos] Create Todo');
The third case is when the handler needs state changes. Then, you need to pass featureKey as a second argument. featureKey is the key of the state piece
from the application state to which the defined handler refers. The third argument is a function that accepts the old state and returns a new state, similar
to the reducer from Redux.
const fetchTodos = createHandler(
  '[Todos] Fetch Todos',
  featureKey,
  state => ({ ...state, loading: true }),
);
If you try to compile the code above, you will get a compilation error. That is because createHandler function is strongly typed in order to avoid
potential mistakes. To fix the error, you need to pass the type of todos state as a generic argument.
const fetchTodos = createHandler<State>(
  '[Todos] Fetch Todos',
  featureKey,
  state => ({ ...state, loading: true }),
);
The last case is when the handler needs both, the payload and the reducer. Let’s see it in action.
const fetchTodosSuccess = createHandler<State, { todos: Todo[] }>(
  '[Todos] Fetch Todos Success',
  featureKey,
  (state, { todos }) => ({ ...state, todos, loading: false }),
);
Store
To create the store, Juliette provides createStore function. It accepts the initial application state as the first argument.
The second argument is devMode and it’s optional. You can enable it when the application is in development mode
in order to log the state and handlers on every dispatch. Also, when devMode is enabled, you’ll get an error if
try to mutate the state.
const store = createStore(initialAppState, true);
To dispatch handlers, the store provides dispatch function.
store.dispatch(fromTodos.fetchTodos());
There are two ways to get the application state. In both cases, you will get the state as an observable. First way is to get the entire
state by using state$ property from the store.
const appState$ = store.state$;
Second option is to select a partial state. For this purpose, Juliette store provides select function. You can pass the key of the feature state
or a selector function that accepts the state as an argument and returns the selected slice.
const todosState1$ = store.select(fromTodos.featureKey);
const todosState2$ = store.select(state => state[fromTodos.featureKey]);
Another way to select a state is to use regular RxJS operators.
const todosState3$ = store.state$.pipe(
  pluck(fromTodos.featureKey),
  distinctUntilChanged(),
);
const todosState4$ = store.state$.pipe(
  map(state => state[fromTodos.featureKey]),
  distinctUntilChanged(),
);
In case you need to initialize a feature state on the fly, there is addFeatureState method.
store.addFeatureState(fromTodos.featureKey, fromTodos.initialState);
Selectors
Juliette provides composeSelectors function for selector composition. It accepts an array of selector functions as the first argument
and composer function as the second argument. Selectors created with composeSelectors function are memoized.
const selectTodosState = (state: AppState) => state[fromTodos.featureKey];
const selectAllTodos = composeSelectors([selectTodosState], state => state.todos);

const selectInProgressTodos = composeSelectors(
  [selectAllTodos],
  todos => todos.filter(todo => todo.status === 'IN_PROGRESS'),
);
const selectDoneTodos = composeSelectors(
  [selectAllTodos],
  todos => todos.filter(todo => todo.status === 'DONE'),
);

const selectInProgressAndDoneTodos = composeSelectors(
  [selectInProgressTodos, selectDoneTodos],
  (inProgressTodos, doneTodos) => [...inProgressTodos, ...doneTodos],
);
Effects
If you need to perform a side effect when some handler is dispatched, the effect component is the right place to do that. This approach to managing
side effects was introduced by the NgRx team and is more reactive and declarative than the use of Redux middleware. To create an effect, create a RxJS
observable that returns a new handler, any other value or nothing. If a new handler is returned, Juliette will dispatch it when the task within
the effect is completed. Otherwise, the returned value will be ignored. Unlike NgRx, where you need to use createEffect function and pass
an additional configuration if you want the effect not to return a new handler, with Juliette it will be done automatically. Enough theory, let’s move
on to examples.
Juliette store provides handlers$ stream that will emit a new value every time when any handler is dispatched. If you need to perform a side effect
when some handler is dispatched, you can filter handlers$ stream by using ofType operator and pass that handler as an argument. Then, the operators
chained after the ofType operator will be executed only when passed handler is dispatched.
const showCreateTodoDialog$ = store.handlers$.pipe(
  ofType(fromTodos.showCreateTodoDialog),
  tap(() => todosService.showCreateTodoDialog()),
);
If passed handler has a payload, you can access it in the next operator’s callback as an argument.
const createTodo$ = store.handlers$.pipe(
  ofType(fromTodos.createTodo),
  switchMap(handler => todosService.createTodo(handler.payload.todo)),
);
Juliette also provides toPayload operator that will extract the payload from the dispatched handler.
const createTodo$ = store.handlers$.pipe(
  ofType(fromTodos.createTodo),
  toPayload(),
  switchMap(({ todo }) => todosService.createTodo(todo)),
);
When the effect needs data from the store, you can use withLatestFrom operator. If you need to dispatch a new handler when the effect task
is completed, you can return it from the last operator in the chain.
const fetchTodos$ = store.handlers$.pipe(
  ofType(fromTodos.fetchTodos),
  withLatestFrom(store.select(fromTodos.featureKey)),
  switchMap(([, { search, currentPage, itemsPerPage }]) =>
    todosService.getTodos(search, currentPage, itemsPerPage).pipe(
      map(todos => fromTodos.fetchTodosSuccess({ todos })),
      catchError(() => of(fromTodos.fetchTodosError())),
    ),
  ),
);
Also, ofType operator can accept a sequence of handlers as an argument. This allows multiple handlers to be listened to in the same effect.
const invokeFetchTodos$ = store.handlers$.pipe(
  ofType(
    fromTodos.updateSearch,
    fromTodos.updateCurrentPage,
    fromTodos.updateItemsPerPage,
  ),
  map(() => fromTodos.fetchTodos()),
);
When the effect needs to dispatch multiple handlers, you can return them in array by using switchMap or mergeMap operators.
const resetPagination$ = store.handlers$.pipe(
  ofType(fromTodos.resetPagination),
  switchMap(() => [
    fromTodos.updateCurrentPage({ currentPage: 1 }),
    fromTodos.updateItemsPerPage({ itemsPerPage: 10 }),
  ]),
);
Finally, use registerEffects function to start up the effects machinery.
registerEffects(store, [
  showCreateTodoDialog$,
  createTodo$,
  fetchTodos$,
  invokeFetchTodos$,
  resetPagination$,
]);
Angular Plugin
JulietteNg library has additional functionalities for using
Juliette in the Angular way. Instead of creating the store via createStore function, it provides StoreModule to do so.
@NgModule({
  ...
  imports: [
    ...
    StoreModule.forRoot(initialAppState, !environment.production),
  ],
})
export class AppModule {}
forRoot method from StoreModule accepts the same arguments as createStore function. Creating the store using StoreModule allows the store
to be injected as a service within any Angular component or service.
@Component({
  ...
})
export class TodosComponent {
  todosState$ = this.store.select(fromTodos.featureKey);

  constructor(private store: Store<AppState>) {}

  fetchTodos(): void {
    this.store.dispatch(fromTodos.fetchTodos());
  }
}
To initialize the feature state in lazy-loaded module, use forFeature method.
@NgModule({
  ...
  imports: [
    ...
    StoreModule.forFeature(fromTodos.featureKey, fromTodos.initialState),
  ],
})
export class TodosModule {}
To register the effects, JulietteNg provides EffectsModule.
@NgModule({
  ...
  imports: [
    ...
    EffectsModule.register([TodosEffects]),
  ],
})
export class AppModule {}
register method from EffectsModule accepts an array of classes with effects and can be used in both, root and feature modules.
By creating effects within the class, you can use all the benefits of dependency injection.
@Injectable()
export class TodosEffects {
  fetchTodos$ = this.store.handlers$.pipe(
    ofType(fromTodos.fetchTodos),
    withLatestFrom(this.store.select(fromTodos.featureKey)),
    switchMap(([, { search, currentPage, itemsPerPage }]) =>
      this.todosService.getTodos(search, currentPage, itemsPerPage).pipe(
        map(todos => fromTodos.fetchTodosSuccess({ todos })),
        catchError(() => of(fromTodos.fetchTodosError())),
      ),
    ),
  );

  constructor(private store: Store<AppState>, private todosService: TodosService) {}
}
React Plugin
JulietteReact library contains custom hooks
for easier state accessibility within the React components. To use them, provide the store via StoreContext.
ReactDOM.render(
  <StoreContext.Provider value={store}>
    <App />
  </StoreContext.Provider>,
  document.getElementById('root'),
);
This plugin provides useSelect hook that accepts a selector function or feature key and useDispatch hook that returns the dispatch function.
function Todos() {
  const todosState = useSelect<AppState, fromTodos.State>(fromTodos.featureKey);
  const dispatch = useDispatch();

  return (
    <div>
      <button onClick={() => dispatch(fromTodos.fetchTodos())}>
        Fetch Todos
      </button>
      {todosState.loading && <p>Loading...</p>}
      ...
    </div>
  );
}
If you need the entire store within the component, there is useStore hook.
const store = useStore<AppState>();
Examples
Take a look at juliette-examples repository to see the projects that use Juliette
as a state management solution.
Show Your Support
Give a ⭐ if you like Juliette 😎
License
Juliette is MIT licensed.
Copyright © 2020-2021 Marko Stanimirović