Style iOS apps with a stylesheet, similar to CSS
NUI
Style iOS apps with a stylesheet, similar to CSS
Description
NUI is a drop-in UI kit for iOS that lets you style UI elements using a stylesheet, similar to CSS. It lets you style an entire app in minutes.
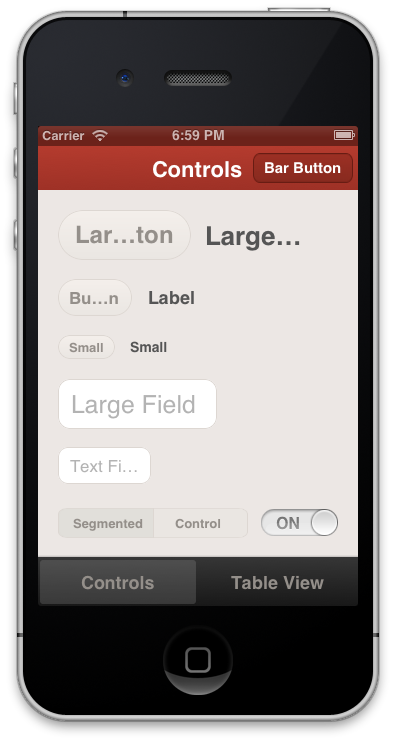
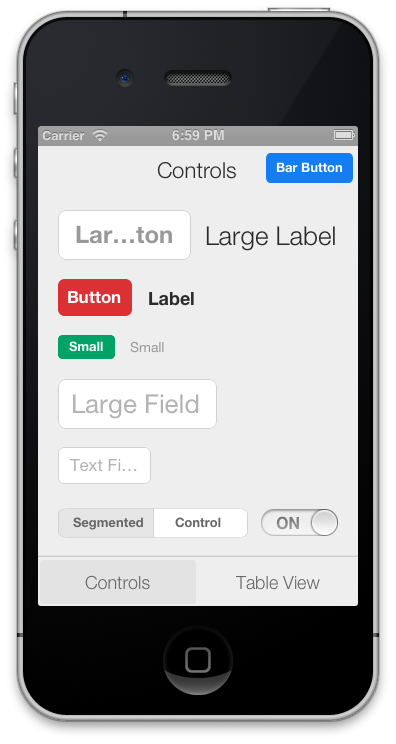
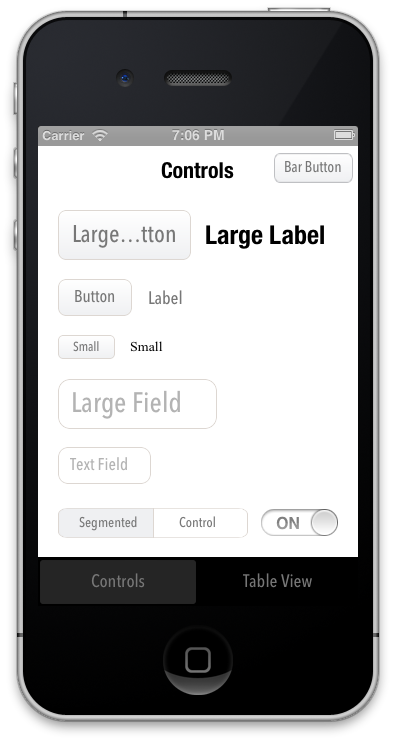
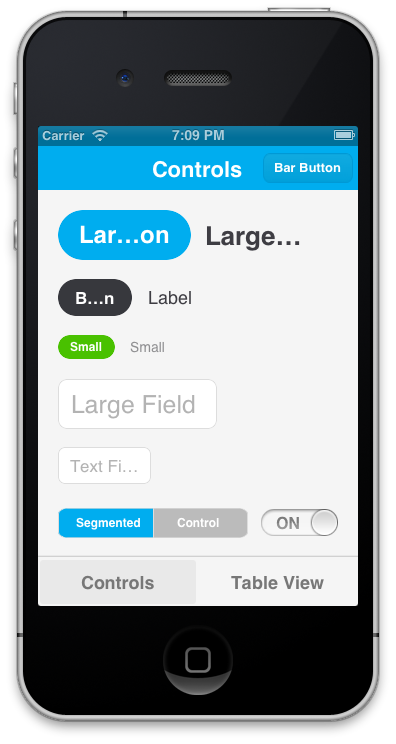
Out of the box, the styling looks like this:
It’s easily modified, though. The styling above, for example, is declared like this. Here are examples of other themes that are defined here:
The styling is declared using a CSS-like syntax that supports variables:
@primaryFontName: HelveticaNeue;
@secondaryFontName: HelveticaNeue-Light;
@primaryFontColor: #333333;
@primaryBackgroundColor: #E6E6E6;

Button {
    background-color: @primaryBackgroundColor;
    border-color: #A2A2A2;
    border-width: @primaryBorderWidth;
    font-color: @primaryFontColor;
    font-color-highlighted: #999999;
    font-name: @primaryFontName;
    font-size: 18;
    corner-radius: 7;
}
NavigationBar {
    background-tint-color: @primaryBackgroundColor;
    font-name: @secondaryFontName;
    font-size: 20;
    font-color: @primaryFontColor;
    text-shadow-color: #666666;
    text-shadow-offset: 1,1;
}
NUI lets you:
- Update the visual appearance of an entire application in minutes
- Save themes for use in multiple applications
- Set the styles of UI elements using simple rules, like setting
Button { border-color: #CCCCCC; } - Define variables like
@primaryFontNameor@myBackgroundColor(a la Sass/LESS) - Avoid digging through documentation to find how to change specific UI elements’ styling
- Quickly create custom style classes
- Modify an application’s styling while it is running
Some exciting features are on the horizon, and contributions are very encouraged. Please see the FAQ.
Installation
CocoaPods
NUI is most easily installed using CocoaPods. Its pod name is “NUI”. After installing it, add [NUISettings init]; to application:didFinishLaunchingWithOptions in AppDelegate.m (like this).
When installed as a framework, NUI can be natively imported in Swift. Just add
import NUI to the top of your file.
Without CocoaPods
If you choose not to use CocoaPods, you can install NUI with these steps:
- Copy the NUI directory into your application
- Add the CoreImage and QuartzCore frameworks to your application if you haven’t already (like this)
- Add NUIParse as a subproject, set its iOSNUIParse target as a dependency of your target, and add libNUIParse.a to your linked libraries.
- Add
[NUISettings init];toapplication:didFinishLaunchingWithOptionsin AppDelegate.m (like this) - To use NUI in Swift add
#import <NUI/NUISettings.h>to your bridging header.
The Demo uses CocoaPods, so you’ll want to install CocoaPods, run pod install in the Demo directory, and then open the .xcworkspace to open the project.
Usage
Here’s a walkthrough on how to get up and running with NUI.
After dropping in NUI, you can modify your app’s styling by simply editing NUIStyle.nss. If you want to avoid modifying NUI’s files, you can copy NUIStyle.nss into your app, rename it (e.g. MyTheme.nss), then replace [NUISettings init] with [NUISettings initWithStylesheet:@"MyTheme"]; (step 4 in Installation).
Due to the nature of UIKit’s usage of simple UI components within more complex UI components, NUI doesn’t style some UIKit components in some very rare cases. If you ever need to apply styling for these cases, you can simply use NUIRenderer:
[NUIRenderer renderButton:myButton];
This will use the ‘Button’ style. You can also specify a custom class:
[NUIRenderer renderButton:myButton withClass:@"LargeButton"]
N.B. NUI used to require that you make your elements inherit from a NUI class, but this is no longer the case. See “Migrating From Subclasses To Categories” below for details.
Editing The Style Rules
NUIStyle.nss contains all of the style rules. A rule like Button { font-name: Helvetica; } modifies the font name of every UIButton, for example.
The format should be self-explanatory, but here are some notes:
- Styling variables are defined at the top, but they can be added/modified/removed as you see fit.
- You can make an element inherit from multiple style classes (see Creating Custom Style Classes below).
To see all of the available properties and values, see the Style Classes and Style Value Types lists below.
Creating Custom Style Classes
You can give elements custom style classes (e.g. LargeButton), and make those classes inherit from one or more other style classes by using the form Button:LargeButton. To bypass NUI’s styling for a particular element, set the class to none. You can set an element’s style class either in Interface Builder or programmatically:
Setting an Element’s Style Class in Interface Builder
To do this, you’ll set a runtime attribute for the element (in Identity Inspector > User Defined Runtime Attributes, click +). Set the Key Path to nuiClass, Type to String, and Value to LargeButton (or Button:MyButton:
Setting an Element’s Style Class Programmatically
To do this, you’ll want to import the NUI category for the element. If you’re styling a UIButton, you’d import:
#import "UIButton+NUI.h"
You can then set nuiClass on your element:
myButton.nuiClass = @"LargeButton";
N.B. A style class can inherit from an indefinite number of style rules, so if you want to create groups of style rules, you can set nuiClass to something like @"MyStyleGroup1:MyStyleGroup2:MyButton".
Excluding Views from NUI’s Styling
If you want to prevent specific view classes from being styled (e.g. third party UI elements that are already styled), you can specify these in NSS:
Button {
    exclude-views: UIAlertButton;
    exclude-subviews: UITableViewCell,TDBadgedCell,UITextField;
}
exclude-viewswill prevent NUI from applying theButtonstyle to views of the specified classesexclude-subviewswill prevent NUI from applying the `Button style to subviews of views of the specified classes
If you want to globally prevent specific view classes from being styled (regardless of style class), you can do this using +[NUISettings setGlobalExclusions:]:
int main(int argc, char *argv[])
{
    @autoreleasepool {
        [NUISettings init];
        [NUISettings setGlobalExclusions:@[@"ABMemberCell", @"ABMultiCell"]];
        return UIApplicationMain(argc, argv, nil, NSStringFromClass([MyAppDelegate class]));
    }
}
Styles specific to a device or orientation
You can have styles or variable definitions only be applied for a particular device and/or orientation by using a @media query:
@media (device:ipad) {
    /* styles or definitions for iPad */
}

@media (device:iphone) {
    /* styles or definitions for iPhone */
}

@media (orientation:landscape) {
    /* styles or definitions for landscape orientation */
}

@media (orientation:portrait) {
    /* styles or definitions for portrait orientation  */
}

@media (orientation:portrait) and (device:ipad) {
    /* styles or definitions for portrait orientation on iPad */
}
Modifying Styling While The Application Is Running
To do this, add the following line after [NUISettings init]; in main.m, replacing @"/path/to/Style.nss" with the absolute file path of your .nss file (e.g. /Users/myusername/projects/ios/MyApp/Style.nss):
[NUISettings setAutoUpdatePath:@"/path/to/Style.nss"];
Now, whenever you modify and save your .nss file while the app is running, the new changes will be applied instantaneously, without any need to rebuild the app. This can drastically speed up the process of styling. You’ll want to remove this line when you create a release build.
Creating Custom Themes
Because all of the style rules are contained in NUIStyle.nss, it’s easy to create an NUI theme that can be reused in other projects. If you make one you like, let me know, and I’ll likely be very happy to include it in this repo.
Migrating From Subclasses To Categories
Version 0.1 of NUI required that you manually make your app’s UI components inherit from NUI classes (e.g. NUIButton). NUI no longer requires this, as it uses UIKit categories instead subclasses. If you were previously using NUI 0.1, and update to a newer version of NUI, you’ll want to simply unset those custom classes, so that, for example, a UIButton is simply a UIButton, instead of being a NUIButton (this would be done either in Identity Inspector > Custom Class or in the application code).
Style Classes
Below are all of the currently available style classes, their corresponding UI component classes, and the properties they support. Value types (e.g. Color, Gradient) are described below in Style Value Types.
BarButton
UIBarButtonItem
- background-color (Color)
- background-color-top/background-color-bottom (Gradient)
- background-color-highlighted (Color)
- background-image (Image)
- background-image-insets (Box)
- background-tint-color (Color)
- border-color (Color)
- border-width (Number)
- corner-radius (Number)
- font-color (Color)
- font-name (FontName)
- font-size (Number)
- text-shadow-color (Color)
- text-shadow-offset (Offset)
BarButtonBack
UIBarButtonItem back button, inherits from BarButton
- background-color (Color)
- background-image (Image)
- background-image-insets (Box)
- background-tint-color (Color)
- border-color (Color)
- border-width (Number)
- corner-radius (Number)
- font-color (Color)
- font-name (FontName)
- font-size (Number)
- text-shadow-color (Color)
- text-shadow-offset (Offset)
Button
UIButton
- background-color (Color)
- background-color-normal (Color)
- background-color-top/background-color-bottom (Gradient)
- background-color-disabled (Color)
- background-color-highlighted (Color)
- background-color-selected (Color)
- background-color-selected-highlighted (Color)
- background-image (Image)
- background-image-insets (Box)
- background-image-disabled (Image)
- background-image-disabled-insets (Box)
- background-image-highlighted (Image)
- background-image-highlighted-insets (Box)
- background-image-selected (Image)
- background-image-selected-insets (Box)
- background-image-selected-disabled (Image)
- background-image-selected-disabled-insets (Box)
- background-image-selected-highlighted (Image)
- background-image-selected-highlighted-insets (Box)
- border-color (Color)
- border-width (Number)
- content-insets (Box)
- corner-radius (Number)
- font-color (Color)
- font-color-disabled (Color)
- font-color-highlighted (Color)
- font-color-selected (Color)
- font-color-selected-disabled (Color)
- font-color-selected-highlighted (Color)
- font-name (FontName)
- font-size (Number)
- height (Number)
- image (Image)
- image-insets (Box)
- image-disabled (Image)
- image-disabled-insets (Box)
- image-highlighted (Image)
- image-highlighted-insets (Box)
- image-selected (Image)
- image-selected-insets (Box)
- image-selected-disabled (Image)
- image-selected-disabled-insets (Box)
- image-selected-highlighted (Image)
- image-selected-highlighted-insets (Box)
- padding (Box)
- shadow-color (Color)
- shadow-offset (Offset)
- shadow-opacity (Number)
- shadow-radius (Number)
- text-align (TextAlign)
- text-alpha (Number)
- text-auto-fit (Boolean)
- text-shadow-color (Color)
- text-shadow-color-disabled (Color)
- text-shadow-color-highlighted (Color)
- text-shadow-color-selected (Color)
- text-shadow-color-selected-disabled (Color)
- text-shadow-color-selected-highlighted (Color)
- text-shadow-offset (Offset)
- text-transform (TextTransform)
- title-insets (Box)
- width (Number)
Control
UIControl
- background-color (Color)
- background-image (Image)
- border-color (Color)
- border-width (Number)
- corner-radius (Number)
- shadow-color (Color)
- shadow-offset (Offset)
- shadow-opacity (Number)
- shadow-radius (Number)
Label
UILabel
- background-color (Color)
- border-color (Color)
- border-width (Number)
- corner-radius (Number)
- font-color (Color)
- font-color-highlighted (Color)
- font-name (FontName)
- font-size (Number)
- height (Number)
- shadow-color (Color)
- shadow-offset (Offset)
- shadow-opacity (Number)
- shadow-radius (Number)
- text-align (TextAlign)
- text-alpha (Number)
- text-auto-fit (Boolean)
- text-line-clamp (Integer)
- text-shadow-color (Color)
- text-shadow-offset (Offset)
- text-transform (TextTransform)
- width (Number)
NavigationBar
UINavigationBar
- bar-tint-color (Color)
- background-color (Color)
- background-color-top/background-color-bottom (Gradient)
- background-image (Image)
- background-image-insets (Box)
- background-tint-color (Color)
- font-color (Color)
- font-name (FontName)
- font-size (Number)
- shadow-image (Image)
- text-shadow-color (Color)
- text-shadow-offset (Offset)
- title-vertical-offset (Number)
PageControl
UIPageControl
- color (Color)
pageIndicatorTintColor - current-color (Color)
currentPageIndicatorTintColor
Progress
UIProgressView
- progress-image (Image)
- progress-tint-color (Color)
- track-image (Image)
- track-tint-color (Color)
- width (Number)
SearchBar
UISearchBar
- background-color (Color)
- background-color-top/background-color-bottom (Gradient)
- background-image (Image)
- background-tint-color (Color)
- scope-background-color (Color)
- scope-background-image (Image)
SearchBarButton
UISearchBar button, inherits from BarButton
See Button
SearchBarScopeBar
UISearchBar scope bar, inherits from SegmentedControl
See SegmentedControl
SegmentedControl
UISegmentedControl
- background-color (Color)
- background-color-selected (Color)
- background-image (Image)
- background-image-insets (Box)
- background-image-selected (Image)
- background-image-selected-insets (Box)
- background-tint-color (Color)
- border-color (Color)
- border-width (Number)
- corner-radius (Number)
- divider-color (Color)
- divider-image (Image)
- font-color (Color)
- font-color-selected (Color)
- font-name (FontName)
- font-size (Number)
- text-shadow-color (Color)
- text-shadow-color-selected (Color)
- text-shadow-offset (Offset)
- text-shadow-offset-selected (Offset)
Slider
UISlider
- minimum-track-tint-color (Color)
- maximum-track-tint-color (Color)
- minimum-value-image (Image)
- maximum-value-image (Image)
- thumb-image (Image)
- thumb-tint-color (Color)
Switch
UISwitch
- background-color (Color)
- off-image (Image)
- off-image-insets (Box)
- on-image (Image)
- on-image-insets (Box)
- on-tint-color (Color)
- thumb-tint-color (Color)
- tint-color (Color)
TabBar
UITabBar
- bar-tint-color (Color)
- background-color (Color)
- background-color-top/background-color-bottom (Gradient)
- background-image (Image)
- background-image-insets (Box)
- background-tint-color (Color)
- selected-image (Image)
- selected-image-tint-color (Color)
TabBarItem
UITabBarItem
- background-image-selected (Image)
- background-image-selected-insets (Box)
- finished-image (Image)
- finished-image-selected (Image)
- font-color (Color)
- font-color-selected (Color)
- font-name (FontName)
- font-size (Number)
- text-offset (Offset)
- text-shadow-color (Color)
- text-shadow-offset (Offset)
Table
UITableView
- background-color (Color)
- background-color-top/background-color-bottom (Gradient)
- row-height (Number)
- separator-color (Color)
- separator-style (SeparatorStyle)
TableCell
UITableViewCell
- tint-color (Color)
- background-color (Color)
- background-color-top/background-color-bottom (Gradient)
- background-color-selected (Color)
- background-color-top-selected/background-color-bottom-selected (Gradient)
- font-color (Color)
- font-color-highlighted (Color)
- font-name (FontName)
- font-size (Number)
- text-align (TextAlign)
- text-alpha (Number)
- text-auto-fit (Boolean)
- text-shadow-color (Color)
- text-shadow-offset (Offset)
TableCellContentView
The content view of a UITableViewCell
- all attributes supported by UIView
TableCellDetail
The detail label of a UITableViewCell
- font-color (Color)
- font-color-highlighted (Color)
- font-name (FontName)
- font-size (Number)
- text-align (TextAlign)
- text-alpha (Number)
- text-auto-fit (Boolean)
- text-shadow-color (Color)
- text-shadow-offset (Offset)
Toolbar
UIToolbar
- background-color (Color)
- background-image-top (Image)
- background-image-bottom (Image)
- background-image-top-landscape (Image)
- background-image-bottom-landscape (Image)
- background-tint-color (Color)
- shadow-image (Image)
- shadow-image-top (Image)
- shadow-image-bottom (Image)
TextField
UITextField
- background-color (Color)
- background-image (Image)
- background-image-insets (Box)
- border-color (Color)
- border-style (BorderStyle)
- border-width (Number)
- corner-radius (Number)
- text-align (TextAlign)
- text-alpha (Number)
- text-auto-fit (Boolean)
- font-color (Color)
- font-name (FontName)
- font-size (Number)
- height (Number)
- padding (Box)
- shadow-color (Color)
- shadow-offset (Offset)
- shadow-opacity (Number)
- shadow-radius (Number)
- tint-color (Color)
- vertical-align (VerticalAlign)
- horizontal-align (HorizontalAlign)
- width (Number)
- keyboard-appearance (KeyboardAppearance)
TextView
UITextView
- font-color (Color)
- font-name (FontName)
- font-size (Number)
- padding (Box)
- keyboard-appearance (KeyboardAppearance)
- all other attributes supported by UIView
View
UIView
- background-color (Color)
- background-image (Image)
- border-color (Color)
- border-width (Number)
- corner-radius (Number)
- height (Number)
- shadow-color (Color)
- shadow-offset (Offset)
- shadow-opacity (Number)
- shadow-radius (Number)
- width (Number)
Window
UIWindow
- background-color (Color)
Style Value Types
- Boolean - A boolean (
trueorfalse) - BorderStyle - A border style, as rendered by a UITextBorderStyle. Accepted values are
none,line,bezel, androunded. - Box - A series of 1 to 4 integers that specify the widths of a box’s edges. Interpreted like CSS’s
paddingandmarginproperties (top, right, bottom, left). Examples:15(a box with a width of 15 for each edge),10 15(a box with a width of 10 for the top and bottom edges and 15 for the right and left edges) - Color - A hex color (e.g.
#FF0000); a rgb, rgba, hsl, or hsla expression (e.g.rgb(255,0,0)orhsla(0.5, 0, 1.0, 0.5)); or a color name that UIColor has a related method name for (e.g.red,yellow,clear). If[UIColor redColor]is supported, thenredis supported. - FontName - A font name. See available values here. Can also be one of the following:
systemboldSystemitalicSystemblackSystemheavySystemlightSystemmediumSystemsemiboldSystemthinSystemultraLightSystem
- Gradient - Two Colors that will create a vertical gradient. background-color-top and background-color-bottom need to be defined in separate .nss properties.
- Image - A name of an image, as used in
[UIImage imageNamed:name](e.g.MyImage.png). - Number - A number (e.g.
-1,4.5) - Offset - Two numbers comprising the horizontal and vertical values of an offset (e.g.
-1,1) - SeparatorStyle - A separator style, as rendered by a UITableViewSeparatorStyle. Accepted values are
none,single-line, andsingle-line-etched. - TextAlign - A text alignment (e.g.
left,right,center) - TextTransform - A text transform (e.g.
uppercase,lowercase,capitalize,none) - VerticalAlign - A vertical alignment (e.g.
top,center,bottom,fill) - KeyboardAppearance - A keyboard appearance (e.g.
default,dark,light,alert)
FAQ
How can I contribute?
Contributers are extremely appreciated! NUI covers a lot of ground, but there are still a number of elements and properties that are unsupported. Adding support for new properties is easy (take a look at NUIButtonRenderer for examples). There are also a number of exciting big features that on the Roadmap that are up for grabs. We’re also always looking for new themes, so feel free to add those, too!
What advantages does this have over UIAppearance?
UIAppearance is alright, but it’s unintuitive, time-consuming, and it doesn’t support either the granularity or number of style modifications that NUI does. Styling should be abstracted in a simple stylesheet with simple property definitions; you shouldn’t have to stare at long, nested method calls and have to dig through Apple’s documentation every time you want to make a small styling modification.
I have an app that uses NUI; can I add a link to it here?
Sure! Feel free to add it to Apps Using NUI.
Do you know about Pixate?
Yep! It’s unclear when it will be launched, it won’t be free (in either meaning of the word, likely), and the jury is still out on how good of a product it’ll be. I prefer free, lightweight solutions.
How is “NUI” pronounced?
“New-ee”. (It rhymes with “GUI”, of course.)
License
NUI is released under the MIT License. Please see the LICENSE file for details.


