Set up free and scalable Scrapyd cluster for distributed web-crawling with just a few clicks. DEMO :point_right:
🔤 English | 🀄 简体中文
How to set up Scrapyd cluster on Heroku
Demo
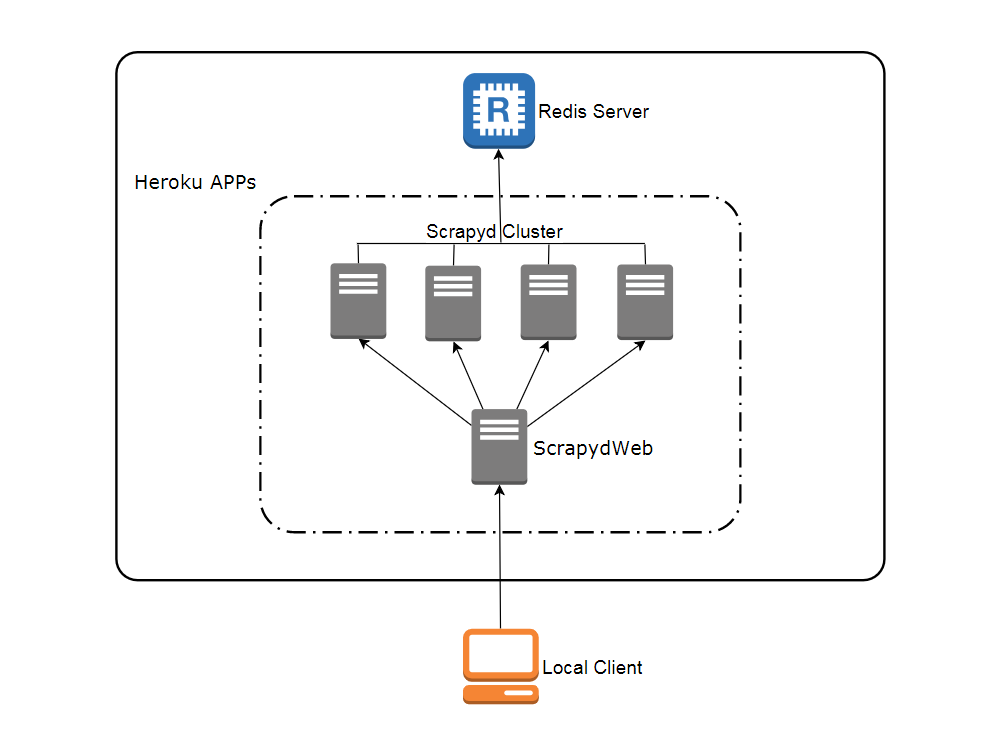
Network topology
Create accounts
View contents
- Heroku
Visit heroku.com to create a free account, with which you can create and run up to 5 apps.

- Redis Labs (optional)
Visit redislabs.com to create a free account, which provides 30MB storage and can be used by scrapy-redis for distributed crawling.

Deploy Heroku apps in the browser
View contents
- Visit my8100/scrapyd-cluster-on-heroku-scrapyd-app to deploy the Scrapyd app. (Don’t forget to update the host, port and password of your Redis server in the form)
- Repeat step 1 to deploy up to 4 Scrapyd apps, assuming theri names are
svr-1,svr-2,svr-3andsvr-4 - Visit my8100/scrapyd-cluster-on-heroku-scrapydweb-app-git to deploy the ScrapydWeb app named
myscrapydweb - (optional) Click the Reveal Config Vars button on dashboard.heroku.com/apps/myscrapydweb/settings to add more Scrapyd server accordingly, e.g.
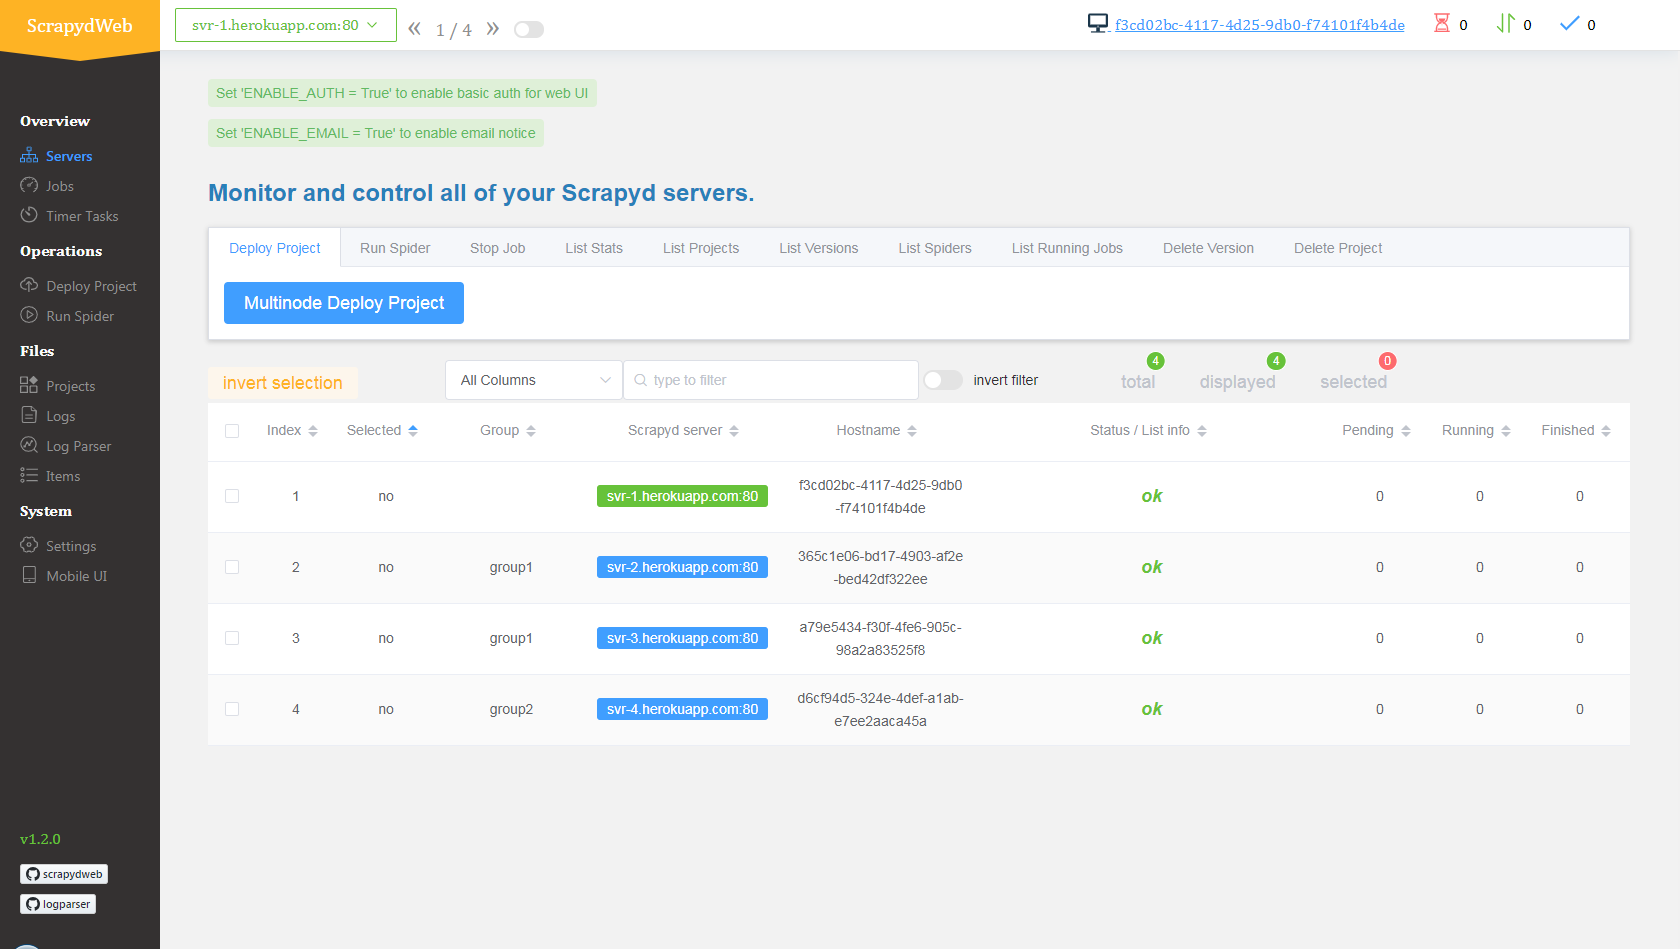
SCRAPYD_SERVER_2as the KEY andsvr-2.herokuapp.com:80#group2as the VALUE. - Visit myscrapydweb.herokuapp.com
- Jump to the Deploy and run distributed spiders section below and move on.
Custom deployment
View contents
Install tools
- Git
- Heroku CLI
- Python client for Redis: Simply run the
pip install rediscommand.
Download config files
Open a new terminal:
git clone https://github.com/my8100/scrapyd-cluster-on-heroku
cd scrapyd-cluster-on-heroku
Log in to Heroku
# Or run 'heroku login -i' to login with username/password
heroku login
# outputs:
# heroku: Press any key to open up the browser to login or q to exit:
# Opening browser to https://cli-auth.heroku.com/auth/browser/12345-abcde
# Logging in... done
# Logged in as username@gmail.com
Set up Scrapyd cluster
- New Git repo
cd scrapyd
git init
# explore and update the files if needed
git status
git add .
git commit -a -m "first commit"
git status
- Deploy Scrapyd app
heroku apps:create svr-1
heroku git:remote -a svr-1
git remote -v
git push heroku master
heroku logs --tail
# Press ctrl+c to stop logs outputting
# Visit https://svr-1.herokuapp.com
-
Add environment variables
- Timezone
# python -c "import tzlocal; print(tzlocal.get_localzone())" heroku config:set TZ=US/Eastern # heroku config:get TZ- Redis account (optional, see settings.py in the scrapy_redis_demo_project.zip)
heroku config:set REDIS_HOST=your-redis-host heroku config:set REDIS_PORT=your-redis-port heroku config:set REDIS_PASSWORD=your-redis-password -
Repeat step 2 and step 3 to get the rest Scrapyd apps ready:
svr-2,svr-3andsvr-4
Set up ScrapydWeb app
- New Git repo
cd ..
cd scrapydweb
git init
# explore and update the files if needed
git status
git add .
git commit -a -m "first commit"
git status
- Deploy ScrapydWeb app
heroku apps:create myscrapydweb
heroku git:remote -a myscrapydweb
git remote -v
git push heroku master
-
Add environment variables
- Timezone
heroku config:set TZ=US/Eastern- Scrapyd servers (see scrapydweb_settings_vN.py in the scrapydweb directory)
heroku config:set SCRAPYD_SERVER_1=svr-1.herokuapp.com:80
heroku config:set SCRAPYD_SERVER_2=svr-2.herokuapp.com:80#group1
heroku config:set SCRAPYD_SERVER_3=svr-3.herokuapp.com:80#group1
heroku config:set SCRAPYD_SERVER_4=svr-4.herokuapp.com:80#group2
Deploy and run distributed spiders
View contents
- Simply upload the compressed file scrapy_redis_demo_project.zip which resides in the scrapyd-cluster-on-heroku directory
- Push seed URLs into
mycrawler:start_urlsto fire crawling and check out the scraped items
In [1]: import redis  # pip install redis

In [2]: r = redis.Redis(host='your-redis-host', port=your-redis-port, password='your-redis-password')

In [3]: r.delete('mycrawler_redis:requests', 'mycrawler_redis:dupefilter', 'mycrawler_redis:items')
Out[3]: 0

In [4]: r.lpush('mycrawler:start_urls', 'http://books.toscrape.com', 'http://quotes.toscrape.com')
Out[4]: 2

# wait for a minute
In [5]: r.lrange('mycrawler_redis:items', 0, 1)
Out[5]:
[b'{"url": "http://quotes.toscrape.com/", "title": "Quotes to Scrape", "hostname": "d6cf94d5-324e-4def-a1ab-e7ee2aaca45a", "crawled": "2019-04-02 03:42:37", "spider": "mycrawler_redis"}',
 b'{"url": "http://books.toscrape.com/index.html", "title": "All products | Books to Scrape - Sandbox", "hostname": "d6cf94d5-324e-4def-a1ab-e7ee2aaca45a", "crawled": "2019-04-02 03:42:37", "spider": "mycrawler_redis"}']
Conclusion
View contents
- Pros
- Free
- Scalable (with the help of ScrapydWeb)
- Cons
- Heroku apps would be restarted (cycled) at least once per day and any changes to the local filesystem will be deleted, so you need the external database to persist data. Check out devcenter.heroku.com for more info.