TangramKit is a powerful iOS UI framework implemented by Swift. It integrates the functions with Android layout,iOS AutoLayout,SizeClass, HTML CSS float and flexbox and bootstrap. So you can use LinearLayout,RelativeLayout,FrameLayout,TableLayout,FlowLayout,FloatLayout,LayoutSizeClass to build your App 自动布局 UIView UITableView UICollectionView

TangramKit 
TangramKit is a simple and easy Swift framework for iOS view layout. The name comes from Tangram of China which provides some simple functions to build a variety of complex interface. It integrates the functions including: Autolayout and SizeClass of iOS, five layout classes of Android, float and flex-box and bootstrap of HTML/CSS. The TangramKit’s objective-C version are named: MyLayout
 Chinese (Simplified): 中文说明
Usage
- There is a container view S which width is 100 and height is wrap to all subviews height. there are four subviews A,B,C,D arranged from top to bottom.
- Subview A’s left margin is 20% width of S, right margin is 30% width of S, height is equal to width of A.
- Subview B’s left margin is 40, width is filled in to residual width of S,height is 40.
- Subview C’s width is filled in to S, height is 40.
- Subview D’s right margin is 20, width is 50% width of S, height is 40

    let S = TGLinearLayout(.vert)
    S.tg_vspace = 10
    S.tg_width.equal(100)
    S.tg_height.equal(.wrap)
    //you can use S.tg_size(width:100, height:.wrap) to instead

    let A = UIView()
    A.tg_left.equal(20%)
    A.tg_right.equal(30%)
    A.tg_height.equal(A.tg_width)
    S.addSubview(A)

    let B = UIView()
    B.tg_left.equal(40)
    B.tg_width.equal(.fill)
    B.tg_height.equal(40)
    S.addSubview(B)

    let C = UIView()
    C.tg_width.equal(.fill)
    C.tg_height.equal(40)
    S.addSubview(C)

    let D = UIView()
    D.tg_right.equal(20)
    D.tg_width.equal(50%)
    D.tg_height.equal(40)
    S.addSubview(D)
TangramKit has override operators: ~=、>=、<=、+=、-=、*=、/= to implement equal、max、min、add、offset、multiply methods of TGLayoutSize and TGLayoutPos class, so you can instead to:
let S = TGLinearLayout(.vert)
   S.tg_vspace = 10
   S.tg_width ~=100
   S.tg_height ~=.wrap

   let A = UIView()
   A.tg_left ~=20%
   A.tg_right ~=30%
   A.tg_height ~=A.tg_width
   S.addSubview(A)

   let B = UIView()
   B.tg_left ~=40
   B.tg_width ~=.fill
   B.tg_height ~=40
   S.addSubview(B)

   let C = UIView()
   C.tg_width ~=.fill
   C.tg_height ~=40
   S.addSubview(C)

   let D = UIView()
   D.tg_right ~=20
   D.tg_width ~=50%
   D.tg_height ~=40
   S.addSubview(D)
Performance comparison
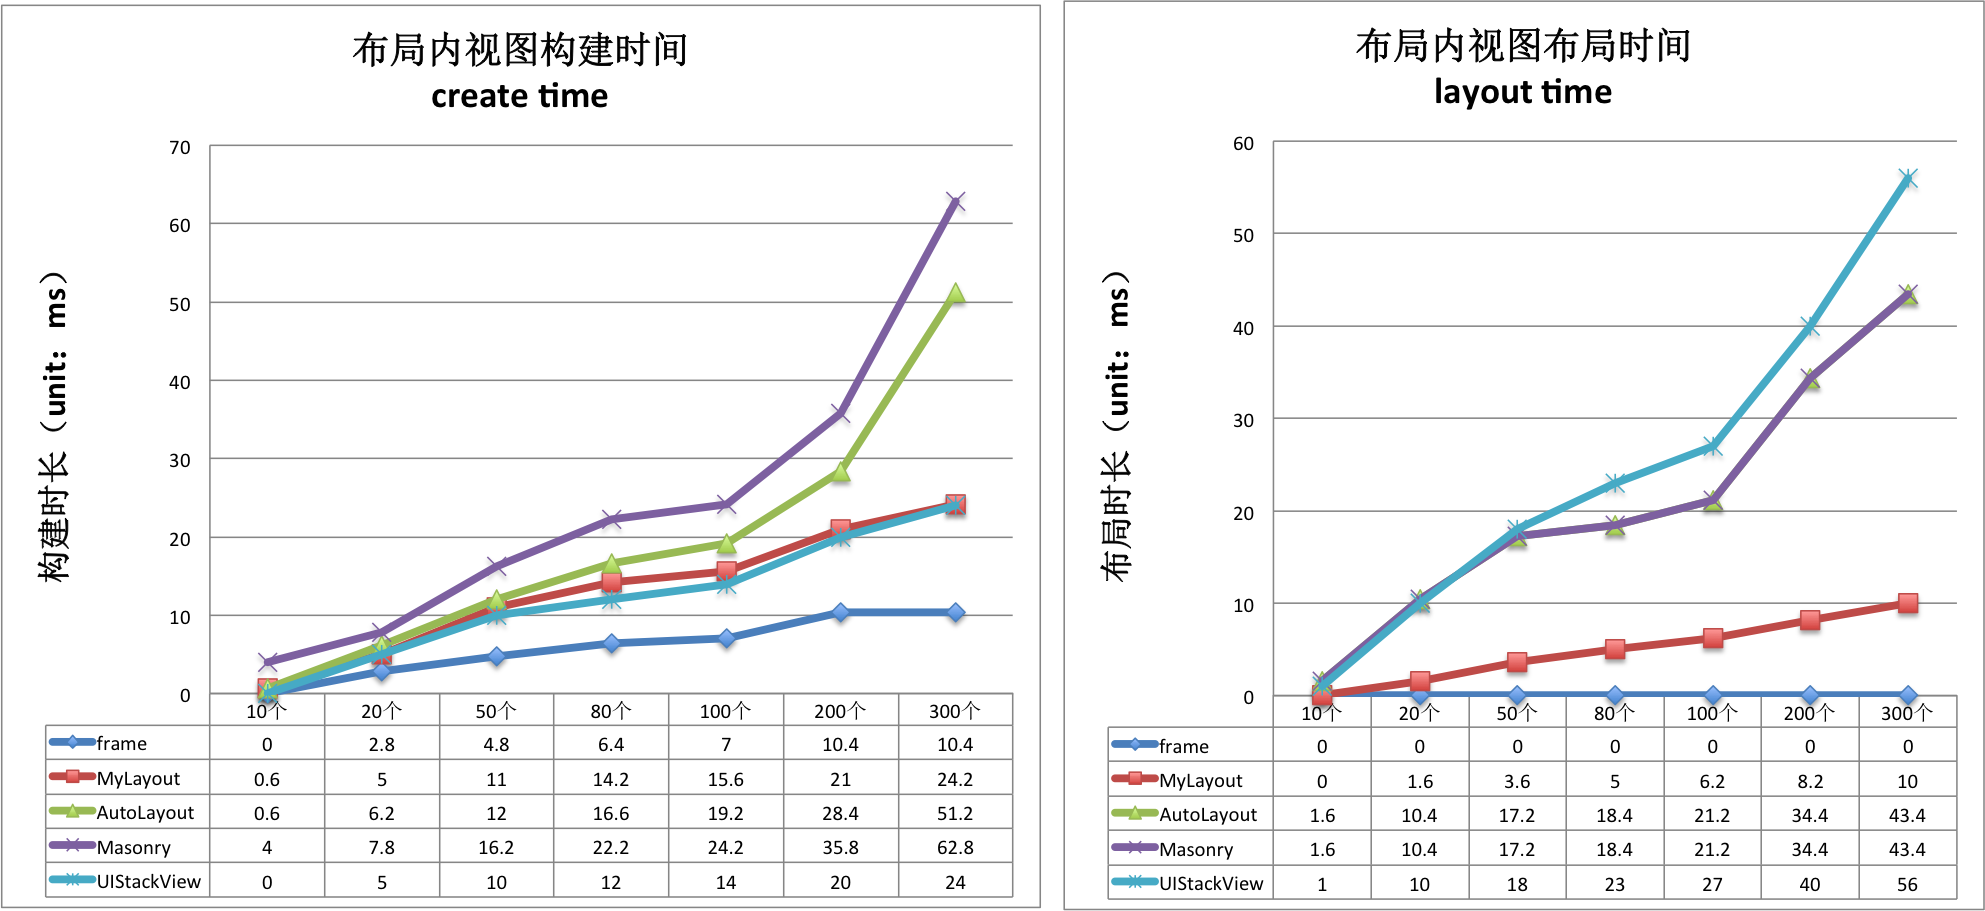
| create time(ms)/per subview | Frame | TangramKit | AutoLayout | Masonry | UIStackView |
|---|---|---|---|---|---|
| TGLinearLayout | 0.08 | 0.164 | 0.219 | 0.304 | 0.131 |
| TGFrameLayout | 0.05 | 0.149 | 0.209 | 0.273 | 0.131 |
| TGRelativeLayout | 0.079 | 0.182 | 0.116 | 0.359 | 0.131 |
| TGFlowLayout | 0.08 | 0.107 | 0.198 | 0.258 | 0.131 |
| TGFloatLayout | 0.044 | 0.148 | 0.203 | 0.250 | 0.131 |
| layout time(ms)/per subview | Frame | TangramKit | AutoLayout | Masonry | UIStackView |
|---|---|---|---|---|---|
| TGLinearLayout | 0 | 0.049 | 0.269 | 0.269 | 0.272 |
| TGFrameLayout | 0 | 0.042 | 0.243 | 0.243 | 0.272 |
| TGRelativeLayout | 0 | 0.068 | 0.274 | 0.274 | 0.272 |
| TGFlowLayout | 0 | 0.036 | 0.279 | 0.279 | 0.272 |
| TGFloatLayout | 0 | 0.055 | 0.208 | 0.208 | 0.272 |
Architecture

TGLayoutPos
TGLayoutPos is represent to the position of a view. UIView provides six extension variables:tg_left, tg_top, tg_bottom, tg_right, tg_centerX, tg_centerY to set view’s margin or space distance between self and others.
TGLayoutSize
TGLayoutSize is represent to the size of a view. UIView provides two extension variables:tg_width,tg_height to set view’s width and height dimension. there are three special TGLayoutSize const object: .wrap, .fill, .average mean: wrap all subviews size, fill in to superview’s residual size, average the superview’s size.
TGWeight
TGWeight is used to set relative position and dimension. TangramKit override operator % to easily construct a TGWeight object. e.g 20% is equal to TGWeight(20).
TGLinearLayout
Is equivalent to: UIStackView of iOS and LinearLayout of Android.
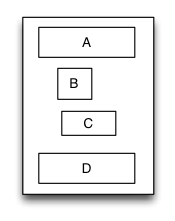
Linear layout is a single line layout view that the subviews are arranged in sequence according to the added order(from top to bottom or from left to right). So the subviews’ origin&size constraints are established by the added order. Subviews arranged in top-to-bottom order is called vertical linear layout view, and
the subviews arranged in left-to-right order is called horizontal linear layout.
override func loadView() {


            super.loadView()

            let S = TGLinearLayout(.vert)
            S.tg_width.equal(120)
            S.tg_height.equal(.wrap)
            S.tg_vspace = 10

            let A = UIView()
            A.tg_left.equal(5)
            A.tg_right.equal(5)
            A.tg_width.equal(100)
            A.tg_height.equal(40)
            S.addSubview(A)

            let B = UIView()
            B.tg_left.equal(20)
            B.tg_width.equal(40)
            B.tg_height.equal(40)
            S.addSubview(B)

            let C = UIView()
            C.tg_right.equal(40)
            C.tg_width.equal(50)
            C.tg_height.equal(40)
            S.addSubview(C)

            let D = UIView()
            D.tg_left.equal(10)
            D.tg_right.equal(10)
            D.tg_width.equal(100)
            D.tg_height.equal(40)
            S.addSubview(D)

            self.view.addSubview(S)
            S.backgroundColor = .red
            A.backgroundColor = .green
            B.backgroundColor = .blue
            C.backgroundColor = .orange
            D.backgroundColor = .cyan
     }
TGRelativeLayout
Is equivalent to: AutoLayout of iOS and RelativeLayout of Android.
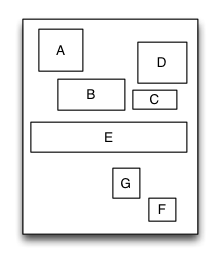
Relative layout is a layout view that the subviews layout and position through mutual constraints.The subviews in the relative layout are not depended to the adding order but layout and position by setting the subviews’ constraints.
override func loadView() {


            super.loadView()

        let S = TGRelativeLayout()
        S.tg_width.equal(170).and().tg_height.equal(280)

        let A = UIView()
        A.tg_left.equal(20).and().tg_top.equal(20)
        A.tg_width.equal(40).and().tg_height.equal(A.tg_width)
        S.addSubview(A)

        let B = UIView()
        B.tg_left.equal(A.tg_centerX).and().tg_top.equal(A.tg_bottom).offset(10)
        B.tg_width.equal(60).and().tg_height.equal(A.tg_height)
        S.addSubview(B)

        let C = UIView()
        C.tg_left.equal(B.tg_right).offset(10)
        C.tg_bottom.equal(B.tg_bottom)
        C.tg_width.equal(40)
        C.tg_height.equal(B.tg_height, multiple:0.5)
        S.addSubview(C)

        let D = UIView()
        D.tg_bottom.equal(C.tg_top).offset(10)
        D.tg_right.equal(15)
        D.tg_height.equal(A.tg_height)
        D.tg_width.equal(D.tg_height)
        S.addSubview(D)

        let E = UIView()
        E.tg_centerY.equal(0)
        E.tg_centerX.equal(0)
        E.tg_height.equal(40)
        E.tg_width.equal(S.tg_width).add(-20)
        S.addSubview(E)
        //...F,G

            self.view.addSubview(S)
            S.backgroundColor = .red
            A.backgroundColor = .green
            B.backgroundColor = .blue
            C.backgroundColor = .orange
            D.backgroundColor = .cyan
            E.backgroundColor = .magenta
       }
TGFrameLayout
Is equivalent to: FrameLayout of Android.
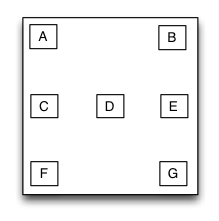
Frame layout is a layout view that the subviews can be overlapped and gravity in a special location of the superview.The subviews’ layout position&size is not depended to the adding order and establish dependency constraint with the superview. Frame layout devided the vertical orientation to top,vertical center and bottom, while horizontal orientation is devided to left,horizontal center and right. Any of the subviews is just gravity in either vertical orientation or horizontal orientation.
 override func loadView() {


        super.loadView()

        let S = TGFrameLayout()
        S.tg_width.equal(320)
        S.tg_height.equal(500)

        let A = UIView()
        A.tg_width.equal(40)
        A.tg_height.equal(40)
        S.addSubview(A)

        let B = UIView()
        B.tg_width.equal(40)
        B.tg_height.equal(40)
        B.tg_right.equal(0)
        S.addSubview(B)

        let C = UIView()
        C.tg_width.equal(40)
        C.tg_height.equal(40)
        C.tg_centerY.equal(0)
        S.addSubview(C)

        let D = UIView()
        D.tg_width.equal(40)
        D.tg_height.equal(40)
        D.tg_centerY.equal(0)
        D.tg_centerX.equal(0)
        S.addSubview(D)

        //..E,F,G

        self.view.addSubview(S)
        S.backgroundColor = .red
        A.backgroundColor = .green
        B.backgroundColor = .blue
        C.backgroundColor = .orange
        D.backgroundColor = .cyan
}
TGTableLayout
Is equivalent to: TableLayout of Android and table of HTML.
Table layout is a layout view that the subviews are multi-row&col arranged like a table. First you must create a rowview and add it to the table layout, then add the subview to the rowview. If the rowviews arranged in top-to-bottom order,the tableview is caled vertical table layout,in which the subviews are arranged from left to right; If the rowviews arranged in in left-to-right order,the tableview is caled horizontal table layout,in which the subviews are arranged from top to bottom.
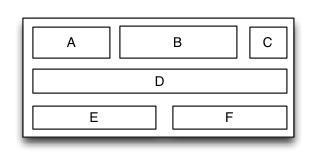
   override func loadView() {


        super.loadView()

        let S = TGTableLayout(.vert)
        S.tg_height.equal(.wrap)
        S.tg_width.equal(.wrap)
        S.tg_vspace = 10
        S.tg_hspace = 10


        S.tg_addRow(size:TGLayoutSize.wrap,colSize:TGLayoutSize.wrap)

        let A = UIView()
        A.tg_width.equal(50)
        A.tg_height.equal(40)
        S.addSubview(A)

        let B = UIView()
        B.tg_width.equal(100)
        B.tg_height.equal(40)
        S.addSubview(B)

        let C = UIView()
        C.tg_width.equal(30)
        C.tg_height.equal(40)
        S.addSubview(C)

        S.tg_addRow(size:TGLayoutSize.wrap,colSize:TGLayoutSize.wrap)

        let D = UIView()
        D.tg_width.equal(200)
        D.tg_height.equal(40)
        S.addSubview(D)

        //...E,F

        self.view.addSubview(S)
        S.backgroundColor = .red
        A.backgroundColor = .green
        B.backgroundColor = .blue
        C.backgroundColor = .orange
        D.backgroundColor = .cyan
}
TGFlowLayout
Is equivalent to: flexbox of CSS3.
Flow layout is a layout view presents in multi-line that the subviews are arranged in sequence according to the added order, and when meeting with a arranging constraint it will start a new line and rearrange. The constrains mentioned here includes count constraints and size constraints. The orientation of the new line would be vertical and horizontal, so the flow layout is divided into: count constraints vertical flow layout, size constraints vertical flow layout, count constraints horizontal flow layout, size constraints horizontal flow layout. Flow layout often used in the scenes that the subviews is arranged regularly, it can be substitutive of UICollectionView to some extent. the TGFlowLayout is almost implement the flex-box function of the HTML/CSS.
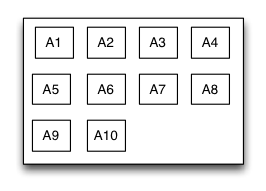
   override func loadView() {


        super.loadView()

        let S = TGFlowLayout(.vert,arrangedCount:4)
        S.tg_height.equal(.wrap)
        S.tg_width.equal(300)
        S.tg_padding = UIEdgeInsetsMake(10,10,10,10)
        S.tg_gravity = TGGravity.horz.fill
        S.tg_space = 10

        for _ in 0 ..< 10
        {
            let A = UIView()
            A.tg_height.equal(A.tg_width)
            S.addSubview(A)

            A.backgroundColor = .green
        }

        self.view.addSubview(S)
        S.backgroundColor = .red
}
TGFloatLayout
Is equivalent to: float of CSS.
Float layout is a layout view that the subviews are floating gravity in the given orientations, when the size is not enough to be hold, it will automatically find the best location to gravity. float layout’s conception is reference from the HTML/CSS’s floating positioning technology, so the float layout can be designed in implementing irregular layout. According to the different orientation of the floating, float layout can be divided into left-right float layout and up-down float layout.
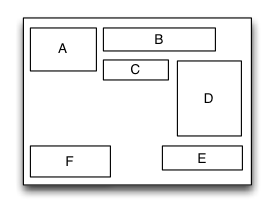
     override func loadView() {


        super.loadView()

        let S = TGFloatLayout(.vert)
        S.tg_height.equal(.wrap)
        S.tg_width.equal(300)
        S.tg_padding = UIEdgeInsetsMake(10,10,10,10)
        S.tg_space = 10

        let A = UIView()
        A.tg_width.equal(80)
        A.tg_height.equal(70)
        S.addSubview(A)

        let B = UIView()
        B.tg_width.equal(150)
        B.tg_height.equal(40)
        S.addSubview(B)

        let C = UIView()
        C.tg_width.equal(70)
        C.tg_height.equal(40)
        S.addSubview(C)

        let D = UIView()
        D.tg_width.equal(100)
        D.tg_height.equal(140)
        S.addSubview(D)

        let E = UIView()
        E.tg_width.equal(150)
        E.tg_height.equal(40)
        E.tg_reverseFloat = true
        S.addSubview(E)

        let F = UIView()
        F.tg_width.equal(120)
        F.tg_height.equal(60)
        S.addSubview(F)

        self.view.addSubview(S)
        S.backgroundColor = .red
        A.backgroundColor = .green
        B.backgroundColor = .blue
        C.backgroundColor = .orange
        D.backgroundColor = .black
        E.backgroundColor = .magenta
        F.backgroundColor = .white
}
TGPathLayout
Is unique characteristic layout view of iOS.
Path layout is a layout view that the subviews are according to a specified path curve to layout. You must provide a type of Functional equation,a coordinate and a type of distance setting to create a Path Curve than all subview are equidistance layout in the Path layout. path layout usually used to create some irregular and gorgeous UI layout.

Sample code:
override func loadView()
{

   super.loadView()

   let S = TGPathLayout()
   S.tg_width.equal(320)
   S.tg_height.equal(320)
   S.tg_coordinateSetting.isReverse = true
   S.tg_coordinateSetting.origin = CGPoint(x: 0.5, y: 0.2)
   S.tg_polarEquation = { 80 * (1 + cos(CGFloat($0))) } // r = a *(1 + cos(𝛉))

   for _ in 0 ..< 4
   {
       let A = UIView()
       A.tg_size(width:40,height:40)
       S.addSubview(A)

       A.backgroundColor = .green
   }

   self.view.addSubview(S)
   S.backgroundColor = .red
}
TGViewSizeClass
Is equivalent to: Size Classes of iOS.
TangramKit provided support to SizeClass in order to fit the different screen sizes of devices. You can combinate the SizeClass with any of the 6 kinds of layout views mentioned above to perfect fit the UI of all equipments.
public func tg_fetchSizeClass(with type:TGSizeClassType, from srcType:TGSizeClassType! = nil) ->TGViewSizeClass
//all device
let rootLayout = TGLinearLayout(.vert)
        rootLayout.tg_padding = UIEdgeInsetsMake(10, 10, 10, 10);
        rootLayout.tg_vspace = 10
        rootLayout.tg_hspace = 10

//iPhone landscape orientation.
let lsc = rootLayout.tg_fetchSizeClass(with: .comb(.any, .compact, nil), from:.default) as! TGLinearLayoutViewSizeClass
        lsc.tg_orientation = .horz
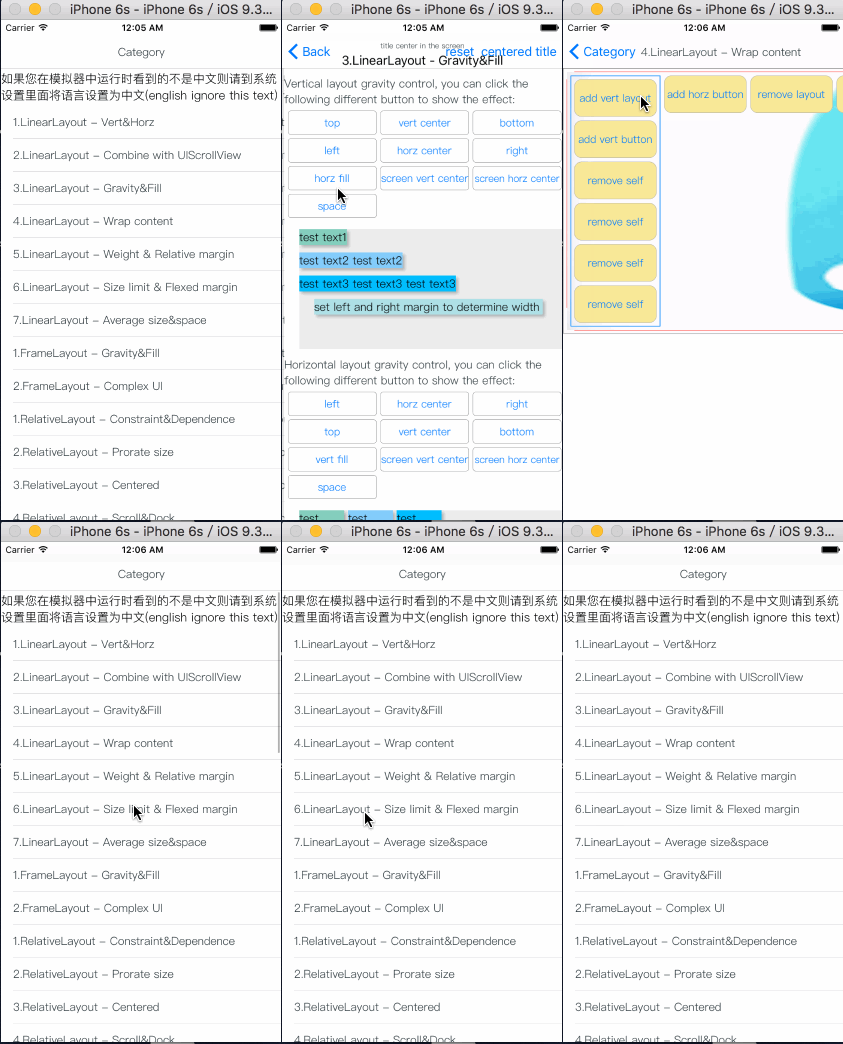
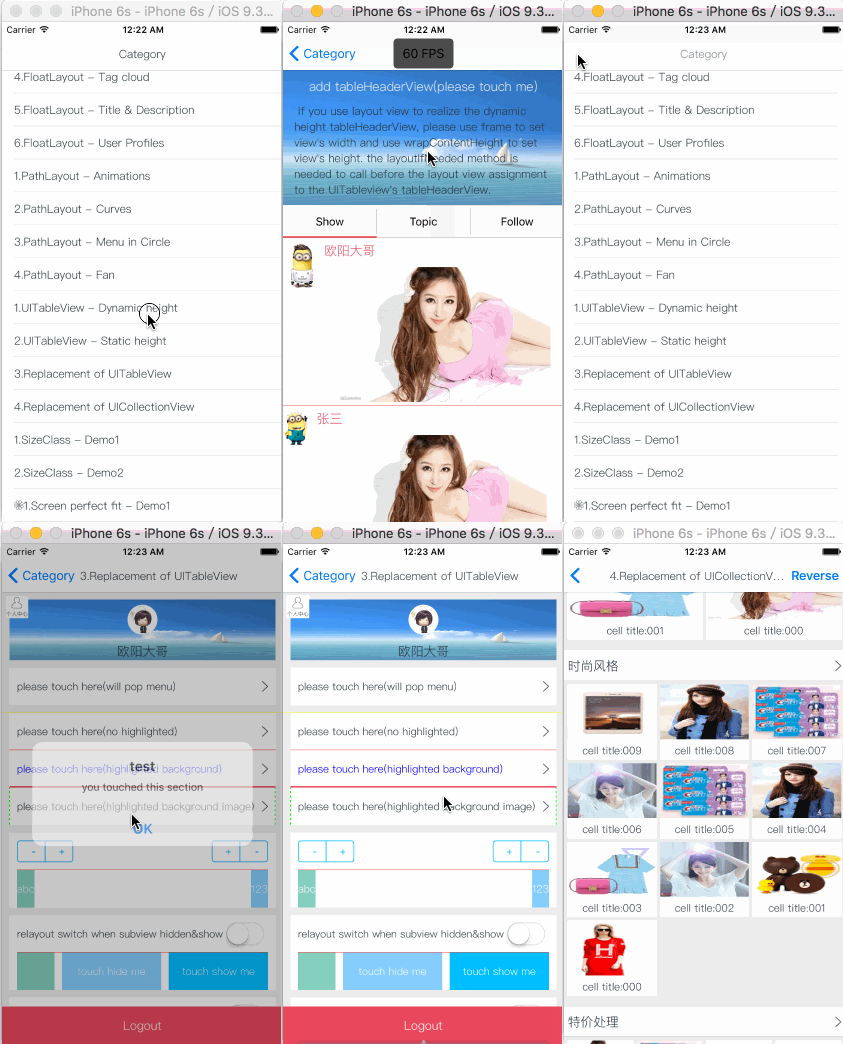
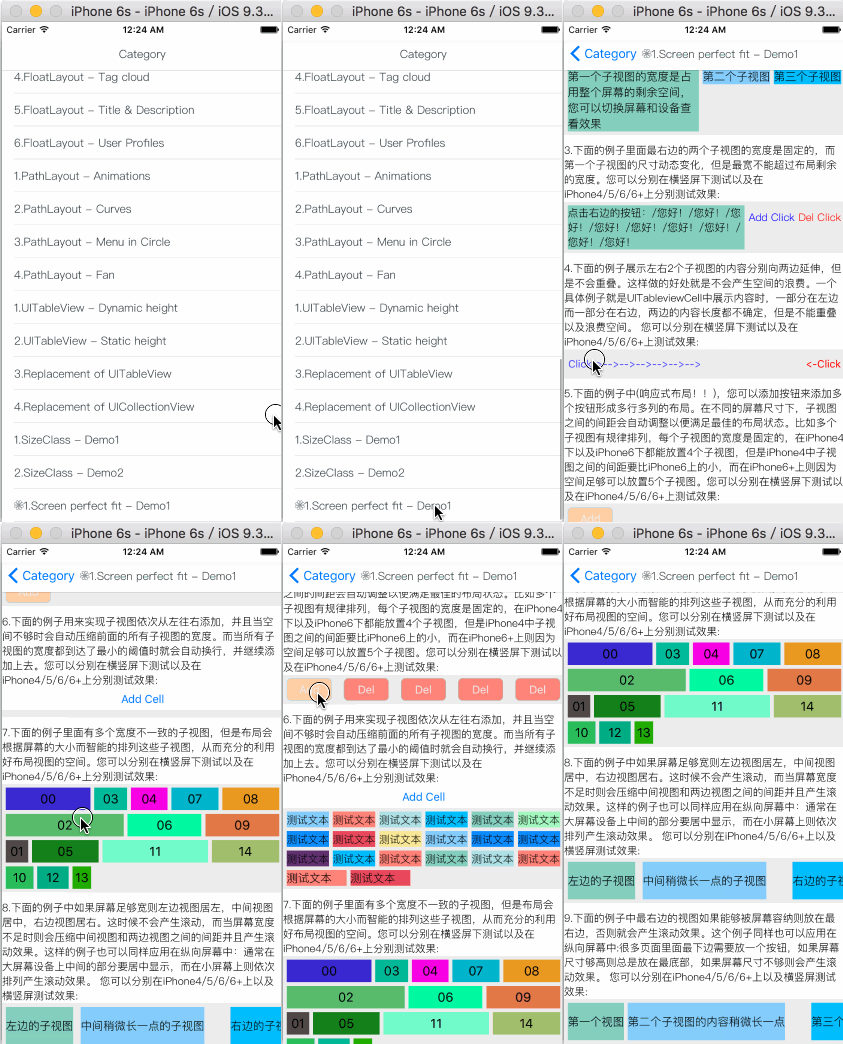
Demo sample
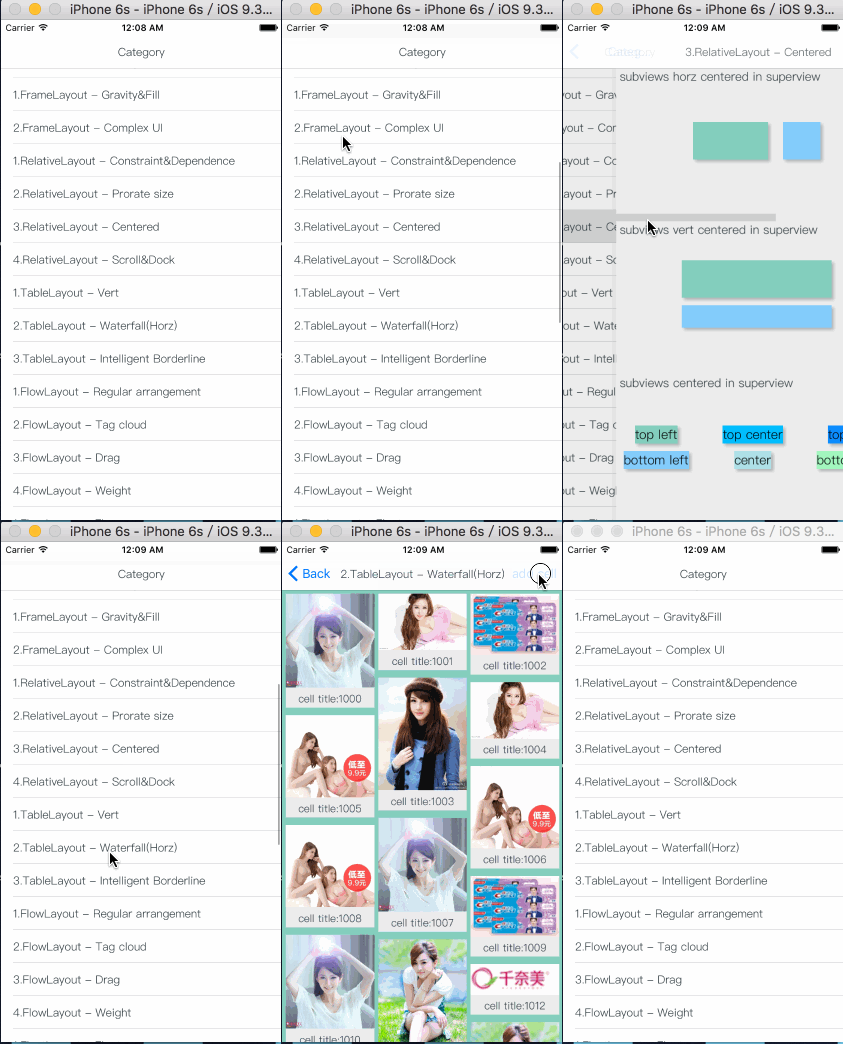
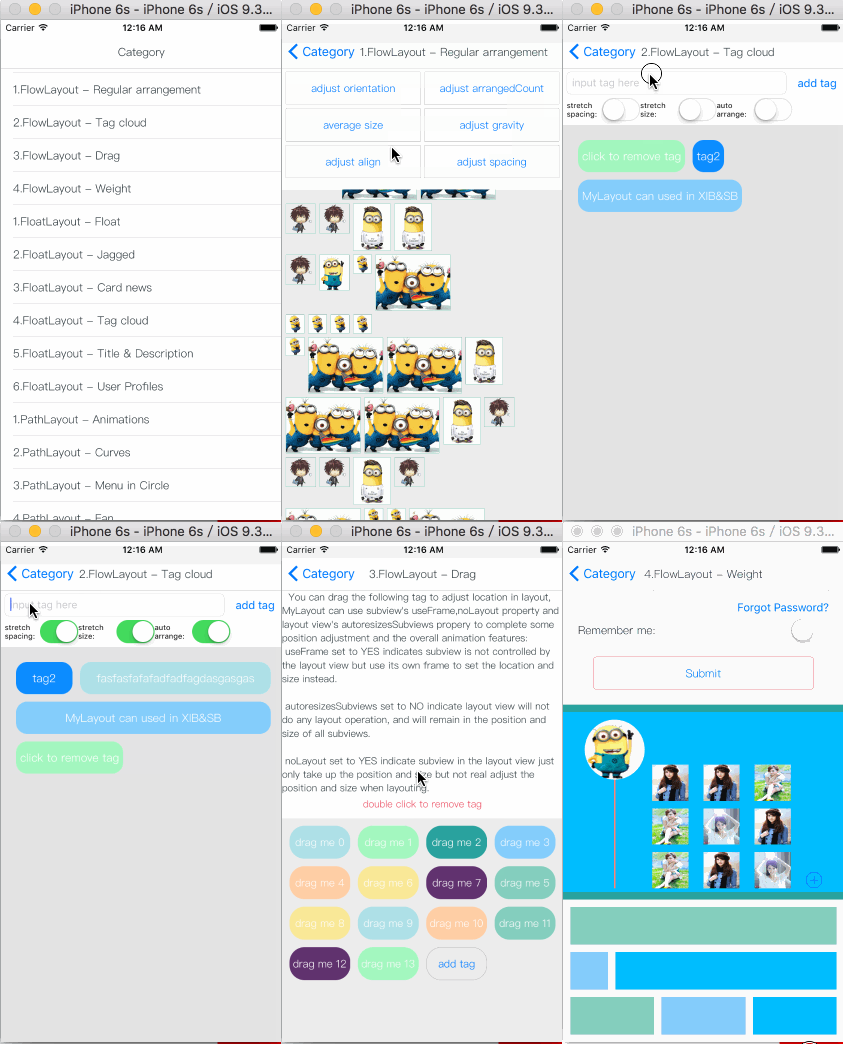
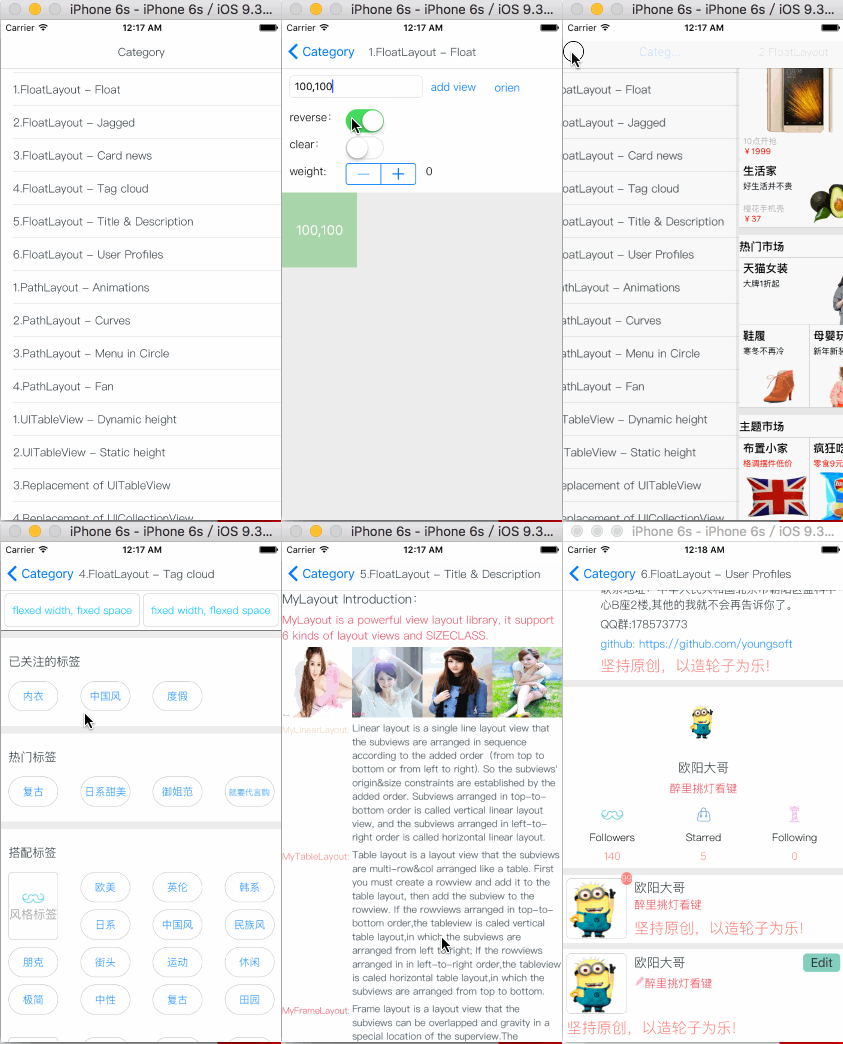
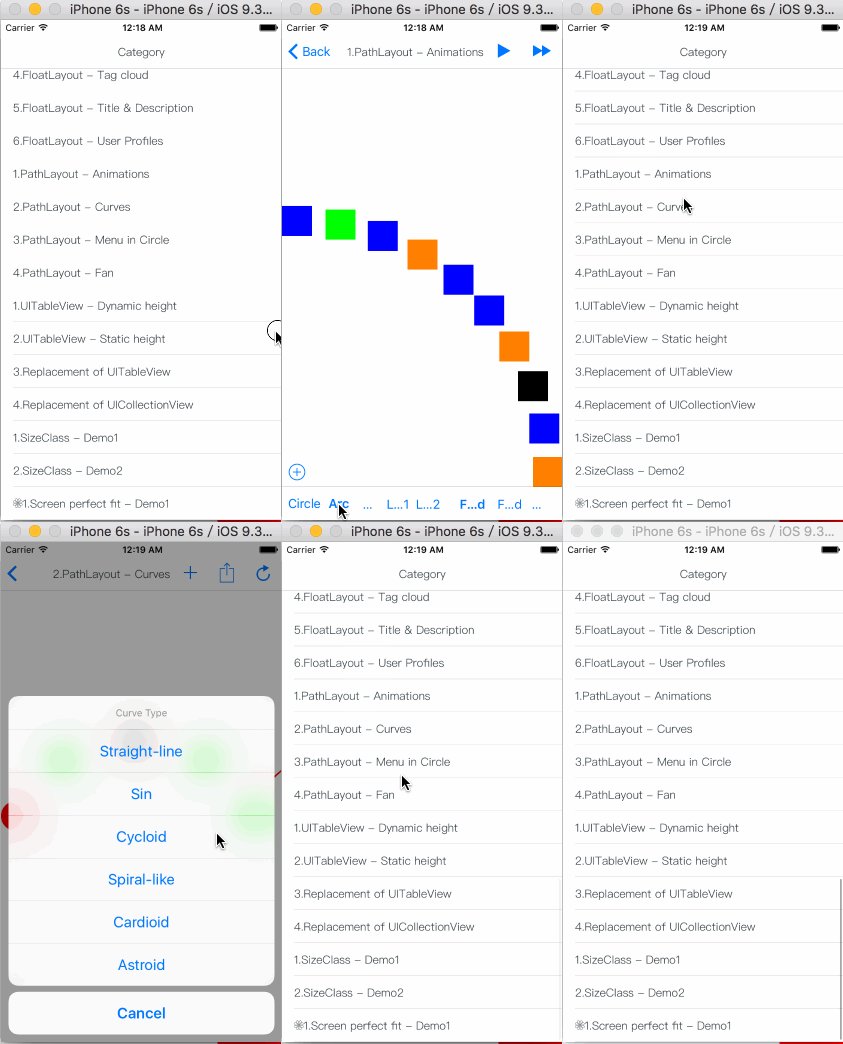
How To Get Started
Communication
- If you need help, use Stack Overflow or Baidu. (Tag ‘TangramKit’)
- If you’d like to contact me, use qq:156355113 or weibo:欧阳大哥 or email:[email protected]
- If you found a bug, and can provide steps to reliably reproduce it, open an issue.
- If you have a feature request, open an issue.
- If you want to contribute, submit a pull request.
Installation
TangramKit supports multiple methods for installing the library in a project.
Copy to your project
- Copy
TangramKitfolder from the demo project to your project
Installation with CocoaPods
CocoaPods is a dependency manager for Objective-C, which automates and simplifies the process of using 3rd-party libraries like TangramKit in your projects. You can install it with the following command:
$ gem install cocoapods
To integrate TangramKit into your Xcode project using CocoaPods, specify it in your Podfile:
source 'https://github.com/CocoaPods/Specs.git'
platform :ios, '8.0'

pod 'TangramKit'
Then, run the following command:
$ pod install
Use Carthage
-
Create a
Cartfilefile.github "youngsoft/TangramKit" -
Run
carthage update. -
On your application targets’ “General” settings tab, in the “Linked Frameworks and Libraries” section, drag and drop
TangramKitframework from the Carthage/Build folder on disk. -
On your application targets’ “Build Phases” settings tab, click the “+” icon and choose “New Run Script Phase”. Create a Run Script in which you specify your shell (ex: bin/sh), add the following contents to the script area below the shell:
/usr/local/bin/carthage copy-frameworksand add the path under “Input Files”, e.g.:
$(SRCROOT)/Carthage/Build/iOS/TangramKit.framework
FAQ
- If you use TangramKit runtime cause 100% CPU usage said appeared constraint conflict, please check the subview’s constraint set.
License
TangramKit is released under the MIT license. See LICENSE for details.
Thanks to the partners:
闫涛: Github
homepage
张光凯: Github
homepage
周杰: Github
阳光不锈:Github
Hanwp: Github
Blog
X: Github


