Taranis NG is an OSINT gathering and analysis tool for CSIRT teams and organisations. It allows team-to-team collaboration, and contains a user portal for simple self asset management. Taranis NG was developed by SK-CERT with a help from wide CSIRT community.
Taranis NG
Taranis NG is an OSINT gathering and analysis tool for CSIRT teams and
organisations. It allows osint gathering, analysis and reporting; team-to-team
collaboration; and contains a user portal for simple self asset management.
Taranis crawls various data sources such as web sites or tweets to gather
unstructured news items. These are processed by analysts to create
structured report items, which are used to create products such as PDF
files, which are finally published.
Taranis supports team-to-team collaboration, and includes a light weight
self service asset management which automatically links to the advisories
that mention vulnerabilities in the software.
| Type | Name | Description |
|---|---|---|
| Collector | web | crawl web sites |
| receive tweets | ||
| read e-mails | ||
| rss | read RSS, Atom feeds | |
| slack | read Slack messages | |
| manual entry | enter news item manually | |
| scheduled tasks | populate feed automatically | |
| Presenter | create a PDF file | |
| text | create plain text from template | |
| html | create HTML from template | |
| misp | create MISP event JSON | |
| Publisher | send e-mail | |
| ftp | upload to FTP | |
| misp | create MISP event | |
| create tweet | ||
| wordpress | publish to WordPress | |
| Bot | analyst | extract attributes from text by regular expressions |
| grouping | group similar items in the news feed | |
| wordlist_updater | update word lists used for matching |
This is just a taste of its features:
- crawl the raw data using various collectors, perhaps located in different environments.
- process even those javascript-generated web pages with advanced data extraction techniques
- create different analyses with completely customizable report item types
- generate many different products with help of product templates
- easily publish to different channels
- time is money: collaborate with other teams by sharing interesting data. Each partnership can be configured and customized.
- split the work responsibilities any way you like, or have multiple teams process partially overlapping data using advanced role and permission system
- use wordlists for filtering and highlighting
- publish the self-service asset management portal to your constituency and allow them to set various notification profiles for those times when a vulnerability hits their product.
Hardware requirements: make sure to have at least 2 GB of RAM, 2 CPU cores and 5 GB of disk
storage available for running, 20 GB of disk storage if you want to build the
project from scratch.
Taranis NG was developed by SK-CERT with a help from
wide CSIRT community, and is released under terms of the European Union Public
Licence.
Resources: CHANGELOG, LICENSE.
Directory structure
- src/ - Taranis NG source code:
- Core is the REST API, the central component of Taranis NG
- GUI is the web user interface
- Collectors retrieve OSINT information from various sources (such as web, twitter, email, atom, rss, slack, and more) and create news items.
- Presenters convert report items to products such as PDF.
- Publishers upload the products to external places such as e-mail, a WordPress web site, etc.
- Bots are used for automated data processing. Think of them as robotic analysts.
- ansible/ - Playbooks, roles, files and inventory to support easy deployment through Ansible
- docker/ - Support files for Docker image creation and example docker-compose file
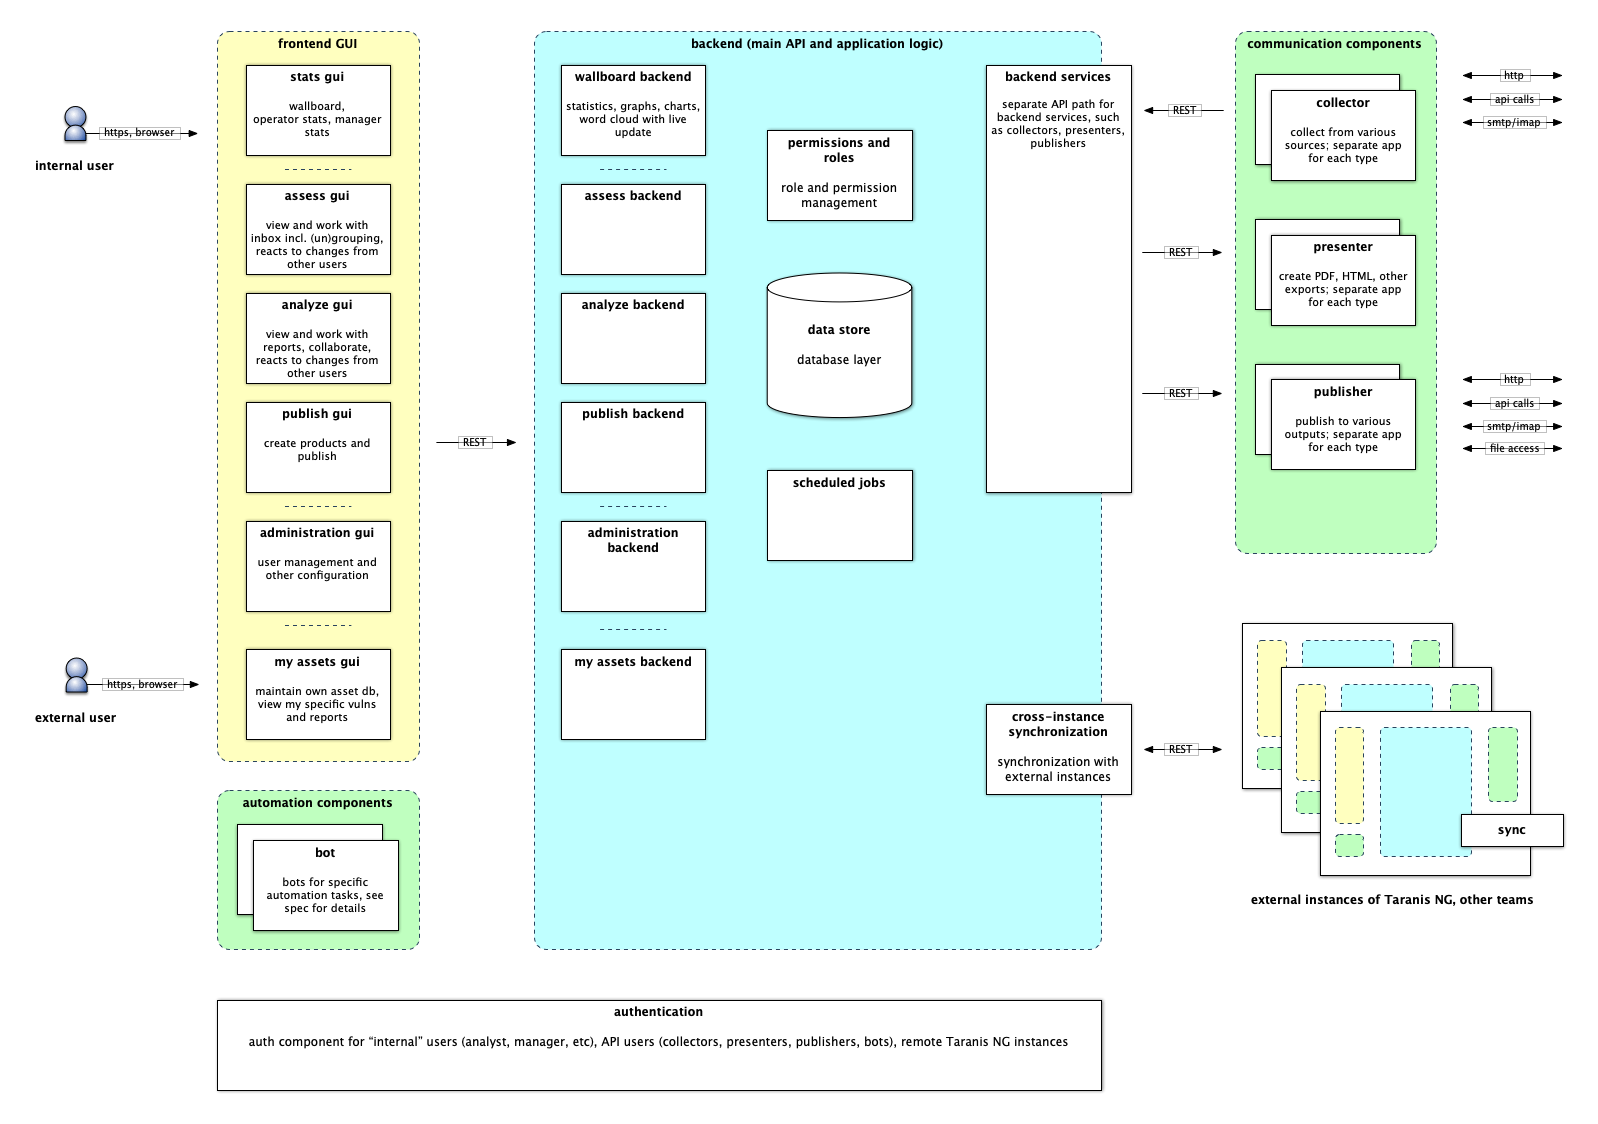
Architecture
Getting started with Docker installation
Currently, the best way to deploy is via Docker. For more information, see docker/README.md.
When your Taranis NG instance is up and running, visit your instance by
navigating to https://localhost:4443 using your web
browser. The default credentials are user / user and admin / admin.
Connecting to collectors, presenters, and publishers
After installation, you have to connect the core application with collectors,
presenters, and publishers. There is no limit to how many of these you have.
The default docker installation deploys one instance of each for you automatically.
Adding a bot node: TL;DR: no action needed. Longer version: This is done automatically on startup if no bot nodes are defined. To verify: Log in as an admin, then navigate to Configuration -> Bots nodes. You should see Default Docker Bot in the list.
Adding a collector node: TL;DR: no action needed. Longer version: This is done automatically on startup if no collector nodes are defined. To verify: Log in as an admin, then navigate to Configuration -> Collectors nodes. You should see Default Docker Collector in the list.
Adding a presenter node: Log in as an admin, then navigate to Configuration
-> Presenters nodes. Click Add new. Enter any name and description. For URL,
enter http://presenters/ and for key, enter supersecret (or whatever
password you chose during the installation). Click Save.
Adding a publisher node: repeat the process at Configuration -> Publishers
nodes. Fill in the fields. For URL, enter http://publishers/. Don’t forget to
set the password.
Altering the roles (optional)
If you don’t wish to use separate accounts for user and admin, or have other
ideas about how the responsibilities should be split, visit Configuration ->
Roles. Edit the roles to your liking, for example by adding the executive
permissions to the Admin role. If you change the roles to yourself, don’t
forget to log out and log back in.
Adding sources to collect
Visit Configuration -> OSINT Sources. Click Add new. Select the collectors
node that you just created and then you should be able to see all the
collectors it has registered. Pick one (for instance the RSS collector), and
you will be able to enter all the necessary details. Finally, click Save.
In a few minutes, you should see freshly collected data in the Assess menu,
which is normally available to the account user / user.
Splitting the sources into groups, and revisiting the permissions (optional)
Visit Configuration -> OSINT Source Groups to customize the groups, in which
the results are being presented. Click Add new, then put the various
sources you’ve created into different groups.
If you want to restrict the access, go to Configuration -> ACLs, and create
a new ACL by clicking Add new. You can pick any particular item type
(Collector, Delegation, OSINT Source, OSINT Source Group, Product Type, Report
Item, Report Item Type, Word List) and then grant see, access, or modify
access types to everyone, selected users, or selected roles.
Uploading the CPE, CWE and CVE dictionaries
In order to simplify the process of writing advisories, you can have CPE, CWE
dictionaries and a current list of CVEs preloaded in Taranis NG.
-
Download the official CPE dictionary from
nvd.nist.gov/products/cpe in gz format. -
Upload the dictionary to the proper path, and import into the database
zcat official-cpe-dictionary_v2.3.xml.gz | \
    docker exec -i taranis-ng-core-1 python manage.py dictionary --upload-cpe
-
Download the official CVE list from
cve.mitre.org/data/downloads/
in xml.gz format. -
Upload the dictionary to the proper path, and import into the database
zcat allitems.xml.gz | \
    docker exec -i taranis-ng-core-1 python manage.py dictionary --upload-cve
-
Download the official CWE list from
cwe.mitre.org/data/downloads.html
in xml.zip format. -
Upload the dictionary to the proper path, and import into the database
zcat cwec_latest.xml.zip | \
    docker exec -i taranis-ng-core-1 python manage.py dictionary --upload-cwe
Some Linux distributions might provide gzcat instead of zcat.
Using the default stop lists for better tag cloud
- Visit Configuration -> Word Lists.
- Open the default word lists (starting with
Default ...). - Choose a word list URL or use the default URL present in the standard installation.
- Under Words, click
Download from URL. - Check whether the CSV file has a header or not, then click
Download from URL. Choose which column has the value and description. - Optionally, you can check
Delete existing wordsoption to remove any previous words in the list. - Finally, if you are satisfied with the configuration, click
Import. - The word list will be imported and you can now save it, to be applied.
About…
This project was inspired by Taranis3,
a great tool made by NCSC-NL. Currently, NCSC-NL has a new tool for producing advisories,
with a different approach to communicating with the world. There was no funding to maintain or
further develop NCSC-NL’s Taranis3.
It aims to become a next generation of this category of tools. The project was made in collaboration
with a wide group of European CSIRT teams who are developers and users of Taranis3, and would not be
possible without their valuable input especially during the requirements collection phase.
The architecture and design of new Taranis NG is a collective brain child of this community.
This project has been co-funded by European Regional Development Fund as part of Operational Programme Integrated Infrastructure (OPII).
Further development has been co-funded by “Connecting Europe Facility – Cybersecurity Digital Service Infrastructure Maintenance and Evolution of Core Service Platform Cooperation Mechanism for CSIRTs – MeliCERTes Facility” (SMART 2018/1024).
Further development is being co-funded by European Commission through the Connecting Europe Facility action entitled “Joint Threat Analysis Network”, action number 2020-EU-IA-0260.
Learn more…
Before the new developer and user documentation becomes available, we invite you
to have a look at the
Taranis NG - original requirements.pdf
for detailed description of the features of the first release, its internal
architecture, and general design goals of the project.
Please note that the version available today may already contain new features
and changes, which are not documented in the requirements PDF.