User-friendly, commercial-grade software for processing aerial imagery. ✈️


![]()
A user-friendly, commercial grade software for drone image processing. Generate georeferenced maps, point clouds, elevation models and textured 3D models from aerial images. It supports multiple engines for processing, currently ODM and MicMac.
- Getting Started
- Customizing and Extending
- API Docs
- Roadmap
- Getting Help
- Support the Project
- Translations
- Become a Contributor
- Architecture Overview
- License
- Trademark
Getting Started
Windows and macOS users can purchase an automated installer, which makes the installation process easier.
There’s also a cloud-hosted version of WebODM available from webodm.net.
Recommended Machine Specs
To run a standalone installation of WebODM (the user interface), including the processing component (NodeODM), we recommend at a minimum:
- 100 GB free disk space
- 16 GB RAM
Don’t expect to process more than a few hundred images with these specifications. To process larger datasets, add more RAM linearly to the number of images you want to process. A CPU with more cores will speed up processing, but can increase memory usage. GPU acceleration is also supported on Linux and WSL. To make use of your CUDA-compatible graphics card, make sure to pass --gpu when starting WebODM. You need the nvidia-docker installed in this case, see https://github.com/NVIDIA/nvidia-docker and https://docs.nvidia.com/datacenter/cloud-native/container-toolkit/install-guide.html#docker for information on docker/NVIDIA setup.
WebODM runs best on Linux, but works well on Windows and Mac too. If you are technically inclined, you can get WebODM to run natively on all three platforms.
WebODM by itself is just a user interface (see below) and does not require many resources. WebODM can be loaded on a machine with just 1 or 2 GB of RAM and work fine without NodeODM. You can then use a processing service such as the lightning network or run NodeODM on a separate, more powerful machine.
Manual installation (Docker)
To install WebODM manually on your machine with docker:
Requirements
- Windows users should install Docker Desktop and :
-
make sure Linux containers are enabled (Switch to Linux Containers…)
-
give Docker enough CPUs (default 2) and RAM (>4Gb, 16Gb better but leave some for Windows) by going to Settings – Advanced
-
select where on your hard drive you want virtual hard drives to reside (Settings – Advanced – Images & Volumes).
-
If you want to run the processing component (NodeODM) with GPU acceleration, install WSL and set up GPU acceleration. It’s supported on Windows 11 or Windows 10, version 21H2 or higher.
-
Installation with Docker
- From the Docker Quickstart Terminal or Git Bash (Windows), or from the command line (Mac / Linux / WSL), type:
git clone https://github.com/OpenDroneMap/WebODM --config core.autocrlf=input --depth 1
cd WebODM
./webodm.sh start
- If you face any issues at the last step on Linux, make sure your user is part of the docker group:
sudo usermod -aG docker $USER
exit
(restart shell by logging out and then back-in)
./webodm.sh start
- Open a Web Browser to
http://localhost:8000(unless you are on Windows using Docker Toolbox, see below)
Docker Toolbox users need to find the IP of their docker machine by running this command from the Docker Quickstart Terminal:
docker-machine ip
192.168.1.100 (your output will be different)
The address to connect to would then be: http://192.168.1.100:8000.
To stop WebODM press CTRL+C or run:
./webodm.sh stop
To update WebODM to the latest version use:
./webodm.sh update
Manage Processing Nodes
WebODM can be linked to one or more processing nodes that speak the NodeODM API, such as NodeODM, NodeMICMAC or ClusterODM. The default configuration includes a “node-odm-1” processing node which runs on the same machine as WebODM, just to help you get started. As you become more familiar with WebODM, you might want to install processing nodes on separate machines.
Adding more processing nodes will allow you to run multiple jobs in parallel.
You can also setup a ClusterODM node to run a single task across multiple machines with distributed split-merge and process dozen of thousands of images more quickly, with less memory.
If you don’t need the default “node-odm-1” node, simply pass --default-nodes 0 flag when starting WebODM:
./webodm.sh restart --default-nodes 0.
Then from the web interface simply manually remove the “node-odm-1” node.
Distributed Installation Using NAS (Qnap)
If you use lightning or another processor node the requirements for WebODM are low enough for it to run on a fairly low power device such as a NAS. Testing has been done on a Qnap-TS264 with 32Gb of RAM (Celeron N5095 processor)
To install WebODM on a Qnap NAS:-
- Enable ssh access to the NAS in control panel
- Install git. This might be easily achieved using the qgit qkpg
- Now follow the “Installation with Docker” instructions above.
- A new “webodm” application should appear in container station along with four individual containers for the app.
- Webodm should be available at port 8000 of the NAS.
- Setup a lightning account online and configure it within “processing nodes”. It’s also possible to setup a more powerful computer to run processing tasks instead of lightning.
This method of working may be useful if using the WebODM Lightning PAYG model as it offers somewhere to host your models outwith the three day window offered as part of PAYG
Enable MicMac
WebODM can use MicMac as a processing engine via NodeMICMAC. To add MicMac, simply run:
./webodm.sh restart --with-micmac
This will create a “node-micmac-1” processing node on the same machine running WebODM. Please note that NodeMICMAC is in active development and is currently experimental. If you find issues, please report them on the NodeMICMAC repository.
Enable SSL
WebODM has the ability to automatically request and install a SSL certificate via Let’s Encrypt, or you can manually specify your own key/certificate pair.
- Setup your DNS record (webodm.myorg.com --> IP of server).
- Make sure port 80 and 443 are open.
- Run the following:
./webodm.sh restart --ssl --hostname webodm.myorg.com
That’s it! The certificate will automatically renew when needed.
If you want to specify your own key/certificate pair, simply pass the --ssl-key and --ssl-cert option to ./webodm.sh. See ./webodm.sh --help for more information.
Note! You cannot pass an IP address to the hostname parameter! You need a DNS record setup.
Enable IPv6
Your installation must first have a public IPv6 address.
To enable IPv6 on your installation, you need to activate IPv6 in Docker by adding the following to a file located at /etc/docker/daemon.json:
{
  "ipv6": true,
  "fixed-cidr-v6": "fdb4:4d19:7eb5::/64"
}
Restart Docker:
systemctl restart docker
To add IPv6, simply run:
./webodm.sh restart --ipv6
Note: When using --ssl mode, you cannot pass an IP address to the hostname parameter; you must set up a DNS AAAA record. Without --ssl mode enabled, access the site at (e.g., http://[2001:0db8:3c4d:0015::1]:8000). The brackets around the IPv6 address are essential!
You can add a new NodeODM node in WebODM by specifying an IPv6 address. Don’t forget to include brackets around the address! e.g., [2001:0db8:fd8a:ae80::1]
Where Are My Files Stored?
When using Docker, all processing results are stored in a docker volume and are not available on the host filesystem. There are two specific docker volumes of interest:
- Media (called webodm_appmedia): This is where all files related to a project and task are stored.
- Postgres DB (called webodm_dbdata): This is what Postgres database uses to store its data.
For more information on how these two volumes are used and in which containers, please refer to the docker-compose.yml file.
For various reasons such as ease of backup/restore, if you want to store your files on the host filesystem instead of a docker volume, you need to pass a path via the --media-dir and/or the --db-dir options:
./webodm.sh restart --media-dir /home/user/webodm_data --db-dir /home/user/webodm_db
Note that existing task results will not be available after the change. Refer to the Migrate Data Volumes section of the Docker documentation for information on migrating existing task results.
Common Troubleshooting
| Symptoms | Possible Solutions |
|---|---|
| Run out of memory | Make sure that your Docker environment has enough RAM allocated: MacOS Instructions, Windows Instructions |
While starting WebODM you get: 'WaitNamedPipe','The system cannot find the file specified.' |
1. Make sure you have enabled VT-x virtualization in the BIOS. 2. Try to downgrade your version of Python to 2.7 |
On Windows, docker-compose fails with Failed to execute the script docker-compose |
Make sure you have enabled VT-x virtualization in the BIOS |
| Cannot access WebODM using Microsoft Edge on Windows 10 | Try to tweak your internet properties according to these instructions |
Getting a No space left on device error, but hard drive has enough space left |
Docker on Windows by default will allocate only 20GB of space to the default docker-machine. You need to increase that amount. See this link and this link |
Cannot start WebODM via ./webodm.sh start, error messages are different at each retry |
You could be running out of memory. Make sure you have enough RAM available. 2GB should be the recommended minimum, unless you know what you are doing |
| While running WebODM with Docker Toolbox (VirtualBox) you cannot access WebODM from another computer in the same network. | As Administrator, run cmd.exe and then type "C:\Program Files\Oracle\VirtualBox\VBoxManage.exe" controlvm "default" natpf1 "rule-name,tcp,,8000,,8000" |
| On Windows, the storage space shown on the WebODM diagnostic page is not the same as what is actually set in Docker’s settings. | From Hyper-V Manager, right-click “DockerDesktopVM”, go to Edit Disk, then choose to expand the disk and match the maximum size to the settings specified in the docker settings. Upon making the changes, restart docker. |
On Linux or WSL, Warning: GPU use was requested, but no GPU has been found |
Run nvidia-smi (natively) or docker run --rm --gpus all nvidia/cuda:11.2.2-devel-ubuntu20.04 nvidia-smi (docker) to check with NVIDIA driver and NVIDIA Container Toolkit. |
Images Missing from Lightning Assets
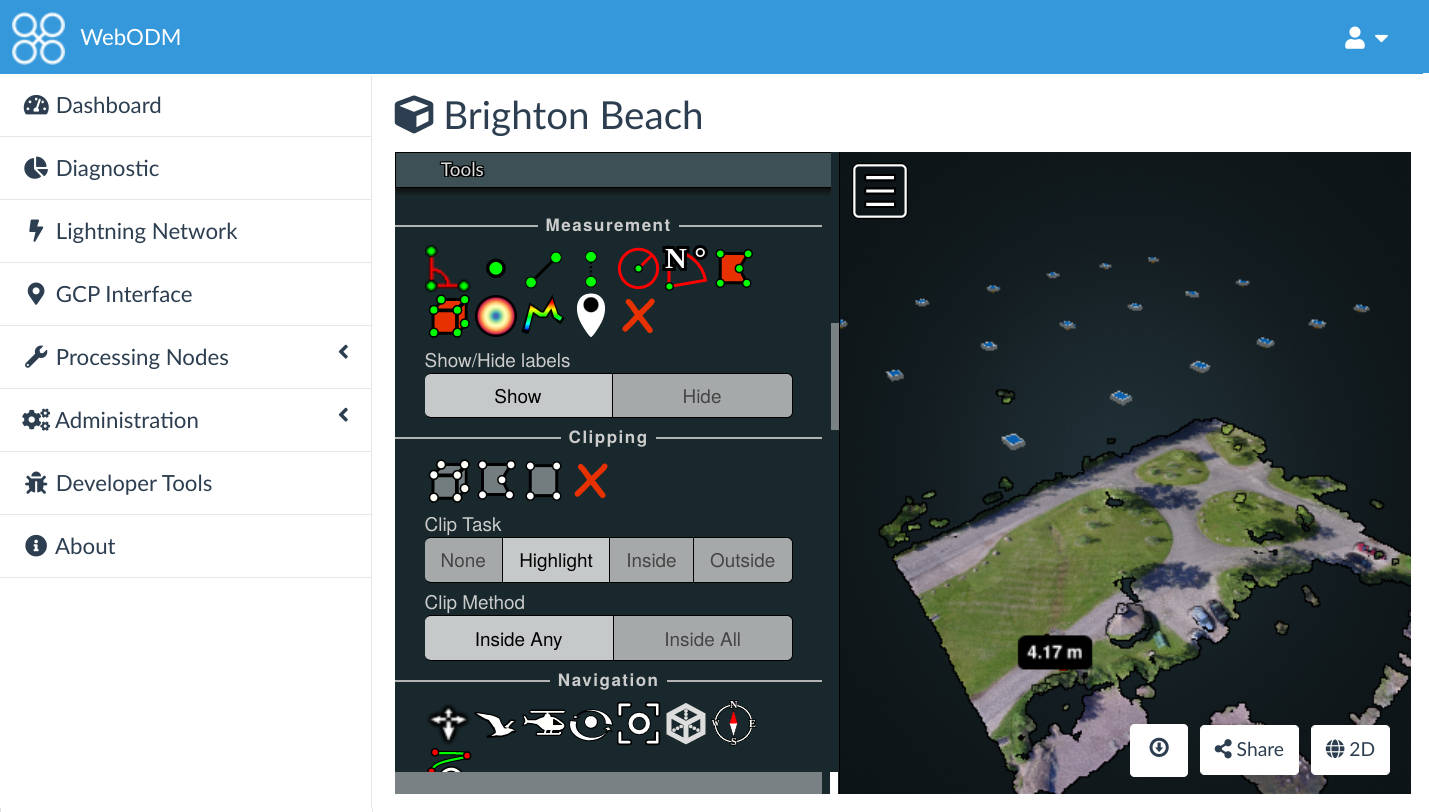
When you use Lightning to process your task, you will need to download all assets to your local instance of WebODM. The all assets zip does not contain the images which were used to create the orthomosaic. This means that, although you can visualise the cameras layer in your local WebODM, when you click on a particular camera icon the image will not be shown.
The fix if you are using WebODM with Docker is as follows (instructions are for MacOS host):
- Ensure that you have a directory which contains all of the images for the task and only the images;
- Open Docker Desktop and navigate to Containers. Identify your WebODM instance and navigate to the container that is named
worker. You will need the Container ID. This is a hash which is listed under the container name. Click to copy the Container ID using the copy icon next to it. - Open Terminal and enter
docker cp <sourcedirectory>/. <dockercontainerID>:/webodm/app/media/project/<projectID>/task/<taskID>. Paste the Container ID to replace the location titled<dockercontainerID>. Enter the full directory path for your images to replace<sourcedirectory>; - Go back to Docker Desktop and navigate to Volumes in the side bar. Click on the volume called
webodm_appmedia, click onproject, identify the correct project and click on it, click ontaskand identify the correct task. - From Docker Desktop substitute the correct
<projectID>and<taskID>into the command in Terminal; - Execute the newly edited command in Terminal. You will see a series of progress messages and your images will be copied to Docker;
- Navigate to your project in your local instance of WebODM;
- Open the Map and turn on the Cameras layer (top left);
- Click on a Camera icon and the relevant image will be shown
Have you had other issues? Please report them so that we can include them in this document.
Backup and Restore
If you want to move WebODM to another system, you just need to transfer the docker volumes (unless you are storing your files on the file system).
On the old system:
mkdir -v backup
docker run --rm --volume webodm_dbdata:/temp --volume `pwd`/backup:/backup ubuntu tar cvf /backup/dbdata.tar /temp
docker run --rm --volume webodm_appmedia:/temp --volume `pwd`/backup:/backup ubuntu tar cvf /backup/appmedia.tar /temp
Your backup files will be stored in the newly created backup directory. Transfer the backup directory to the new system, then on the new system:
ls backup # --> appmedia.tar  dbdata.tar
./webodm.sh down # Make sure WebODM is down
docker run --rm --volume webodm_dbdata:/temp --volume `pwd`/backup:/backup ubuntu bash -c "rm -fr /temp/* && tar xvf /backup/dbdata.tar"
docker run --rm --volume webodm_appmedia:/temp --volume `pwd`/backup:/backup ubuntu bash -c "rm -fr /temp/* && tar xvf /backup/appmedia.tar"
./webodm.sh start
In case when recovery .tar is missed, or corrupted you can conduct Hard Recovery
Reset Password
If you forgot the password you picked the first time you logged into WebODM, to reset it just type:
./webodm.sh start && ./webodm.sh resetadminpassword newpass
The password will be reset to newpass. The command will also tell you what username you chose.
Manage Plugins
Plugins can be enabled and disabled from the user interface. Simply go to Administration – Plugins.
Update
If you use docker, updating is as simple as running:
./webodm.sh update
If you are running WebODM natively, these commands should do it:
cd /webodm
sudo su odm # Only in case you are running WebODM with a different user
git pull origin master
source python3-venv/bin/activate # If you are running a virtualenv
npm install
pip install -r requirements.txt
webpack --mode production
python manage.py collectstatic --noinput
python manage.py migrate
Run the docker version as a Linux Service
If you wish to run the docker version with auto start/monitoring/stop, etc, as a systemd style Linux Service, a systemd unit file is included in the service folder of the repo.
This should work on any Linux OS capable of running WebODM, and using a SystemD based service daemon (such as Ubuntu 16.04 server for example).
This has only been tested on Ubuntu 16.04 server and Red Hat Enterprise Linux 9.
The following pre-requisites are required:
- Requires odm user
- Requires docker installed via system (ubuntu:
sudo apt-get install docker.io) - Requires ‘screen’ package to be installed
- Requires odm user member of docker group
- Required WebODM directory checked out/cloned to /opt/WebODM
- Requires that /opt/WebODM is recursively owned by odm:odm
- Requires that a Python 3 environment is used at /opt/WebODM/python3-venv
If all pre-requisites have been met, and repository is checked out/cloned to /opt/WebODM folder, then you can use the following steps to enable and manage the service:
First, to install the service, and enable the services to run at startup from now on:
sudo systemctl enable /opt/WebODM/service/webodm-docker.service
To manually start/stop the service:
sudo systemctl stop webodm-docker
sudo systemctl start webodm-docker
To manually check service status:
sudo systemctl status webodm-docker
For the adventurous, the repository can be put anyplace you like by editing the ./WebODM/service/webodm-docker.service file before enabling the service the reflect your repository location, and modifying the systemctl enable command to that directiory.
Run it natively
WebODM can run natively on Windows, MacOS and Linux. We don’t recommend to run WebODM natively (using docker is easier), but it’s possible.
Ubuntu 16.04 LTS users can refer to this community script to install WebODM natively on a new machine.
To run WebODM, you will need to install:
- PostgreSQL (>= 9.5)
- PostGIS 2.3
- Python 3.6
- GDAL (>= 3)
- Node.js (>= 6.0)
- Nginx (Linux/MacOS) - OR - Apache + mod_wsgi or Waitress (Windows)
- Redis (>= 2.6)
- GRASS GIS (>= 7.8)
On Linux, make sure you have:
apt-get install binutils libproj-dev gdal-bin nginx
On Windows use the OSGeo4W installer to install GDAL. MacOS users can use:
brew install postgres postgis
Then these steps should be sufficient to get you up and running:
git clone --depth 1 https://github.com/OpenDroneMap/WebODM
Create a WebODM/webodm/local_settings.py file containing your database settings:
DATABASES = {
    'default': {
        'ENGINE': 'django.contrib.gis.db.backends.postgis',
        'NAME': 'webodm_dev',
        'USER': 'postgres',
        'PASSWORD': 'postgres',
        'HOST': 'localhost',
        'PORT': '5432',
    }
}
From psql or pgadmin, connect to PostgreSQL, create a new database (name it webodm_dev), connect to it and set the postgis.enable_outdb_rasters and postgis.gdal_enabled_drivers settings:
ALTER SYSTEM SET postgis.enable_outdb_rasters TO True;
ALTER SYSTEM SET postgis.gdal_enabled_drivers TO 'GTiff';
Start the redis broker:
redis-server
Then:
pip install -r requirements.txt
sudo npm install -g webpack
sudo npm install -g webpack-cli
npm install
webpack --mode production
python manage.py collectstatic --noinput
chmod +x start.sh && ./start.sh --no-gunicorn
Finally, start at least one celery worker:
./worker.sh start
The start.sh script will use Django’s built-in server if you pass the --no-gunicorn parameter. This is good for testing, but bad for production.
In production, if you have nginx installed, modify the configuration file in nginx/nginx.conf to match your system’s configuration and just run start.sh without parameters.
Windows users should refer to this guide to install Apache + mod_wsgi and run gunicorn:
gunicorn webodm.wsgi --bind 0.0.0.0:8000 --preload
If you are getting a rt_raster_gdal_warp: Could not create GDAL transformation object for output dataset creation, make sure that your PostGIS installation has PROJ support:
SELECT PostGIS_Full_Version();
You may also need to set the environment variable PROJSO to the .so or .dll projection library your PostGIS is using. This just needs to have the name of the file. So for example on Windows, you would in Control Panel -> System -> Environment Variables add a system variable called PROJSO and set it to libproj.dll (if you are using proj 4.6.1). You’ll have to restart your PostgreSQL service/daemon after this change. http://postgis.net/docs/manual-2.0/RT_ST_Transform.html
If you are using Windows and are unable to go past the pip install -r requirements.txt command because of an error regarding zlib and Pillow, manually edit the requirements.txt file, remove the Pillow requirement and run:
easy_install pillow
pip install -r requirements.txt
On Windows make sure that all of your PATH environment variables are set properly. These commands:
python --version
pip --version
npm --version
gdalinfo --version
redis-server --version
Should all work without errors.
Run it on the cloud (Google Compute, Amazon AWS)
12 steps, to have WebODM running on a cloud instance.
These steps are for Google Cloud, but can also be used for Amazon AWS, and other cloud platforms with small modifications:
- Launch a Google Cloud instance of Ubuntu 18.0 LTS.
- Open the SSH terminal - Google offers SSH via the website.
- Run sudo apt-get update
- Run sudo apt-get upgrade
- Install docker-compose. Do not install via apt for 24.04 onward.
- Run sudo apt-get install python-pip
- Run git clone https://github.com/OpenDroneMap/WebODM --config core.autocrlf=input --depth 1
- cd WebODM (Linux is case sensitive)
- sudo ./webodm.sh start
- You now can access webodm via the public IP address for your google instance. Remember the default port of 8000.
- Check that your instance’s firewall is allowing inbound TCP connections on port 8000! If you forget this step you will not be able to connect to WebODM.
- Open http://GooglepublicIPaddressforyourinstance:8000
To setup the firewall on Google Cloud, open the instance, on the middle of the instance settings page find NIC0. Open it, and then add the TCP Port 8000 for ingress, and egress on the Firewall.
Customizing and Extending
Small customizations such as changing the application colors, name, logo, or adding custom CSS/HTML/Javascript can be performed directly from the Customize – Brand/Theme panels within WebODM. No need to fork or change the code.
More advanced customizations can be achieved by writing plugins. This is the preferred way to add new functionality to WebODM since it requires less effort than maintaining a separate fork. The plugin system features server-side signals that can be used to be notified of various events, a ES6/React build system, a dynamic client-side API for adding elements to the UI, a built-in data store, an async task runner, a GRASS engine, hooks to add menu items and functions to rapidly inject CSS, Javascript and Django views.
For plugins, the best source of documentation currently is to look at existing code. If a particular hook / entrypoint for your plugin does not yet exist, request it. We are adding hooks and entrypoints as we go.
To create a plugin simply copy the plugins/test plugin into a new directory (for example, plugins/myplugin), then modify manifest.json, plugin.py and issue a ./webodm.sh restart.
API Docs
See the API documentation page.
Roadmap
We follow a bottom-up approach to decide what new features are added to WebODM. User feedback guides us in the decision making process and we collect such feedback via improvement requests.
Don’t see a feature that you want? Open a feature request or help us build it.
Sometimes we also prioritize work that has received financial backing. If your organization is in the position to financially support the development of a particular feature, get in touch and we’ll make it happen.
Getting Help
We have several channels of communication for people to ask questions and to get involved with the community:
The preferred way to communicate is via the OpenDroneMap Community Forum.
Support the Project
There are many ways to contribute back to the project:
- Help us test new and existing features and report bugs and feedback.
- Share your aerial datasets.
- Help answer questions on the community forum and chat.
- ⭐️ us on GitHub.
- Help us translate WebODM in your language.
- Help us classify point cloud datasets.
- Spread the word about WebODM and OpenDroneMap on social media.
- While we don’t accept donations, you can purchase an installer, a book or a sponsor package.
- You can pledge funds for getting new features built and bug fixed.
- Become a contributor 🤘
Translations
It’s easy to translate WebODM in a different language!
- Visit https://hosted.weblate.org/engage/webodm/ and register an account (it’s free)
- Pick a language to translate, or start a new translation
- Start translating! It’s that easy.
If you want to preview your translation work, start WebODM in developer mode:
./webodm.sh restart --dev
Then edit the LOCALES file to include your translation locale code. Finally, visit the Developer Tools panel from WebODM’s dashboard and press the Download and Replace Translation Files button:
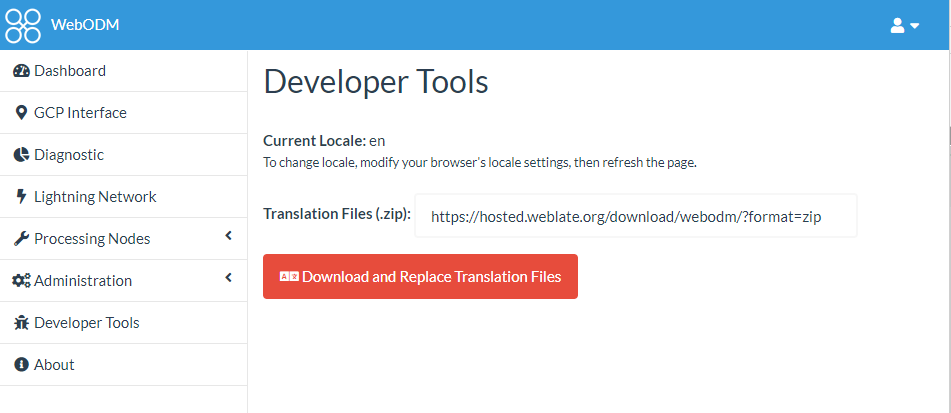
The latest translation files from weblate.org will be downloaded and applied to the installation of WebODM.
Become a Contributor
The easiest way to get started is to take a look at our list of outstanding issues and pick one. You can also fix/improve something entirely new based on your experience with WebODM. All ideas are considered and people of all skill levels are welcome to contribute.
You don’t necessarily need to be a developer to become a contributor. We can use your help to write better documentation and improve the user interface texts and visuals.
If you know how to code, we primarily use Python (Django), Javascript (React), HTML and SCSS. See the Development Quickstart and Contributing documents for more information.
To make a contribution, you will need to open a pull request (here’s how). To make changes to WebODM, make a clone of the repository and run ./webodm.sh start --dev.
If you have questions visit us on the forum and we’ll be happy to help you out with your first contribution.
Architecture Overview
The OpenDroneMap project is composed of several components.
- ODM is a command line toolkit that processes aerial images. Users comfortable with the command line are probably OK using this component alone.
- NodeODM is a lightweight interface and API (Application Program Interface) built directly on top of ODM. Users not comfortable with the command line can use this interface to process aerial images and developers can use the API to build applications. Features such as user authentication, map displays, etc. are not provided.
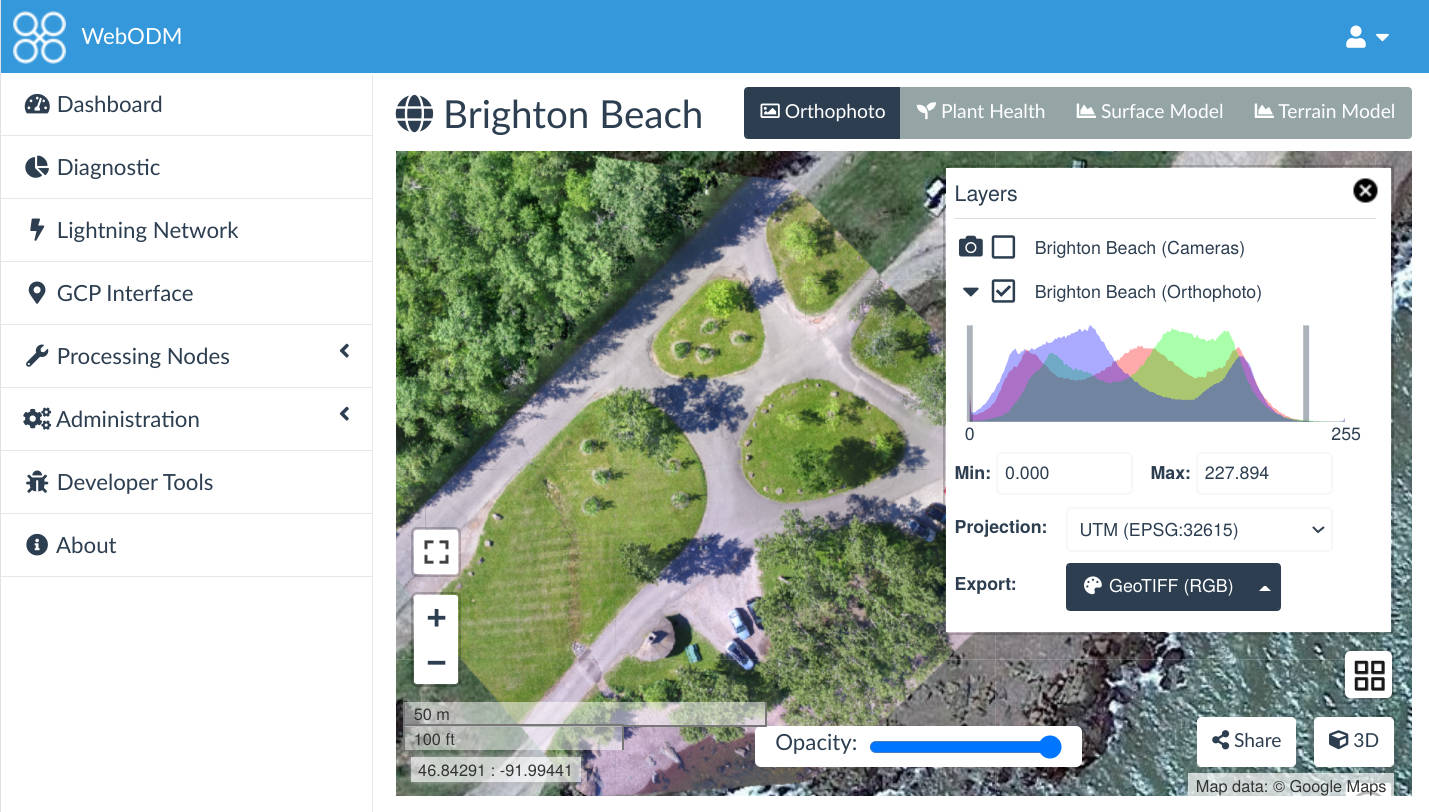
- WebODM adds more features such as user authentication, map displays, 3D displays, a higher level API and the ability to orchestrate multiple processing nodes (run jobs in parallel). Processing nodes are simply servers running NodeODM.

WebODM is built with scalability and performance in mind. While the default setup places all databases and applications on the same machine, users can separate its components for increased performance (ex. place a Celery worker on a separate machine for running background tasks).
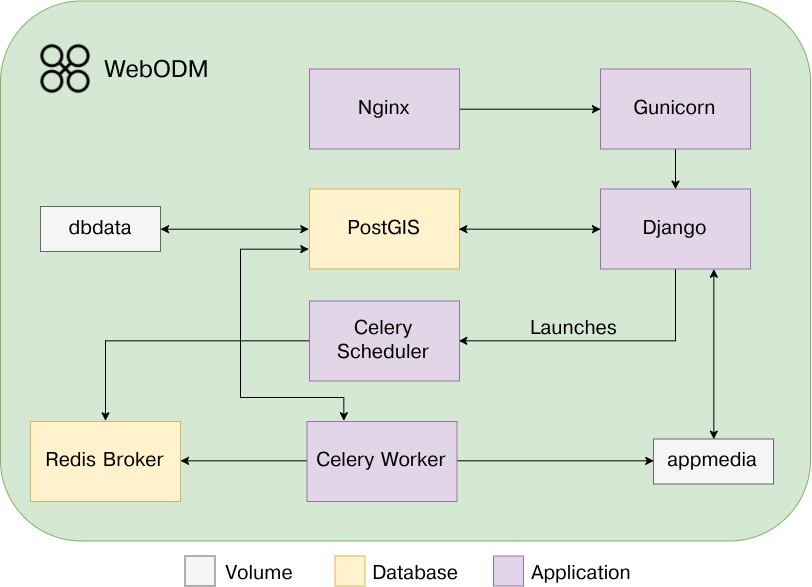
A few things to note:
- We use Celery workers to do background tasks such as resizing images and processing task results, but we use an ad-hoc scheduling mechanism to communicate with NodeODM (which processes the orthophotos, 3D models, etc.). The choice to use two separate systems for task scheduling is due to the flexibility that an ad-hoc mechanism gives us for certain operations (capture task output, persistent data and ability to restart tasks mid-way, communication via REST calls, etc.).
- If loaded on multiple machines, Celery workers should all share their
app/mediadirectory with the Django application (via network shares). You can manage workers via./worker.sh
License
WebODM is licensed under the terms of the GNU Affero General Public License v3.0.